ESMBind (ESMB):ESM-2 用於蛋白質結合位點預測的低秩適應


 此圖片來自 Metagenomic Atlas。
簡而言之: 將 LoRA 應用於蛋白質語言模型 ESM-2 是一種有效且重要的微調和正則化策略,在我們的訓練/測試拆分上,它在蛋白質序列結合位點預測任務中表現出與 SOTA 結構模型相當的效能。然而,由於序列相似性等原因,這可能會產生誤導,需要進一步清理資料。該模型僅從單個蛋白質序列預測結合殘基,不需要 MSA 或結構資訊。繼續閱讀以更好地瞭解如何使用 LoRA 微調 pLM,並提供微調您自己的 pLM LoRA 和在您喜歡的蛋白質序列上執行推理的程式碼示例。
蛋白質語言模型 (pLM),如 ESM-2,是像其大型語言模型 (LLM) 對應物一樣的 transformer,但它們是在蛋白質序列而不是自然語言文字上訓練的。每個蛋白質序列由 20 種標準氨基酸組成,有時還包括一些非標準氨基酸。通常,對於 ESM-2 模型,每個氨基酸(用一個字母表示)被視為一個 token。因此,一個由 200 個氨基酸組成的蛋白質序列將有 200 個 token 被 pLM 分詞。pLM 具有 transformer 的所有常見架構,包括查詢、鍵和值權重矩陣 、 和 ,並且在計算注意力時將每個氨基酸 token 表示為查詢、鍵和值向量。蛋白質語言模型如 ESM-2 使用掩碼語言建模目標進行訓練,並學習預測被掩碼的氨基酸。它們已被證明比 AlphaFold2 更準確地預測蛋白質 3D 結構,並從單個蛋白質序列提供原子級準確和快速的預測。有關我們使用的基本模型的更多資訊,請參見此處和此處。
在本文中,我們將討論應用一種流行的引數高效微調策略,稱為低秩適應(Low Rank Adaptation),簡稱 LoRA。LoRA 在 LLM 社群和 Stable Diffusion 社群中非常流行,但它們也可以用於微調蛋白質語言模型!事實上,它們已被證明作為正則化工具非常有用,並且顯著減少了微調 pLM 時出現的過擬合問題,這對於蛋白質來說是一個相當大的障礙,因為存在蛋白質同源物和資料集中高度相似的序列。
什麼是...LoRA?
低秩適應(LoRA)是一種引數高效的微調策略,它在 Hugging Face 的 PEFT 庫中實現。有關 LoRA 的概念指南,請參見此處。
在深度學習領域,低秩適應(LoRA)的概念最早由 Hu 等人提出。這些 LoRA 為神經網路的傳統微調提供了一種高效的替代方案。該過程首先凍結神經網路中現有層的權重。例如,在 Transformer 注意力機制的背景下,這可能涉及凍結查詢、鍵或值矩陣 、 或 的權重。
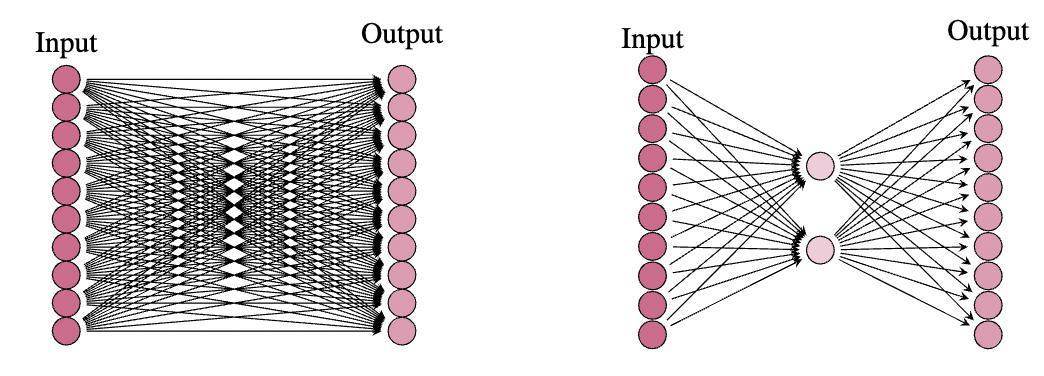
在此之後,一個 LoRA 層被引入到一個或多個這些預訓練權重矩陣中。如果我們認為 是一個凍結的權重矩陣,那麼 LoRA 層將採用 的形式,其中 構成了 LoRA。通常,這些是低秩分解,其中 和 ,其中原始權重矩陣為 。通常, 遠小於 。
LoRA 的應用只有在 遠小於輸入和輸出維度時才能提供顯著的引數減少效益。我們可以選擇一個小的 並實現 LoRA 來代替傳統的微調。經驗證據表明,在許多情況下,選擇 或 足以滿足需求——即使對於 LLM 中的大型權重矩陣,例如 Transformer 注意力機制的查詢、鍵和值矩陣。在 Stable Diffusion 中,社群訓練的 LoRA 的秩通常更高,但目前尚不清楚這是否真的有必要。可能與我們的直覺相反,較低的秩通常更好,特別是對於正則化。
現在讓我們探討一個 LoRA 在減少引數數量方面沒有帶來任何實質性好處的場景

這裡,我們看到 LoRA 層 的引數數量與原始層 相同,其中 LoRA(右側)的引數數量為 ,原始凍結權重矩陣(左側)的引數數量為 。接下來,讓我們看一個例子,它使我們獲得凍結權重矩陣引數的 %。
我們看到原始(凍結)權重矩陣有 個引數,而 LoRA 只有 個引數。在大多數情況下,凍結矩陣的秩(這是 LoRA 中間層的神經元數量)遠小於輸入和輸出維度,並且引數數量實際上大幅減少。例如,我們可能有一個輸入和輸出維度為 ,在這種情況下,權重矩陣有 個引數。然而,這個矩陣的秩通常遠低於 。在實踐中,結果表明,選擇 作為查詢、鍵和值矩陣的中間維度通常足以用於 LoRA。在這種情況下,LoRA 中將有 個引數,這不到原始引數數量的十分之一。一旦我們有了這樣的 LoRA,我們就可以在一些下游任務上對其進行訓練,然後將 LoRA 權重矩陣 新增到原始(凍結)權重矩陣 中,以獲得一個在此新任務上表現良好的模型。
重要的是,LoRA 可以幫助解決過擬合等問題,這在學習蛋白質序列時可能是一個嚴重的問題。正是這一點,加上引數效率和訓練更大模型的需求,促使我們決定採用 LoRA 作為微調策略。此外,使用 Hugging Face PEFT 庫進行引數高效微調的 LoRA 的簡單性使其成為一個有吸引力的選擇。早期也清楚地表明,使用 LoRA 實際上可以提高效能,從而進一步激勵我們採用它作為一種策略。
使用 LoRA 進行過擬合和正則化
我們首先對最小的 ESM-2 模型進行了 ~209K 蛋白質序列的普通微調。資料最終根據 UniProt 按家族分類,以幫助解決過擬合和對泛化能力過於樂觀的結果,但最初我們沒有考慮序列相似性等問題。這可能存在問題,並可能由於訓練/測試拆分中存在高度相似的序列而導致過擬合。由於蛋白質同源物等原因,簡單隨機的資料集拆分不適用於蛋白質。如果資料集未根據序列相似性進行過濾,模型往往會過早過擬合,因為隨機訓練/測試拆分包含彼此過於相似的序列。
因此,考慮到這一點,我們接下來根據家族劃分蛋白質資料,選擇隨機家族新增到測試集中,直到大約 20% 被分離為測試資料。不幸的是,這對於過擬合的幫助不大。然而,應用 LoRA 確實起到了作用!LoRA 並不能解決所有問題,還需要進一步根據序列相似性過濾資料集,但 LoRA 確實顯著減少了過擬合的程度。例如,請參閱 這份 Weights and Biases 報告中提供的示例。此外,請檢視使用此策略訓練的模型之一 此處。您可能還想檢視 這份報告。在閱讀模型與 SOTA 結合位點預測模型的比較時,建議謹慎,因為其中一些模型仍然在一定程度上過擬合,並且未在與 SOTA 模型相同的資料集上進行測試。這僅僅是為了粗略瞭解模型在測試資料集上的表現。
無需 MSA 或結構資訊!
由於 ESM-2 和 ESMFold 的架構和訓練方式,它們不需要任何**多序列比對(Multiple Sequence Alignment)**。這意味著預測速度更快,所需領域知識更少,使它們更易於使用和訪問。這些模型的效能仍然與 AlphaFold2 相當甚至更好,但速度卻快了 60 倍!它們也是序列模型,因此不需要蛋白質的任何結構資訊。考慮到大多數蛋白質還沒有 3D 摺疊和骨架結構預測,這是個好訊息。這種情況正在緩慢改變,因為 ESMFold 模型提供了快速結構預測,而且 Metagenomic Atlas 現在包含了超過 7.7 億種蛋白質。儘管這些模型速度快且準確,但它們仍然不如 AlphaFold2 流行,不過人們正在慢慢認識到它們是無價的資源。現在讓我們看看一些程式碼,您可以使用這些程式碼來訓練自己的 ESM-2 模型的 LoRA,以預測蛋白質的結合位點!如果您對深度學習、蛋白質語言模型或蛋白質有所瞭解,或者即使您不瞭解,也應該嘗試獲得更好的指標!此外,如果您熟悉 UniProt 或 UniRef,執行進一步的資料清理可能會有益。
LoRA 推理和訓練筆記本供您試用!
為 ESM-2 微調 LoRA
在這裡,我們將提供一個如何為 ESM-2 模型微調 LoRA 以預測蛋白質序列結合殘基的示例。我們將把這個問題視為一個二元 token 分類任務。開始之前,建議您根據 requirements.txt 檔案或 conda-environment.yml 檔案設定虛擬環境或 conda 環境。要從 requirements.txt 檔案重新建立環境,請使用
pip install -r requirements.txt
要從 conda-environment.yml 檔案重新建立 Conda 環境,請使用
conda env create -f conda-environment.yml
匯入
import os
# os.environ["CUDA_VISIBLE_DEVICES"] = "0"
import wandb
import numpy as np
import torch
import torch.nn as nn
import pickle
import xml.etree.ElementTree as ET
from datetime import datetime
from sklearn.model_selection import train_test_split
from sklearn.utils.class_weight import compute_class_weight
from sklearn.metrics import (
    accuracy_score,
    precision_recall_fscore_support,
    roc_auc_score,
    matthews_corrcoef
)
from transformers import (
    AutoModelForTokenClassification,
    AutoTokenizer,
    DataCollatorForTokenClassification,
    TrainingArguments,
    Trainer
)
from datasets import Dataset
from accelerate import Accelerator
# Imports specific to the custom peft lora model
from peft import get_peft_config, PeftModel, PeftConfig, get_peft_model, LoraConfig, TaskType
輔助函式和資料預處理
現在,您需要準備訓練/測試資料及其標籤的 pickle 檔案。我們將提供一個關於如何從下載的 UniProt 資料獲取自己的 pickle 檔案的筆記本,但目前,您可以從這裡下載準備好的 pickle 檔案。只需導航到“檔案和版本”並下載所有四個 pickle 檔案到您的機器上。完成此操作後,將以下 pickle 檔案路徑替換為您下載的 pickle 檔案所在的本地路徑。我們已將蛋白質序列的截止長度設定為 1000 個氨基酸。這是蛋白質語言模型的“上下文視窗”。請注意,有更小的資料集可用,如果您願意,可以使用 UniProt 策劃自己的資料集。如果您喜歡策劃自己的資料,可以嘗試在 UniProt 中搜索 (ft_binding:*) 並根據您自己的要求過濾蛋白質。您可能還會考慮從 蛋白質資料庫 (PDB) 策劃結合位點資料。我們尚未嘗試過,但這可能為結合位點提供一個很好的資料來源。
# Helper Functions and Data Preparation
def truncate_labels(labels, max_length):
    """Truncate labels to the specified max_length."""
    return [label[:max_length] for label in labels]

def compute_metrics(p):
    """Compute metrics for evaluation."""
    predictions, labels = p
    predictions = np.argmax(predictions, axis=2)

    # Remove padding (-100 labels)
    predictions = predictions[labels != -100].flatten()
    labels = labels[labels != -100].flatten()

    # Compute accuracy
    accuracy = accuracy_score(labels, predictions)

    # Compute precision, recall, F1 score, and AUC
    precision, recall, f1, _ = precision_recall_fscore_support(labels, predictions, average='binary')
    auc = roc_auc_score(labels, predictions)

    # Compute MCC
    mcc = matthews_corrcoef(labels, predictions)

    return {'accuracy': accuracy, 'precision': precision, 'recall': recall, 'f1': f1, 'auc': auc, 'mcc': mcc}

def compute_loss(model, inputs):
    """Custom compute_loss function."""
    logits = model(**inputs).logits
    labels = inputs["labels"]
    loss_fct = nn.CrossEntropyLoss(weight=class_weights)
    active_loss = inputs["attention_mask"].view(-1) == 1
    active_logits = logits.view(-1, model.config.num_labels)
    active_labels = torch.where(
        active_loss, labels.view(-1), torch.tensor(loss_fct.ignore_index).type_as(labels)
    )
    loss = loss_fct(active_logits, active_labels)
    return loss

# Load the data from pickle files (replace with your local paths)
with open("train_sequences_chunked_by_family.pkl", "rb") as f:
    train_sequences = pickle.load(f)

with open("test_sequences_chunked_by_family.pkl", "rb") as f:
    test_sequences = pickle.load(f)

with open("train_labels_chunked_by_family.pkl", "rb") as f:
    train_labels = pickle.load(f)

with open("test_labels_chunked_by_family.pkl", "rb") as f:
    test_labels = pickle.load(f)

# Tokenization
tokenizer = AutoTokenizer.from_pretrained("facebook/esm2_t12_35M_UR50D")
max_sequence_length = 1000

train_tokenized = tokenizer(train_sequences, padding=True, truncation=True, max_length=max_sequence_length, return_tensors="pt", is_split_into_words=False)
test_tokenized = tokenizer(test_sequences, padding=True, truncation=True, max_length=max_sequence_length, return_tensors="pt", is_split_into_words=False)

# Directly truncate the entire list of labels
train_labels = truncate_labels(train_labels, max_sequence_length)
test_labels = truncate_labels(test_labels, max_sequence_length)

train_dataset = Dataset.from_dict({k: v for k, v in train_tokenized.items()}).add_column("labels", train_labels)
test_dataset = Dataset.from_dict({k: v for k, v in test_tokenized.items()}).add_column("labels", test_labels)

# Compute Class Weights
classes = [0, 1]
flat_train_labels = [label for sublist in train_labels for label in sublist]
class_weights = compute_class_weight(class_weight='balanced', classes=classes, y=flat_train_labels)
accelerator = Accelerator()
class_weights = torch.tensor(class_weights, dtype=torch.float32).to(accelerator.device)
自定義加權訓練器
接下來,由於我們使用類權重(因為非結合殘基和結合殘基之間存在不平衡),我們將需要一個自定義加權訓練器。
# Define Custom Trainer Class
class WeightedTrainer(Trainer):
    def compute_loss(self, model, inputs, return_outputs=False):
        outputs = model(**inputs)
        loss = compute_loss(model, inputs)
        return (loss, outputs) if return_outputs else loss
訓練函式
接下來,我們定義訓練函式。請注意您可以調整的 LoRA 超引數。嘗試調整一些設定,看看能否在資料集上獲得更好的效能!關於選擇合適的權重矩陣來應用 LoRA,以及選擇秩和縮放因子 alpha 等 LoRA 超引數的指南,您可能需要閱讀原始論文(本文中已連結)的第 7 節,以及 Weights and Biases 報告(本文中也已連結)。如果您想深入瞭解選擇超引數(尤其是秩)的極度技術細節,您可以訓練多個 LoRA 並計算每對 LoRA 權重矩陣的格拉斯曼子空間相似度測量
實現此操作的程式碼超出了本文的範圍,但我們計劃在未來的文章中釋出如何實現此操作的示例。
def train_function_no_sweeps(train_dataset, test_dataset):

    # Set the LoRA config
    config = {
        "lora_alpha": 1, #try 0.5, 1, 2, ..., 16
        "lora_dropout": 0.2,
        "lr": 5.701568055793089e-04,
        "lr_scheduler_type": "cosine",
        "max_grad_norm": 0.5,
        "num_train_epochs": 3,
        "per_device_train_batch_size": 12,
        "r": 2,
        "weight_decay": 0.2,
        # Add other hyperparameters as needed
    }
    # The base model you will train a LoRA on top of
    model_checkpoint = "facebook/esm2_t12_35M_UR50D"

    # Define labels and model
    id2label = {0: "No binding site", 1: "Binding site"}
    label2id = {v: k for k, v in id2label.items()}
    model = AutoModelForTokenClassification.from_pretrained(model_checkpoint, num_labels=len(id2label), id2label=id2label, label2id=label2id)

    # Convert the model into a PeftModel
    peft_config = LoraConfig(
        task_type=TaskType.TOKEN_CLS,
        inference_mode=False,
        r=config["r"],
        lora_alpha=config["lora_alpha"],
        target_modules=["query", "key", "value"], # also try "dense_h_to_4h" and "dense_4h_to_h"
        lora_dropout=config["lora_dropout"],
        bias="none" # or "all" or "lora_only"
    )
    model = get_peft_model(model, peft_config)

    # Use the accelerator
    model = accelerator.prepare(model)
    train_dataset = accelerator.prepare(train_dataset)
    test_dataset = accelerator.prepare(test_dataset)

    timestamp = datetime.now().strftime('%Y-%m-%d_%H-%M-%S')

    # Training setup
    training_args = TrainingArguments(
        output_dir=f"esm2_t12_35M-lora-binding-sites_{timestamp}",
        learning_rate=config["lr"],
        lr_scheduler_type=config["lr_scheduler_type"],
        gradient_accumulation_steps=1,
        max_grad_norm=config["max_grad_norm"],
        per_device_train_batch_size=config["per_device_train_batch_size"],
        per_device_eval_batch_size=config["per_device_train_batch_size"],
        num_train_epochs=config["num_train_epochs"],
        weight_decay=config["weight_decay"],
        evaluation_strategy="epoch",
        save_strategy="epoch",
        load_best_model_at_end=True,
        metric_for_best_model="f1",
        greater_is_better=True,
        push_to_hub=False,
        logging_dir=None,
        logging_first_step=False,
        logging_steps=200,
        save_total_limit=7,
        no_cuda=False,
        seed=8893,
        fp16=True,
        report_to='wandb'
    )

    # Initialize Trainer
    trainer = WeightedTrainer(
        model=model,
        args=training_args,
        train_dataset=train_dataset,
        eval_dataset=test_dataset,
        tokenizer=tokenizer,
        data_collator=DataCollatorForTokenClassification(tokenizer=tokenizer),
        compute_metrics=compute_metrics
    )

    # Train and Save Model
    trainer.train()
    save_path = os.path.join("lora_binding_sites", f"best_model_esm2_t12_35M_lora_{timestamp}")
    trainer.save_model(save_path)
    tokenizer.save_pretrained(save_path)
訓練!
執行以下命令開始訓練您的 LoRA!請注意,由於資料集大小的原因,這可能需要一段時間,具體取決於您的 GPU。如果您想在 Colab 中執行此操作,您可能需要使用 Colab Pro,或者訓練一個較小的模型和/或使用一個較小的資料集。但是,執行推理(見下文)可以在標準 Colab 中完成。
train_function_no_sweeps(train_dataset, test_dataset)
檢查訓練/測試指標
最後,您可以透過將以下程式碼中的 LoRA 模型路徑 AmelieSchreiber/esm2_t12_35M_lora_binding_sites_v2_cp3 替換為您訓練的 LoRA 檢查點路徑來檢查其中一個儲存模型的訓練/測試指標。這將幫助您檢查過擬合以及模型對未見蛋白質序列的泛化能力。您的訓練/測試指標應該彼此相似。也就是說,您的訓練指標應該與您的測試指標大致相同。如果訓練指標比測試指標差,您可能需要訓練更長時間,因為模型可能欠擬合。如果您的訓練指標遠高於您的測試指標,則您的模型已過擬合!
from sklearn.metrics import(
    matthews_corrcoef,
    accuracy_score,
    precision_recall_fscore_support,
    roc_auc_score
)
from peft import PeftModel
from transformers import DataCollatorForTokenClassification

# Define paths to the LoRA and base models
base_model_path = "facebook/esm2_t12_35M_UR50D"
lora_model_path = "AmelieSchreiber/esm2_t12_35M_lora_binding_sites_v2_cp3" # "path/to/your/lora/model" Replace with the correct path to your LoRA model

# Load the base model
base_model = AutoModelForTokenClassification.from_pretrained(base_model_path)

# Load the LoRA model
model = PeftModel.from_pretrained(base_model, lora_model_path)
model = accelerator.prepare(model)  # Prepare the model using the accelerator

# Define label mappings
id2label = {0: "No binding site", 1: "Binding site"}
label2id = {v: k for k, v in id2label.items()}

# Create a data collator
data_collator = DataCollatorForTokenClassification(tokenizer)

# Define a function to compute the metrics
def compute_metrics(dataset):
    # Get the predictions using the trained model
    trainer = Trainer(model=model, data_collator=data_collator)
    predictions, labels, _ = trainer.predict(test_dataset=dataset)

    # Remove padding and special tokens
    mask = labels != -100
    true_labels = labels[mask].flatten()
    flat_predictions = np.argmax(predictions, axis=2)[mask].flatten().tolist()

    # Compute the metrics
    accuracy = accuracy_score(true_labels, flat_predictions)
    precision, recall, f1, _ = precision_recall_fscore_support(true_labels, flat_predictions, average='binary')
    auc = roc_auc_score(true_labels, flat_predictions)
    mcc = matthews_corrcoef(true_labels, flat_predictions)  # Compute the MCC

    return {"accuracy": accuracy, "precision": precision, "recall": recall, "f1": f1, "auc": auc, "mcc": mcc}  # Include the MCC in the returned dictionary

# Get the metrics for the training and test datasets
train_metrics = compute_metrics(train_dataset)
test_metrics = compute_metrics(test_dataset)

train_metrics, test_metrics
執行推理
現在,您已經有了一個可以預測結合位點的訓練好的 LoRA。您可能希望在您喜歡的蛋白質序列上執行推理。為此,只需執行以下程式碼(用您自己的模型替換下面的模型)。如果您只想測試 Hugging Face 上已有的微調模型,您可以獨立於上面的其餘程式碼執行此操作,而無需進行任何更改。
!pip install transformers -q
!pip install peft -q
from transformers import AutoModelForTokenClassification, AutoTokenizer
from peft import PeftModel
import torch

# Path to the saved LoRA model
model_path = "AmelieSchreiber/esm2_t12_35M_lora_binding_sites_v2_cp3"
# ESM2 base model
base_model_path = "facebook/esm2_t12_35M_UR50D"

# Load the model
base_model = AutoModelForTokenClassification.from_pretrained(base_model_path)
loaded_model = PeftModel.from_pretrained(base_model, model_path)

# Ensure the model is in evaluation mode
loaded_model.eval()

# Load the tokenizer
loaded_tokenizer = AutoTokenizer.from_pretrained(base_model_path)

# Protein sequence for inference
protein_sequence = "MAVPETRPNHTIYINNLNEKIKKDELKKSLHAIFSRFGQILDILVSRSLKMRGQAFVIFKEVSSATNALRSMQGFPFYDKPMRIQYAKTDSDIIAKMKGT"  # Replace with your actual sequence

# Tokenize the sequence
inputs = loaded_tokenizer(protein_sequence, return_tensors="pt", truncation=True, max_length=1024, padding='max_length')

# Run the model
with torch.no_grad():
    logits = loaded_model(**inputs).logits

# Get predictions
tokens = loaded_tokenizer.convert_ids_to_tokens(inputs["input_ids"][0])  # Convert input ids back to tokens
predictions = torch.argmax(logits, dim=2)

# Define labels
id2label = {
    0: "No binding site",
    1: "Binding site"
}

# Print the predicted labels for each token
for token, prediction in zip(tokens, predictions[0].numpy()):
    if token not in ['<pad>', '<cls>', '<eos>']:
        print((token, id2label[prediction]))
後續步驟
以類似於 Chinchilla 論文的方式,以 1:1 的方式擴充套件模型和資料集,已顯示出效能提升,儘管過擬合的障礙尚未在所有資料集上完全解決。關於蛋白質語言模型是否與 LLM 遵循相似的縮放定律,目前 OpenBioML 社群正在積極研究,如果您對這篇文章感興趣,歡迎加入!該專案的下一步將是根據序列相似性進一步過濾資料集,以進一步減輕過擬合併提高泛化能力。我們發現 LoRA 顯著改善了過擬合問題,這令人著迷,並計劃繼續嘗試應用該技術。
我們還計劃使用量化低秩適應(QLoRA)來幫助擴充套件到更大的模型。然而,在撰寫本文時,Hugging Face 的 ESM-2 模型移植版本尚不支援梯度檢查點。如果您想改變這一點,請向 Hugging Face Transformers Github 提交拉取請求,以便我們能夠為 Hugging Face 的 ESM-2 模型移植版本啟用梯度檢查點!由於 LoRA 和縮放所帶來的迄今為止令人鼓舞的改進,我們希望僅基於序列的方法能夠達到與 SOTA 相當的效能。這將是一個有價值的貢獻,因為大多數蛋白質尚未進行 3D 摺疊和骨架結構預測。我們還希望這種簡單而有效的微調策略能夠降低那些希望涉足使用和微調蛋白質語言模型的人的進入門檻,並使 ESM-2 模型的全部潛力得到更好的實現。在未來的工作中,我們還計劃研究諸如翻譯後修飾(PTM)預測(將其視為 token 分類任務),以及蛋白質功能預測任務(如 CAFA-5),也使用 LoRA。我們已經在為其中一些任務準備了筆記本,供您嘗試更多的 LoRA 微調!