LLM 效能比較:使用 LoRA 深入研究 Roberta、Llama 2 和 Mistral 在災難推文分析中的表現


引言
在自然語言處理 (NLP) 這個日新月異的領域中,我們經常需要比較不同的語言模型,以確定哪一個最適合特定任務。本篇博文旨在比較三個模型:RoBERTa、Mistral-7b 和 Llama-2-7b。我們用它們來解決一個常見問題——對關於災難的推文進行分類。值得注意的是,Mistral 和 Llama 2 是擁有 70 億引數的大型模型。相比之下,RoBERTa-large(3.55 億引數)是一個相對較小的模型,用作比較研究的基線。
在這篇部落格中,我們使用了 PEFT (Parameter-Efficient Fine-Tuning) 技術:LoRA (Low-Rank Adaptation of Large Language Models) 來對預訓練模型進行序列分類任務的微調。LoRa 旨在顯著減少可訓練引數的數量,同時保持強大的下游任務效能。
本博文的主要目標是使用 Hugging Face 的三個預訓練模型,為序列分類任務實現 LoRA 微調:meta-llama/Llama-2-7b-hf, mistralai/Mistral-7B-v0.1, 和 roberta-large。
使用的硬體
- 節點數:1
- 每個節點的 GPU 數量:1
- GPU 型別:A6000
- GPU 記憶體:48GB
目標
- 使用 LoRA PEFT 方法實現預訓練 LLM 的微調。
- 學習如何使用 HuggingFace API (transformers、peft 和 datasets)。
- 使用 Weights & Biases 設定超引數調優和實驗日誌記錄。
依賴項
datasets
evaluate
peft
scikit-learn
torch
transformers
wandb
注意:為了重現報告的結果,請檢查 wandb 報告中固定的版本。
預訓練模型
RoBERTa
RoBERTa (Robustly Optimized BERT Approach) 是 Meta AI 研究團隊提出的 BERT 模型的一個高階變體。BERT 是一種基於 Transformer 的語言模型,使用自注意力機制進行上下文詞表示,並以掩碼語言模型為目標進行訓練。注意,BERT 是一個僅包含編碼器的模型,用於自然語言理解任務(如序列分類和詞元分類)。
RoBERTa 是一款流行的微調模型,適合作為我們實驗的基線。更多資訊,您可以檢視 Hugging Face 模型卡片。
Llama 2
Llama 2 模型,即 Large Language Model Meta AI,屬於 Meta AI 推出的大型語言模型 (LLM) 家族。Llama 2 模型的大小各不相同,引數數量從 70 億到 650 億不等。
Llama 2 是一種自迴歸語言模型,基於 Transformer 解碼器架構。為了生成文字,Llama 2 將一個詞序列作為輸入,並使用滑動視窗迭代預測下一個詞元。Llama 2 的架構與 GPT-3 等模型略有不同。例如,Llama 2 使用 SwiGLU 啟用函式而不是 ReLU,並選擇旋轉位置嵌入代替絕對可學習的位置嵌入。
最近釋出的 Llama 2 引入了架構上的改進,透過將上下文長度擴充套件到最多 4096 個詞元,並使用分組查詢注意力 (GQA) 解碼,來更好地利用非常長的序列。
Mistral 7B
Mistral 7B v0.1 擁有 73 億引數,是 Mistral AI 推出的第一款 LLM。Mistral 7B 架構中使用的主要新技術有:
- 滑動視窗注意力:用基於滑動視窗的注意力機制取代全注意力(平方計算成本),其中每個詞元最多可以關注來自前一層的 4096 個詞元(線性計算成本)。這種機制使 Mistral 7B 能夠處理更長的序列,其中更高層可以訪問超出 4096 個詞元視窗大小的歷史資訊。
- 分組查詢注意力:該技術同樣用於 Llama 2,透過快取序列中先前已解碼詞元的鍵和值向量來最佳化推理過程(減少處理時間)。
LoRA
PEFT (Parameter Efficient Fine-Tuning) 是一系列技術(p-tuning、prefix-tuning、IA3、Adapters 和 LoRa)的集合,旨在用更少的訓練引數來微調大型模型,同時保持與全量微調相當的效能水平。
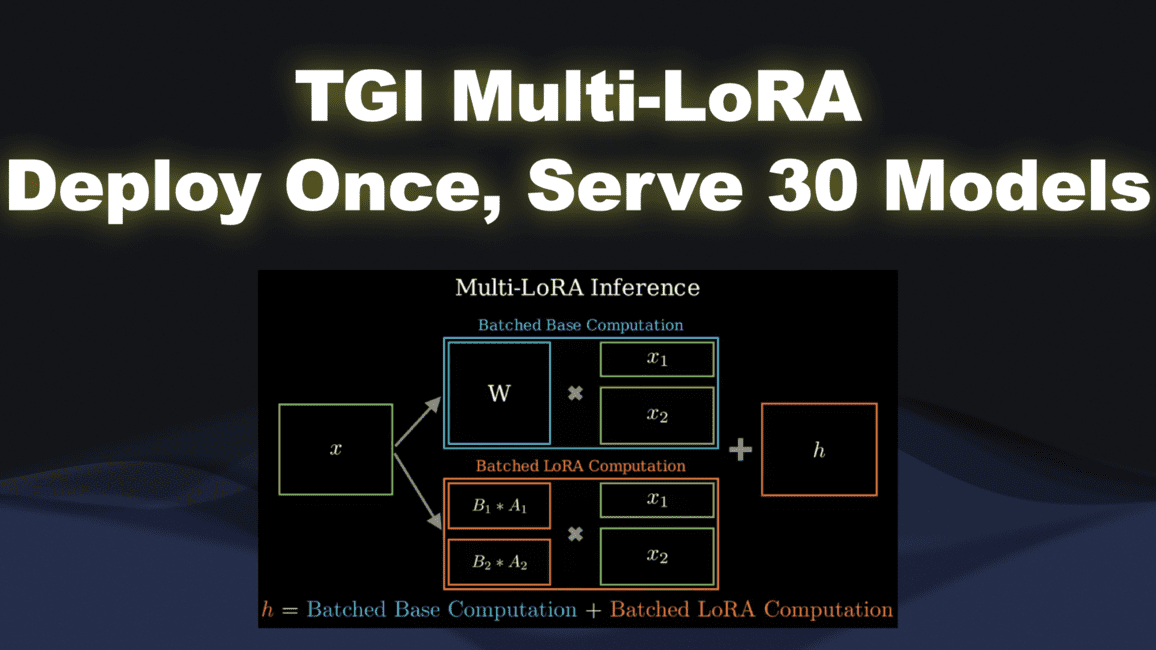
LoRA (Low-Rank Adaptation) 是一種 PEFT 方法,與介面卡層 (Adapter layers) 有相似之處。其主要目標是減少模型的可訓練引數。LoRA 的操作涉及學習一個低秩更新矩陣,同時保持預訓練權重凍結。

設定
RoBERTa 的最大序列長度限制為 512,因此我們為所有模型設定 MAX_LEN=512 以確保公平比較。
MAX_LEN = 512
roberta_checkpoint = "roberta-large"
mistral_checkpoint = "mistralai/Mistral-7B-v0.1"
llama_checkpoint = "meta-llama/Llama-2-7b-hf"
資料準備
資料載入
我們將從 Hugging Face 載入資料集
from datasets import load_dataset
dataset = load_dataset("mehdiiraqui/twitter_disaster")
現在,讓我們將資料集拆分為訓練集和驗證集。然後新增測試集
from datasets import Dataset
# Split the dataset into training and validation datasets
data = dataset['train'].train_test_split(train_size=0.8, seed=42)
# Rename the default "test" split to "validation"
data['val'] = data.pop("test")
# Convert the test dataframe to HuggingFace dataset and add it into the first dataset
data['test'] = dataset['test']
以下是資料集的概覽
DatasetDict({
    train: Dataset({
        features: ['id', 'keyword', 'location', 'text', 'target'],
        num_rows: 6090
    })
    val: Dataset({
        features: ['id', 'keyword', 'location', 'text', 'target'],
        num_rows: 1523
    })
    test: Dataset({
        features: ['id', 'keyword', 'location', 'text', 'target'],
        num_rows: 3263
    })
})
讓我們檢查一下資料分佈
import pandas as pd

data['train'].to_pandas().info()
data['test'].to_pandas().info()
- 訓練資料集
RangeIndex: 7613 entries, 0 to 7612
Data columns (total 5 columns):
 #   Column    Non-Null Count  Dtype
---  ------    --------------  -----
 0   id        7613 non-null   int64
 1   keyword   7552 non-null   object
 2   location  5080 non-null   object
 3   text      7613 non-null   object
 4   target    7613 non-null   int64
dtypes: int64(2), object(3)
memory usage: 297.5+ KB
- 測試資料集
<class 'pandas.core.frame.DataFrame'>
RangeIndex: 3263 entries, 0 to 3262
Data columns (total 5 columns):
 #   Column    Non-Null Count  Dtype
---  ------    --------------  -----
 0   id        3263 non-null   int64
 1   keyword   3237 non-null   object
 2   location  2158 non-null   object
 3   text      3263 non-null   object
 4   target    3263 non-null   int64
dtypes: int64(2), object(3)
memory usage: 127.6+ KB
訓練資料集中的目標分佈
target
0    4342
1    3271
Name: count, dtype: int64
由於類別不平衡,我們將計算正負樣本的權重,並在之後用於損失計算
pos_weights = len(data['train'].to_pandas()) / (2 * data['train'].to_pandas().target.value_counts()[1])
neg_weights = len(data['train'].to_pandas()) / (2 * data['train'].to_pandas().target.value_counts()[0])
最終的權重是
POS_WEIGHT, NEG_WEIGHT = (1.1637114032405993, 0.8766697374481806)
然後,我們計算 text 列的最大長度
# Number of Characters
max_char = data['train'].to_pandas()['text'].str.len().max()
# Number of Words
max_words = data['train'].to_pandas()['text'].str.split().str.len().max()
The maximum number of characters is 152.
The maximum number of words is 31.
資料處理
讓我們來看一個訓練資料的行示例
data['train'][0]
{'id': 5285,
 'keyword': 'fear',
 'location': 'Thibodaux, LA',
 'text': 'my worst fear. https://#/iH8UDz8mq3',
 'target': 0}
資料包含關鍵詞、位置和推文文字。為簡單起見,我們選擇 text 特徵作為 LLM 的唯一輸入。
至此,我們已經準備好了符合預訓練 LLM 預期的 HuggingFace 格式的訓練集、驗證集和測試集。下一步是使用相應的分詞器定義用於訓練的分詞資料集,將 text 特徵轉換為詞元 ID 序列和注意力掩碼這兩個張量。由於每個模型都有其特定的分詞器,我們需要定義三個不同的資料集。
我們首先定義 RoBERTa 的資料載入器
- 載入分詞器
from transformers import AutoTokenizer
roberta_tokenizer = AutoTokenizer.from_pretrained(roberta_checkpoint, add_prefix_space=True)
注意:RoBERTa 分詞器在訓練時將空格視為詞元的一部分。因此,如果句子的第一個詞前面沒有空格,它的編碼方式會不同。為了確保第一個詞包含空格,我們設定 add_prefix_space=True。此外,為了保持所有三個模型的預處理一致,我們對 Llama 2 和 Mistral 7b 也將該引數設定為 'True'。
- 定義用於轉換資料幀中一行的預處理函式
def roberta_preprocessing_function(examples):
    return roberta_tokenizer(examples['text'], truncation=True, max_length=MAX_LEN)
透過將預處理函式應用於我們訓練資料集的第一個示例,我們得到了分詞後的輸入 (input_ids) 和注意力掩碼
roberta_preprocessing_function(data['train'][0])
{'input_ids': [0, 127, 2373, 2490, 4, 1205, 640, 90, 4, 876, 73, 118, 725, 398, 13083, 329, 398, 119, 1343, 246, 2], 'attention_mask': [1, 1, 1, 1, 1, 1, 1, 1, 1, 1, 1, 1, 1, 1, 1, 1, 1, 1, 1, 1, 1]}
- 現在,讓我們將預處理函式應用於整個資料集
col_to_delete = ['id', 'keyword','location', 'text']
# Apply the preprocessing function and remove the undesired columns
roberta_tokenized_datasets = data.map(roberta_preprocessing_function, batched=True, remove_columns=col_to_delete)
# Rename the target to label as for HugginFace standards
roberta_tokenized_datasets = roberta_tokenized_datasets.rename_column("target", "label")
# Set to torch format
roberta_tokenized_datasets.set_format("torch")
注意: 我們從資料中刪除了不需要的列:id、keyword、location 和 text。我們刪除了 text,因為我們已經將其轉換為輸入 ID 和注意力掩碼
我們可以看一下我們分詞後的訓練資料集
roberta_tokenized_datasets['train'][0]
{'label': tensor(0),
 'input_ids': tensor([    0,   127,  2373,  2490,     4,  1205,   640,    90,     4,   876,
            73,   118,   725,   398, 13083,   329,   398,   119,  1343,   246,
             2]),
 'attention_mask': tensor([1, 1, 1, 1, 1, 1, 1, 1, 1, 1, 1, 1, 1, 1, 1, 1, 1, 1, 1, 1, 1])}
- 為了生成訓練批次,我們還需要將給定批次中的行填充到批次中的最大長度。為此,我們將使用
DataCollatorWithPadding類
# Data collator for padding a batch of examples to the maximum length seen in the batch
from transformers import DataCollatorWithPadding
roberta_data_collator = DataCollatorWithPadding(tokenizer=roberta_tokenizer)
您可以按照相同的步驟為 Mistral 7B 和 Llama 2 模型準備資料
注意 Llama 2 和 Mistral 7B 沒有預設的 pad_token_id。因此,我們也使用 eos_token_id 進行填充。
- Mistral 7B
# Load Mistral 7B Tokenizer
from transformers import AutoTokenizer, DataCollatorWithPadding
mistral_tokenizer = AutoTokenizer.from_pretrained(mistral_checkpoint, add_prefix_space=True)
mistral_tokenizer.pad_token_id = mistral_tokenizer.eos_token_id
mistral_tokenizer.pad_token = mistral_tokenizer.eos_token

def mistral_preprocessing_function(examples):
    return mistral_tokenizer(examples['text'], truncation=True, max_length=MAX_LEN)

mistral_tokenized_datasets = data.map(mistral_preprocessing_function, batched=True, remove_columns=col_to_delete)
mistral_tokenized_datasets = mistral_tokenized_datasets.rename_column("target", "label")
mistral_tokenized_datasets.set_format("torch")

# Data collator for padding a batch of examples to the maximum length seen in the batch
mistral_data_collator = DataCollatorWithPadding(tokenizer=mistral_tokenizer)
- Llama 2
# Load Llama 2 Tokenizer
from transformers import AutoTokenizer, DataCollatorWithPadding
llama_tokenizer = AutoTokenizer.from_pretrained(llama_checkpoint, add_prefix_space=True)
llama_tokenizer.pad_token_id = llama_tokenizer.eos_token_id
llama_tokenizer.pad_token = llama_tokenizer.eos_token

def llama_preprocessing_function(examples):
    return llama_tokenizer(examples['text'], truncation=True, max_length=MAX_LEN)

llama_tokenized_datasets = data.map(llama_preprocessing_function, batched=True, remove_columns=col_to_delete)
llama_tokenized_datasets = llama_tokenized_datasets.rename_column("target", "label")
llama_tokenized_datasets.set_format("torch")

# Data collator for padding a batch of examples to the maximum length seen in the batch
llama_data_collator = DataCollatorWithPadding(tokenizer=llama_tokenizer)
現在我們已經準備好了分詞資料集,下一節將展示如何載入預訓練的 LLM 檢查點以及如何設定 LoRa 權重。
模型
RoBERTa
載入用於分類任務的 RoBERTa 檢查點
我們使用 Hugging Face 的 AutoModelForSequenceClassification 類載入帶有序列分類頭的預訓練 RoBERTa 模型
from transformers import AutoModelForSequenceClassification
roberta_model = AutoModelForSequenceClassification.from_pretrained(roberta_checkpoint, num_labels=2)
為 RoBERTa 分類器設定 LoRA
我們匯入 LoRa 配置併為 RoBERTa 分類器設定一些引數
- TaskType: 序列分類
- r(rank): 我們分解矩陣的秩
- lora_alpha: 用於縮放學習權重的 Alpha 引數。LoRA 論文建議將 alpha 固定為 16
- lora_dropout: LoRA 層的丟棄機率
- bias: 是否向 LoRa 層新增偏置項
下面的程式碼使用了 Lora 論文 推薦的值。在本文的 稍後部分,我們將使用 wandb 對這些引數進行超引數調優。
from peft import get_peft_model, LoraConfig, TaskType
roberta_peft_config = LoraConfig(
    task_type=TaskType.SEQ_CLS, r=2, lora_alpha=16, lora_dropout=0.1, bias="none",
)
roberta_model = get_peft_model(roberta_model, roberta_peft_config)
roberta_model.print_trainable_parameters()
我們可以看到,可訓練引數的數量僅佔 RoBERTa 模型引數的 0.64%
trainable params: 2,299,908 || all params: 356,610,052 || trainable%: 0.6449363911929212
Mistral
載入用於分類模型的檢查點
讓我們載入帶有序列分類頭的預訓練 Mistral-7B 模型
from transformers import AutoModelForSequenceClassification
import torch
mistral_model =  AutoModelForSequenceClassification.from_pretrained(
  pretrained_model_name_or_path=mistral_checkpoint,
  num_labels=2,
  device_map="auto"
)
對於 Mistral 7B,我們必須新增填充詞元 ID,因為它預設沒有定義。
mistral_model.config.pad_token_id = mistral_model.config.eos_token_id
為 Mistral 7B 分類器設定 LoRa
對於 Mistral 7B 模型,我們需要指定 target_modules (注意力模組中的查詢和值向量)
from peft import get_peft_model, LoraConfig, TaskType

mistral_peft_config = LoraConfig(
    task_type=TaskType.SEQ_CLS, r=2, lora_alpha=16, lora_dropout=0.1, bias="none",
    target_modules=[
        "q_proj",
        "v_proj",
    ],
)

mistral_model = get_peft_model(mistral_model, mistral_peft_config)
mistral_model.print_trainable_parameters()
可訓練引數的數量僅佔 Mistral 模型引數的 0.024%
trainable params: 1,720,320 || all params: 7,112,380,416 || trainable%: 0.02418768259540745
Llama 2
載入用於分類模式的檢查點
讓我們載入帶有序列分類頭的預訓練 Llama 2 模型。
from transformers import AutoModelForSequenceClassification
import torch
llama_model =  AutoModelForSequenceClassification.from_pretrained(
  pretrained_model_name_or_path=llama_checkpoint,
  num_labels=2,
  device_map="auto",
  offload_folder="offload",
  trust_remote_code=True
)
對於 Llama 2,我們必須新增填充詞元 ID,因為它預設沒有定義。
llama_model.config.pad_token_id = llama_model.config.eos_token_id
為 Llama 2 分類器設定 LoRa
我們為 Llama 2 定義 LoRa,引數與 Mistral 相同
from peft import get_peft_model, LoraConfig, TaskType
llama_peft_config = LoraConfig(
    task_type=TaskType.SEQ_CLS, r=16, lora_alpha=16, lora_dropout=0.05, bias="none",
    target_modules=[
        "q_proj",
        "v_proj",
    ],
)

llama_model = get_peft_model(llama_model, llama_peft_config)
llama_model.print_trainable_parameters()
可訓練引數的數量僅佔 Llama 2 模型引數的 0.12%
trainable params: 8,404,992 || all params: 6,615,748,608 || trainable%: 0.1270452143516515
至此,我們已經定義了用於訓練的分詞資料集以及帶有 LoRa 層的 LLM 設定。下一節將介紹如何使用 HuggingFace 的 Trainer 類啟動訓練。
設定訓練器
評估指標
首先,我們定義將用於比較三個模型的效能指標:F1 分數、召回率、精確率和準確率
import evaluate
import numpy as np

def compute_metrics(eval_pred):
    # All metrics are already predefined in the HF `evaluate` package
    precision_metric = evaluate.load("precision")
    recall_metric = evaluate.load("recall")
    f1_metric= evaluate.load("f1")
    accuracy_metric = evaluate.load("accuracy")

    logits, labels = eval_pred # eval_pred is the tuple of predictions and labels returned by the model
    predictions = np.argmax(logits, axis=-1)
    precision = precision_metric.compute(predictions=predictions, references=labels)["precision"]
    recall = recall_metric.compute(predictions=predictions, references=labels)["recall"]
    f1 = f1_metric.compute(predictions=predictions, references=labels)["f1"]
    accuracy = accuracy_metric.compute(predictions=predictions, references=labels)["accuracy"]
    # The trainer is expecting a dictionary where the keys are the metrics names and the values are the scores.
    return {"precision": precision, "recall": recall, "f1-score": f1, 'accuracy': accuracy}
用於加權損失的自定義訓練器
如本文開頭所述,我們的正負類別存在不平衡分佈。我們需要使用加權交叉熵損失來訓練我們的模型以解決這個問題。Trainer 類不支援提供自定義損失,因為它期望直接從模型的輸出中獲取損失。
因此,我們需要定義我們自己的自定義 WeightedCELossTrainer,它會重寫 compute_loss 方法,以根據模型的預測和輸入標籤計算加權交叉熵損失
from transformers import Trainer

class WeightedCELossTrainer(Trainer):
    def compute_loss(self, model, inputs, return_outputs=False):
        labels = inputs.pop("labels")
        # Get model's predictions
        outputs = model(**inputs)
        logits = outputs.get("logits")
        # Compute custom loss
        loss_fct = torch.nn.CrossEntropyLoss(weight=torch.tensor([neg_weights, pos_weights], device=model.device, dtype=logits.dtype))
        loss = loss_fct(logits.view(-1, self.model.config.num_labels), labels.view(-1))
        return (loss, outputs) if return_outputs else loss
訓練器設定
讓我們為這三個模型設定訓練引數和訓練器。
RoBERTa
第一個重要步驟是將模型移至 GPU 裝置進行訓練。
roberta_model = roberta_model.cuda()
roberta_model.device()
它將列印以下內容
device(type='cuda', index=0)
然後,我們設定訓練引數
from transformers import TrainingArguments

lr = 1e-4
batch_size = 8
num_epochs = 5

training_args = TrainingArguments(
    output_dir="roberta-large-lora-token-classification",
    learning_rate=lr,
    lr_scheduler_type= "constant",
    warmup_ratio= 0.1,
    max_grad_norm= 0.3,
    per_device_train_batch_size=batch_size,
    per_device_eval_batch_size=batch_size,
    num_train_epochs=num_epochs,
    weight_decay=0.001,
    evaluation_strategy="epoch",
    save_strategy="epoch",
    load_best_model_at_end=True,
    report_to="wandb",
    fp16=False,
    gradient_checkpointing=True,
)
最後,我們透過提供模型、訓練引數和分詞後的資料集來定義 RoBERTa 訓練器
roberta_trainer = WeightedCELossTrainer(
    model=roberta_model,
    args=training_args,
    train_dataset=roberta_tokenized_datasets['train'],
    eval_dataset=roberta_tokenized_datasets["val"],
    data_collator=roberta_data_collator,
    compute_metrics=compute_metrics
)
Mistral-7B
與 RoBERTa 類似,我們按如下方式初始化 WeightedCELossTrainer
from transformers import TrainingArguments, Trainer

mistral_model = mistral_model.cuda()

lr = 1e-4
batch_size = 8
num_epochs = 5

training_args = TrainingArguments(
    output_dir="mistral-lora-token-classification",
    learning_rate=lr,
    lr_scheduler_type= "constant",
    warmup_ratio= 0.1,
    max_grad_norm= 0.3,
    per_device_train_batch_size=batch_size,
    per_device_eval_batch_size=batch_size,
    num_train_epochs=num_epochs,
    weight_decay=0.001,
    evaluation_strategy="epoch",
    save_strategy="epoch",
    load_best_model_at_end=True,
    report_to="wandb",
    fp16=True,
    gradient_checkpointing=True,
)


mistral_trainer = WeightedCELossTrainer(
    model=mistral_model,
    args=training_args,
    train_dataset=mistral_tokenized_datasets['train'],
    eval_dataset=mistral_tokenized_datasets["val"],
    data_collator=mistral_data_collator,
    compute_metrics=compute_metrics
)
注意,我們需要透過將 fp16 設定為 True 來啟用半精度訓練。主要原因是 Mistral-7B 很大,其權重無法以完整的 float32 精度裝入單個 GPU 記憶體 (48GB)。
Llama 2
與 Mistral 7B 類似,我們按如下方式定義訓練器
from transformers import TrainingArguments, Trainer

llama_model = llama_model.cuda()

lr = 1e-4
batch_size = 8
num_epochs = 5
training_args = TrainingArguments(
    output_dir="llama-lora-token-classification",
    learning_rate=lr,
    lr_scheduler_type= "constant",
    warmup_ratio= 0.1,
    max_grad_norm= 0.3,
    per_device_train_batch_size=batch_size,
    per_device_eval_batch_size=batch_size,
    num_train_epochs=num_epochs,
    weight_decay=0.001,
    evaluation_strategy="epoch",
    save_strategy="epoch",
    load_best_model_at_end=True,
    report_to="wandb",
    fp16=True,
    gradient_checkpointing=True,
)


llama_trainer = WeightedCELossTrainer(
    model=llama_model,
    args=training_args,
    train_dataset=llama_tokenized_datasets['train'],
    eval_dataset=llama_tokenized_datasets["val"],
    data_collator=llama_data_collator,
    compute_metrics=compute_metrics
)
超引數調優
我們使用 Wandb Sweep API 執行超引數調優,採用貝葉斯搜尋策略(30 次執行)。調優的超引數如下。
| 方法 | 指標 | lora_alpha | lora_bias | lora_dropout | lora_rank | 學習率 | max_length |
|---|---|---|---|---|---|---|---|
| 貝葉斯 | 目標:最大化 | 分佈:分類 | 分佈:分類 | 分佈:均勻 | 分佈:分類 | 分佈:均勻 | 分佈:分類 |
| 名稱:eval/f1-score | 值 -16 -32 -64 |
值:None | -最大值:0.1 -最小值:0 |
值 -4 -8 -16 -32 |
-最大值:2e-04 -最小值:1e-05 |
值:512 |
更多資訊,您可以檢視 資源部分 中的 Wandb 實驗報告。
結果
| 模型 | F1 分數 | 訓練時間 | 記憶體消耗 | 可訓練引數數量 |
|---|---|---|---|---|
| RoBERTa | 0.8077 | 538 秒 | GPU1: 9.1 Gb GPU2: 8.3 Gb |
0.64% |
| Mistral 7B | 0.7364 | 2030 秒 | GPU1: 29.6 Gb GPU2: 29.5 Gb |
0.024% |
| Llama 2 | 0.7638 | 2052 秒 | GPU1: 35 Gb GPU2: 33.9 Gb |
0.12% |
結論
在這篇博文中,我們使用 LoRa 比較了三種大型語言模型 (LLM)——RoBERTa、Mistral 7b 和 Llama 2——在災難推文分類任務上的效能。從效能結果來看,我們可以看到 RoBERTa 的表現遠超 Mistral 7B 和 Llama 2。這就引出了一個問題:對於像短序列二元分類這樣的任務,我們真的需要一個複雜且龐大的 LLM 嗎?
我們可以從這項研究中學到的一點是,應該考慮具體的專案需求、可用資源和效能要求來選擇要使用的 LLM 模型。
此外,對於序列較短且相對簡單的預測任務,像 RoBERTa 這樣的基礎模型仍然具有競爭力。
最後,我們展示了 LoRa 方法可以同時應用於編碼器(RoBERTa)和解碼器(Llama 2 和 Mistral 7B)模型。
資源
您可以在以下 Github 專案中找到程式碼指令碼。
您可以在以下 Weight&Bias 報告中檢視超引數搜尋結果