影像外擴 II - 差分擴散


這是關於影像外擴(outpainting)的第三篇指南,如果你想了解其他方法,可以看這裡
在本指南中,我將深入探討如何使用 差分擴散 (differential diffusion) 進行影像外擴,並詳細介紹我為獲得良好結果所採取的每一步。
我將從一張非正方形且具有景深(bokeh)效果的圖片開始,以增加難度。當圖片有這種背景時,拼接縫隙會非常明顯。這張圖片我從 Unsplash 上獲取。

所以,第一個任務是把它變成一張正方形圖片(擴充套件它),這樣我們就可以繼續把它變得更大。但我每次會生成 1024x1024 的影像,因為這是 SDXL 的最佳解析度。
然後,我將測試僅使用灰色背景的新區域生成的效果。但要做到這一點,我們還需要建立一個可以與差分擴散配合使用的蒙版。為此,我將把邊緣向左移動 50 畫素,並應用一個模糊濾鏡。這有助於平滑過渡。
| 處理成正方形的影像 | 蒙版 | 模糊處理的蒙版 |
|---|---|---|
 |
 |
 |
我們將使用社群的 pipeline StableDiffusionXLDifferentialImg2ImgPipeline,載入方式如下
pipeline = StableDiffusionXLPipeline.from_pretrained(
    "stabilityai/stable-diffusion-xl-base-1.0",
    torch_dtype=torch.float16,
    variant="fp16",
    custom_pipeline="pipeline_stable_diffusion_xl_differential_img2img",
).to("cuda")

image = pipeline(
    prompt=prompt="",
    negative_prompt="",
    width=1024,
    height=1024,
    guidance_scale=6.0,
    num_inference_steps=25,
    original_image=image,
    image=image,
    strength=1.0,
    map=mask,
).images[0]
此時,如果我們不帶提示詞生成影像,模型會認為灰色區域是一個灰色物體,比如一堵牆。
 |
 |
如果這是由會畫畫的人來使用,那個人可以畫一個草圖然後生成影像。但我不是那樣的人,所以我需要為新的外擴區域想一個提示詞。
為此,我們可以自己建立提示詞,使用像 GPT-4V 或 Bing Chat 這樣的線上聊天機器人,或者像 Llava 這樣的本地視覺大語言模型 (VLLM)。我個人總是喜歡使用本地 VLLM,而這個模型引起了我的注意:internlm-xcomposer2-vl-7b-4bit,因為它即使只用 4-bit 版本也表現得非常好。
這是我得到的結果
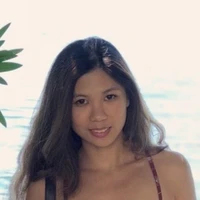
這張圖片捕捉到一個男人站在水邊,可能是一個湖或一條河。他穿著一件印有“evolution”字樣的白色連帽衫和卡其色褲子。肩上揹著一個綠色揹包,手裡拿著一臺相機。背景是晴空下的山脈。
作為對比,這是 Bing 給我的結果
這張圖片描繪了一位攝影師,身穿戶外裝備,手持專業相機,背景是寧靜的湖泊和白雪皚皚的群山,景色令人驚歎。這是人類活動與自然美景的美麗融合。
在進行影像修復或外擴時,提示詞非常重要。舉個例子,以下是使用這兩個提示詞的結果
| XComposer2 | XComposer2 |
|---|---|
 |
 |
| Bing | Bing |
 |
 |
對於這張特定的圖片,或許對於 SDXL 來說普遍如此,XComposer2 生成的提示詞更好,因為它描述了圖片而沒有使用像“令人驚歎的背景”、“美麗的融合”或“自然美景”這樣誇張的詞語。
採用 XComposer2 的提示詞並固定種子(seed),讓我們看看差分擴散是如何工作的。
| 普通蒙版 | 模糊處理的蒙版 |
|---|---|
 |
|
 |
|
我們可以看到,差分擴散能更好地將外擴部分與原始影像融合在一起,即使它們完全不同。讓我們看看增加模糊度會發生什麼。
| 模糊半徑 20 | 模糊半徑 40 |
|---|---|
|
 |
| 模糊半徑 80 | 模糊半徑 100 |
 |
 |
現在,我們可以清楚地看到為什麼差分擴散是進行影像修復和外擴的一種非常好的方法。對於這個外擴區域,當模糊度為 80 或 100 時,我們能看到接縫的唯一原因就是顏色差異。請注意,模糊範圍和區域越大,原始影像的變化就越大。
為了解決這個顏色問題,或者至少是減弱它,我們需要用其他東西填充新的區域。一些能幫助模型更好地理解我們想在新區域中得到什麼的東西。
有幾種技術可以做到這一點。它們各有幫助,但用途不同。例如,PatchMatch 或 LaMa 有助於影像修復(inpainting),因為它們會移除內容並用新的內容填充。對於這個用例,它們效果不太好,因為需要填充的區域太大且是全新的。所以,我將使用 OpenCV 的方法。在這種情況下,我喜歡使用 telea 演算法 的結果。
要使用此方法,需要為 Python 安裝 OpenCV
pip install opencv-python
在多個庫之間轉換影像不是一個好主意,因為這可能導致質量損失。所以,為此,我將所有函式都轉換為使用 OpenCV。唯一的主要區別是模糊。為了獲得與 Pillow 類似的效果,我們需要使用一個大得多的值。在這種情況下,模糊半徑為 500。
我們需要用於 Telea 修復的蒙版必須與原始蒙版大小相同,沒有偏移,因為那才是我們想要替換的區域。

我們需要模型來使用這些資訊。通常,對於修復模型或普通的圖生圖模型,我們會降低 strength 的值。但對於差分擴散,我們可以將這個值保持在最大,只需將蒙版變淺一些。我將為此使用深灰色。
 |
 |
 |
 |
現在,我們有了一些不錯的結果,但我仍然看到兩個問題。我們仍然能看到接縫,因為顏色有輕微的差異,而且我們依賴提示詞來完成這個任務。如果我們傳遞了錯誤的提示詞(如果你使用 VLLM,這很有可能發生),外擴的效果就會很差。
為了解決這兩個問題,我們將使用 IP Adapter。這很明顯;沒有比影像提示(Image Prompt)更好的方式來告訴模型原始影像的細節了。
我們現在唯一的問題是原始影像不是正方形的,而 IP Adapter 只適用於正方形影像。原始作者提出了一個解決方案,涉及到調整影像大小和填充,但這會把這些資訊提供給模型,而我們不希望這樣,因為我們恰恰是想繪製那個區域。
既然我們並不真的需要給出一個確切的構圖,並且我們可以給 IP Adapter 輸入多張圖片,那麼我們要做的是將原始影像切成正方形,然後將這些正方形輸入到 IP Adapter。為此,最好使用較大的初始影像,然後將每個正方形縮小到 224x224,這是它們需要的尺寸。

這個函式可以做到這一點
def slice_image(image):
    height, width, _ = image.shape
    slice_size = min(width // 2, height // 3)

    slices = []

    for h in range(3):
        for w in range(2):
            left = w * slice_size
            upper = h * slice_size
            right = left + slice_size
            lower = upper + slice_size

            if w == 1 and right > width:
                left -= right - width
                right = width
            if h == 2 and lower > height:
                upper -= lower - height
                lower = height

            slice = image[upper:lower, left:right]
            slices.append(slice)

    return slices
這些是我們用它得到的切片影像
 |
 |
 |
 |
 |
 |
在沒有提示詞的情況下,由於我們正在將這些影像輸入到 IP Adapter,我們可以將 CFG 降至約 4.0
 |
 |
 |
 |
有時我們可能會得到仍有接縫的影像,但大多數時候它們都很好,而且我們解決了顏色差異問題,因為 IP Adapter 向模型提供了該資訊。
現在我們有了一個可以擴充套件縱向/橫向影像而無需提示詞的指令碼,這些是我用其他影像做的測試
| 原始 | 擴充套件後 |
|---|---|
 |
 |
 |
 |
 |
 |
 |
 |
使用這種方法,如果你想保留的主體位於邊界,它會有一點變化,因為我們使用的是模糊蒙版。如果你不希望這樣,可以嘗試減少蒙版的模糊度和偏移量。如果這不起作用,唯一的替代方法是使用修復模型。
還有一些影像用這種方法是行不通的。例如,這張
| 原始 | 擴充套件後 |
|---|---|
 |
 |
那是因為我們只有主體的一半,而且 Telea 演算法將顏色向右擴充套件了。在這種情況下,我們可以用提示詞給它一點幫助。我將使用“colored eggs inside a round nest on a table”(桌上圓巢裡的彩蛋)。
 |
 |
你使用的模型也非常重要。一些模型在影像外擴方面表現更好,而另一些則更適合寫實照片或特定型別,如動漫、奇幻等。
現在,我們剩下的唯一事情就是建立真正大的外擴圖


這是完整的程式碼。首先,我把影像變成正方形,然後進行擴充套件。你可以選擇擴充套件的方向。請注意,這只是一個程式碼示例。你需要根據自己的需求進行修改,但希望這能幫助你開始使用 diffusers 和差分擴散進行這類影像外擴。
import random
import urllib.request

import cv2
import numpy as np
import torch

from diffusers import DPMSolverMultistepScheduler, StableDiffusionXLPipeline


def merge_images(original, new_image, offset, direction):
    if direction in ["left", "right"]:
        merged_image = np.zeros((original.shape[0], original.shape[1] + offset, 3), dtype=np.uint8)
    elif direction in ["top", "bottom"]:
        merged_image = np.zeros((original.shape[0] + offset, original.shape[1], 3), dtype=np.uint8)

    if direction == "left":
        merged_image[:, offset:] = original
        merged_image[:, : new_image.shape[1]] = new_image
    elif direction == "right":
        merged_image[:, : original.shape[1]] = original
        merged_image[:, original.shape[1] + offset - new_image.shape[1] : original.shape[1] + offset] = new_image
    elif direction == "top":
        merged_image[offset:, :] = original
        merged_image[: new_image.shape[0], :] = new_image
    elif direction == "bottom":
        merged_image[: original.shape[0], :] = original
        merged_image[original.shape[0] + offset - new_image.shape[0] : original.shape[0] + offset, :] = new_image

    return merged_image


def slice_image(image):
    height, width, _ = image.shape
    slice_size = min(width // 2, height // 3)

    slices = []

    for h in range(3):
        for w in range(2):
            left = w * slice_size
            upper = h * slice_size
            right = left + slice_size
            lower = upper + slice_size

            if w == 1 and right > width:
                left -= right - width
                right = width
            if h == 2 and lower > height:
                upper -= lower - height
                lower = height

            slice = image[upper:lower, left:right]
            slices.append(slice)

    return slices


def process_image(
    image,
    fill_color=(0, 0, 0),
    mask_offset=50,
    blur_radius=500,
    expand_pixels=256,
    direction="left",
    inpaint_mask_color=50,
    max_size=1024,
):
    height, width = image.shape[:2]

    new_height = height + (expand_pixels if direction in ["top", "bottom"] else 0)
    new_width = width + (expand_pixels if direction in ["left", "right"] else 0)

    if new_height > max_size:
        # If so, crop the image from the opposite side
        if direction == "top":
            image = image[:max_size, :]
        elif direction == "bottom":
            image = image[new_height - max_size :, :]
        new_height = max_size

    if new_width > max_size:
        # If so, crop the image from the opposite side
        if direction == "left":
            image = image[:, :max_size]
        elif direction == "right":
            image = image[:, new_width - max_size :]
        new_width = max_size

    height, width = image.shape[:2]

    new_image = np.full((new_height, new_width, 3), fill_color, dtype=np.uint8)
    mask = np.full_like(new_image, 255, dtype=np.uint8)
    inpaint_mask = np.full_like(new_image, 0, dtype=np.uint8)

    mask = cv2.cvtColor(mask, cv2.COLOR_BGR2GRAY)
    inpaint_mask = cv2.cvtColor(inpaint_mask, cv2.COLOR_BGR2GRAY)

    if direction == "left":
        new_image[:, expand_pixels:] = image[:, : max_size - expand_pixels]
        mask[:, : expand_pixels + mask_offset] = inpaint_mask_color
        inpaint_mask[:, :expand_pixels] = 255
    elif direction == "right":
        new_image[:, :width] = image
        mask[:, width - mask_offset :] = inpaint_mask_color
        inpaint_mask[:, width:] = 255
    elif direction == "top":
        new_image[expand_pixels:, :] = image[: max_size - expand_pixels, :]
        mask[: expand_pixels + mask_offset, :] = inpaint_mask_color
        inpaint_mask[:expand_pixels, :] = 255
    elif direction == "bottom":
        new_image[:height, :] = image
        mask[height - mask_offset :, :] = inpaint_mask_color
        inpaint_mask[height:, :] = 255

    # mask blur
    if blur_radius % 2 == 0:
        blur_radius += 1
    mask = cv2.GaussianBlur(mask, (blur_radius, blur_radius), 0)

    # telea inpaint
    _, mask_np = cv2.threshold(inpaint_mask, 128, 255, cv2.THRESH_BINARY | cv2.THRESH_OTSU)
    inpaint = cv2.inpaint(new_image, mask_np, 3, cv2.INPAINT_TELEA)

    # convert image to tensor
    inpaint = cv2.cvtColor(inpaint, cv2.COLOR_BGR2RGB)
    inpaint = torch.from_numpy(inpaint).permute(2, 0, 1).float()
    inpaint = inpaint / 127.5 - 1
    inpaint = inpaint.unsqueeze(0).to("cuda")

    # convert mask to tensor
    mask = torch.from_numpy(mask)
    mask = mask.unsqueeze(0).float() / 255.0
    mask = mask.to("cuda")

    return inpaint, mask


def image_resize(image, new_size=1024):
    height, width = image.shape[:2]

    aspect_ratio = width / height
    new_width = new_size
    new_height = new_size

    if aspect_ratio != 1:
        if width > height:
            new_height = int(new_size / aspect_ratio)
        else:
            new_width = int(new_size * aspect_ratio)

    image = cv2.resize(image, (new_width, new_height), interpolation=cv2.INTER_LANCZOS4)

    return image


pipeline = StableDiffusionXLPipeline.from_pretrained(
    "SG161222/RealVisXL_V4.0",
    torch_dtype=torch.float16,
    variant="fp16",
    custom_pipeline="pipeline_stable_diffusion_xl_differential_img2img",
).to("cuda")
pipeline.scheduler = DPMSolverMultistepScheduler.from_config(pipeline.scheduler.config, use_karras_sigmas=True)

pipeline.load_ip_adapter(
    "h94/IP-Adapter",
    subfolder="sdxl_models",
    weight_name=[
        "ip-adapter-plus_sdxl_vit-h.safetensors",
    ],
    image_encoder_folder="models/image_encoder",
)
pipeline.set_ip_adapter_scale(0.1)


def generate_image(prompt, negative_prompt, image, mask, ip_adapter_image, seed: int = None):
    if seed is None:
        seed = random.randint(0, 2**32 - 1)

    generator = torch.Generator(device="cpu").manual_seed(seed)

    image = pipeline(
        prompt=prompt,
        negative_prompt=negative_prompt,
        width=1024,
        height=1024,
        guidance_scale=4.0,
        num_inference_steps=25,
        original_image=image,
        image=image,
        strength=1.0,
        map=mask,
        generator=generator,
        ip_adapter_image=[ip_adapter_image],
        output_type="np",
    ).images[0]

    image = (image * 255).astype(np.uint8)
    image = cv2.cvtColor(image, cv2.COLOR_BGR2RGB)

    return image


prompt = ""
negative_prompt = ""
direction = "right"  # left, right, top, bottom
inpaint_mask_color = 50  # lighter use more of the Telea inpainting
expand_pixels = 256  # I recommend to don't go more than half of the picture so it has context
times_to_expand = 4

url = "https://huggingface.co/datasets/OzzyGT/testing-resources/resolve/main/differential/photo-1711580377289-eecd23d00370.jpeg?download=true"

with urllib.request.urlopen(url) as url_response:
    img_array = np.array(bytearray(url_response.read()), dtype=np.uint8)

original = cv2.imdecode(img_array, -1)
image = image_resize(original)
expand_pixels_to_square = 1024 - image.shape[1]  # image.shape[1] for horizontal, image.shape[0] for vertical
image, mask = process_image(
    image, expand_pixels=expand_pixels_to_square, direction=direction, inpaint_mask_color=inpaint_mask_color
)

ip_adapter_image = []
for index, part in enumerate(slice_image(original)):
    ip_adapter_image.append(part)

generated = generate_image(prompt, negative_prompt, image, mask, ip_adapter_image)
final_image = generated

for i in range(times_to_expand):
    image, mask = process_image(
        final_image, direction=direction, expand_pixels=expand_pixels, inpaint_mask_color=inpaint_mask_color
    )

    ip_adapter_image = []
    for index, part in enumerate(slice_image(generated)):
        ip_adapter_image.append(part)

    generated = generate_image(prompt, negative_prompt, image, mask, ip_adapter_image)
    final_image = merge_images(final_image, generated, 256, direction)

cv2.imwrite("result.png", final_image)