使用 Kili 和 HuggingFace AutoTrain 進行意見分類


引言
在任何與使用者相關的業務中,瞭解使用者需求都至關重要。但這需要大量的努力和分析,而且成本相當高。那麼為什麼不利用機器學習呢?透過使用 Auto ML,可以大大減少編碼量。
在本文中,我們將利用 HuggingFace AutoTrain 和 Kili 構建一個用於文字分類的主動學習管道。Kili 是一個透過建立高質量訓練資料來支援以資料為中心的機器學習方法的平臺。它提供協作式資料標註工具和 API,可在可靠的資料集構建和模型訓練之間實現快速迭代。主動學習是一個將標註資料新增到資料集,然後迭代重新訓練模型的過程。因此,它是無止境的,需要人工標註資料。
作為本文的具體示例用例,我們將使用 Google Play 商店中 Medium 的使用者評論來構建我們的管道。之後,我們將使用構建的管道對評論進行分類。最後,我們將對分類後的評論進行情感分析。然後,我們將分析結果,這將使理解使用者需求和滿意度變得容易得多。
使用 HuggingFace 進行 AutoTrain
自動化機器學習是自動化機器學習管道的一個術語。它還包括資料清洗、模型選擇和超引數最佳化。我們可以使用 🤗 Transformers 進行自動超引數搜尋。超引數最佳化是一個困難且耗時的過程。
雖然我們可以使用 Transformers 和其他強大的 API 自行構建管道,但也可以使用 AutoTrain 完全自動化此過程。AutoTrain 構建在許多強大的 API 上,如 Transformers、Datasets 和 Inference-API。
資料清洗、模型選擇和超引數最佳化步驟在 AutoTrain 中都是完全自動化的。人們可以充分利用這個框架來為特定任務構建生產就緒的 SOTA Transformer 模型。目前,AutoTrain 支援二進位制和多標籤文字分類、Token 分類、抽取式問答、文字摘要和文字評分。它還支援多種語言,如英語、德語、法語、西班牙語、芬蘭語、瑞典語、印地語、荷蘭語以及更多。如果您的語言不受 AutoTrain 支援,也可以使用自定義模型和自定義分詞器。
Kili
Kili 是一個面向資料中心業務的端到端人工智慧訓練平臺。Kili 提供最佳化的標註功能和質量管理工具來管理您的資料。您可以快速標註影像、影片、文字、PDF 和語音資料,同時控制資料集的質量。它還具有用於 GraphQL 和 Python 的強大 API,大大簡化了資料管理。
它提供線上或本地部署版本,支援計算機視覺、自然語言處理和光學字元識別等現代機器學習技術。它支援文字分類、命名實體識別 (NER)、關係抽取以及更多 NLP/OCR 任務。它還支援物件檢測、影像轉錄、影片分類、語義分割等計算機視覺任務!
Kili 是一款商業工具,但您也可以建立一個免費的開發者賬戶來試用 Kili 的工具。您可以在定價頁面瞭解更多資訊。
專案
我們將以評論分類和情感分析為例,以瞭解移動應用程式的洞察。
我們從 Google Play 商店提取了大約 4 萬條 Medium 的評論。我們將逐步標註此資料集中的評論文字。然後,我們將構建一個評論分類管道。在建模中,第一個模型將使用 AutoTrain 進行準備。然後我們還將構建一個不使用 AutoTrain 的模型。
所有程式碼和資料集都可以在專案的 GitHub 倉庫中找到。
資料集
讓我們先看一下原始資料集,
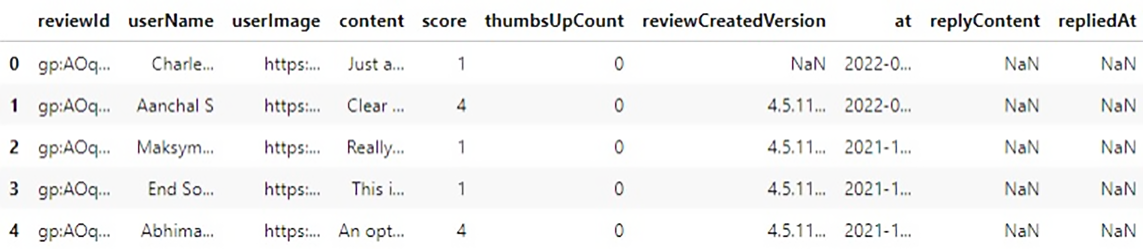
此資料集中有 10 列和 40130 個樣本。我們唯一需要的列是 `content`,它是使用者的評論。在開始之前,我們需要定義一些類別。
我們定義了 4 個類別,
- 訂閱:由於 Medium 有訂閱選項,任何與使用者對訂閱功能的意見相關的內容都應歸入此類。
- 內容:Medium 是一個分享平臺,有從詩歌到高階人工智慧研究的各種文章。使用者對各種主題、內容質量的意見都應歸入此類。
- 介面:關於使用者介面、文章搜尋、推薦引擎以及任何與介面相關的問題都應歸入此類。這也包括與支付相關的問題。
- 使用者體驗:使用者對應用程式的總體想法和意見。這應該通常是抽象的,不指示其他類別。
對於標籤部分,我們首先需要在 Kili 平臺中建立一個專案。我們可以使用平臺的 Web 介面或 API。讓我們看看兩者。
從網頁介面
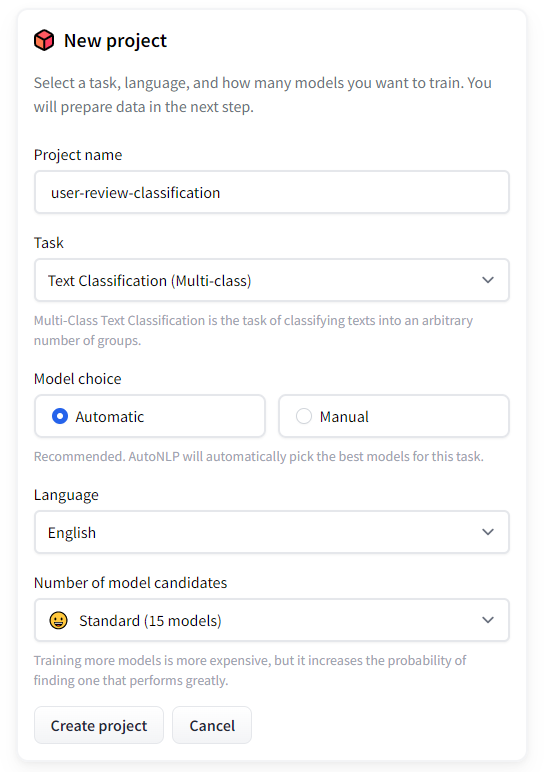
從專案列表頁面,我們建立一個多類文字分類專案。

之後,在專案頁面上,您可以透過單擊“新增資產”按鈕新增資料。目前,您最多可以新增 25000 個樣本,但如果您聯絡 Kili 銷售團隊,可以擴充套件此限制。
建立專案後,我們需要新增任務。我們可以在“設定”頁面準備一個標註介面。
雖然我們定義了 4 個類別,但不可避免地會遇到應該具有多個類別或完全奇怪的評論。我將新增另外兩個標籤(不用於建模)來捕獲這些情況。
在我們的示例中,我們添加了兩個額外的標籤(“其他”、“多標籤”)。我們還添加了一個命名實體識別 (NER) 作業,只是為了指定我們在標註時如何決定一個標籤。最終介面如下所示
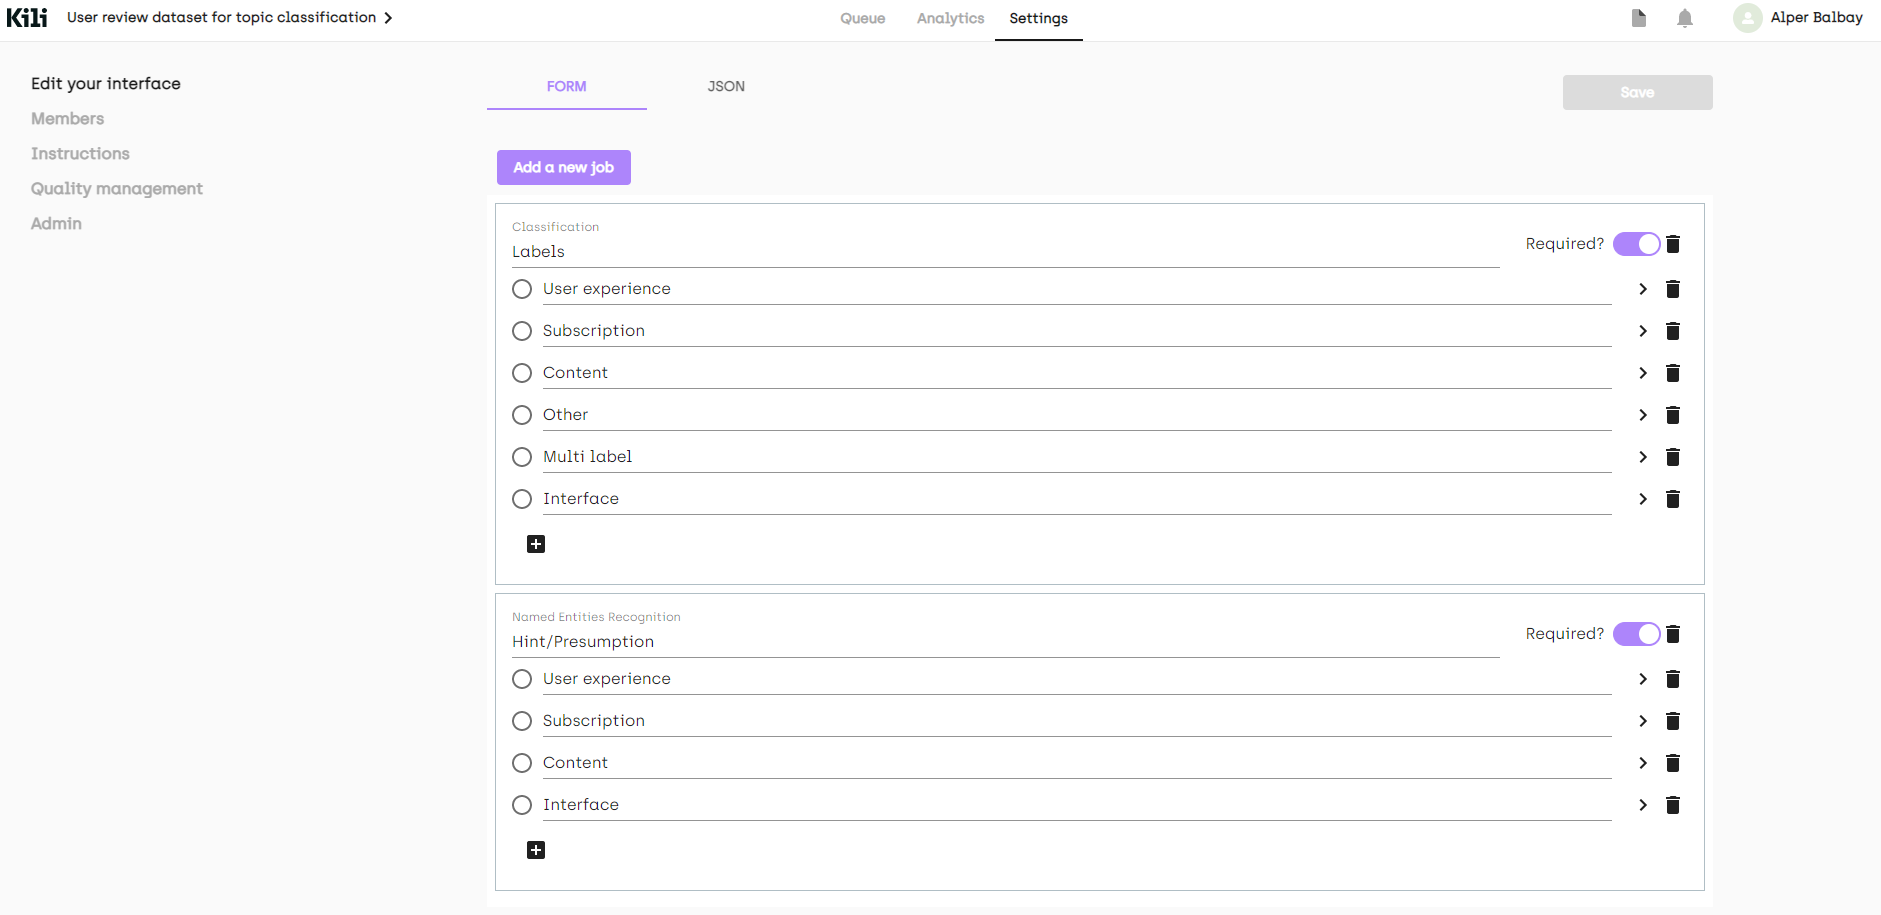
正如您從左側選單中看到的,也可以在“說明”頁面上放置一個描述您的標籤的連結。我們還可以從“成員”新增其他成員到我們的專案,或者從“質量管理”頁面新增質量度量。更多資訊可以在文件中找到。
現在,讓我們使用 Python API 建立我們的專案。
首先,我們需要匯入所需的庫。
(notebooks/kili_project_management.ipynb)
import os
#we will process the data (which is a csv file)
import pandas as pd

#API client
from kili.client import Kili
#Why not use pretty progress bars?
from tqdm import tqdm

from dotenv import load_dotenv
load_dotenv()
為了訪問平臺,我們需要驗證我們的客戶端。
API_KEY = os.getenv('KILI_API_KEY')
# initialize and authenticate the Kili client
kili = Kili(api_key = API_KEY)
現在我們可以開始準備我們的介面,介面在 Python 中只是一個字典。我們將定義我們的作業,然後填充標籤。由於所有標籤也可以有子標籤,我們也會將標籤作為字典傳遞。
labels = ['User experience', 'Subscription', 'Content', 'Other', 'Multi label']
entity_dict = {
    'User experience': '#cc4125',
    'Subscription': '#4543e6',
    'Content': '#3edeb6',
}
project_name = 'User review dataset for topic classification'
project_description = "Medium's app reviews fetched from google play store for topic classification"

interface = {
    'jobs': {
        'JOB_0': {
            'mlTask': 'CLASSIFICATION',
            'instruction': 'Labels',
            'required': 1,
            'content': {
                "categories": {},
                "input": "radio",
            },
        },
        'JOB_1': {
            'mlTask': "NAMED_ENTITIES_RECOGNITION",
            'instruction': 'Entities',
            'required': 1,
            'content': {
                'categories': {},
                "input": "radio"
            },
        },
    }
}

# fill the interface json with jobs
for label in labels:
    # converts labels to uppercase and replaces whitespaces with underscores (_)
    # ex. User experience -> USER_EXPERIENCE
    # this is the preferred way to fill the interface
    label_upper = label.strip().upper().replace(' ', '_')
    #
    content_dict_0 = interface['jobs']['JOB_0']['content']
    categories_0 = content_dict_0['categories']
    category = {'name': label, 'children': []}
    categories_0[label_upper] = category

for label, color in entity_dict.items():
    label_upper = label.strip().upper().replace(' ', '_')
    content_dict_1 = interface['jobs']['JOB_1']['content']
    categories_1 = content_dict_1['categories']
    category = {'name': label, 'children': [], 'color': color}
    categories_1[label_upper] = category

# now we can create our project
# this method returns the created project’s id
project_id = kili.create_project(json_interface=interface,
                            input_type='TEXT',
                            title=project_name,
                            description=project_description)['id']
我們已準備好將資料上傳到專案。`append_many_to_dataset` 方法可用於將資料匯入平臺。透過使用 Python API,我們可以最大批次匯入 100 個數據。這是一個上傳資料的簡單函式。
def import_dataframe(project_id:str, dataset:pd.DataFrame, text_data_column:str, external_id_column:str, subset_size:int=100) -> bool:
    """
    Arguments:
    Inputs
        - project_id (str): specifies the project to load the data, this is also returned when we create our project
        - dataset (pandas DataFrame): Dataset that has proper columns for id and text inputs
        - text_data_column (str): specifies which column has the text input data
        - external_id_column (str): specifies which column has the ids
        - subset_size (int): specifies the number of samples to import at a time. Cannot be higher than 100

    Outputs:
        None

    Returns:
        True or False regards to process succession

    """

    assert subset_size <= 100, "Kili only allows to upload 100 assets at most at a time onto the app"


    L = len(dataset)

    # set 25000 as an upload limit, can be changed
    if L>25000:
        print('Kili Projects currently supports maximum 25000 samples as default. Importing first 25000 samples...')
        L=25000

    i = 0

    while i+subset_size < L:

        subset = dataset.iloc[i:i+subset_size]

        externalIds = subset[external_id_column].astype(str).to_list()
        contents = subset[text_data_column].astype(str).to_list()

        kili.append_many_to_dataset(project_id=project_id,
                                    content_array=contents,
                                    external_id_array=externalIds)

        i += subset_size

    return True
它只是將給定的 `dataset` DataFrame 匯入到由 project_id 指定的專案中。
我們可以從 docstring 中看到引數,我們只需要傳遞我們的資料集以及相應的列名。我們只需使用載入資料時獲得的樣本索引。然後,瞧,資料上傳就完成了!
dataset_path = '../data/processed/lowercase_cleaned_dataset.csv'
df = pd.read_csv(dataset_path).reset_index() # reset index to get the indices

import_dataframe(project_id, df, 'content', 'index')
使用 Python API 並不困難,我們使用的輔助方法解決了許多難題。我們還使用了另一個指令碼來檢查資料集更新後的新樣本。有時模型效能會在資料集更新後下降。這是由於簡單的錯誤,如錯誤標記和引入資料集偏差。該指令碼只是簡單地進行身份驗證,然後將兩個給定資料集版本的不同樣本移動到“待稽核”。我們可以透過 `update_properties_in_assets` 方法更改樣本的屬性
(scripts/move_diff_to_review.py)
# Set up the Kili client and arguments
from kili.client import Kili
from dotenv import load_dotenv
import os
import argparse

import pandas as pd

load_dotenv()

parser = argparse.ArgumentParser()
parser.add_argument('--first',
                    required=True,
                    type=str,
                    help='Path to first dataframe')
parser.add_argument('--second',
                    required=True,
                    type=str,
                    help='Path to second dataframe')

args = vars(parser.parse_args())

# set the kili connection up
API_KEY = os.getenv('KILI_API_KEY')
kili = Kili(API_KEY)

# read dataframes
df1 = pd.read_csv(args['first'])
df2 = pd.read_csv(args['second'])

# concating two of them should let us have duplicates of common elements
# then we can drop the duplicated elements without keeping any duplicates to get the different elements across the two dataframes
diff_df = pd.concat((df1, df2)).drop_duplicates(keep=False)
diff_ids = diff_df['id'].to_list()

# The changes should be given as an array that
# contains the change for every single sample.
# That’s why [‘TO_REVIEW’] * len(diff_df) is passed to status_array argument
kili.update_properties_in_assets(diff_ids,
                                 status_array=['TO_REVIEW'] * len(diff_ids))

print('SET %d ENTRIES TO BE REVIEWED!' % len(diff_df))
標註
既然我們已經上傳了源資料,平臺有一個內建的標註介面,使用起來非常容易。可用的鍵盤快捷鍵在標註資料時提供了幫助。我們輕鬆使用了該介面,有自動定義的快捷鍵,它簡化了標註。我們可以透過點選介面右上角的鍵盤圖示檢視快捷鍵,它們也在標註介面的右側以下劃線字元顯示。
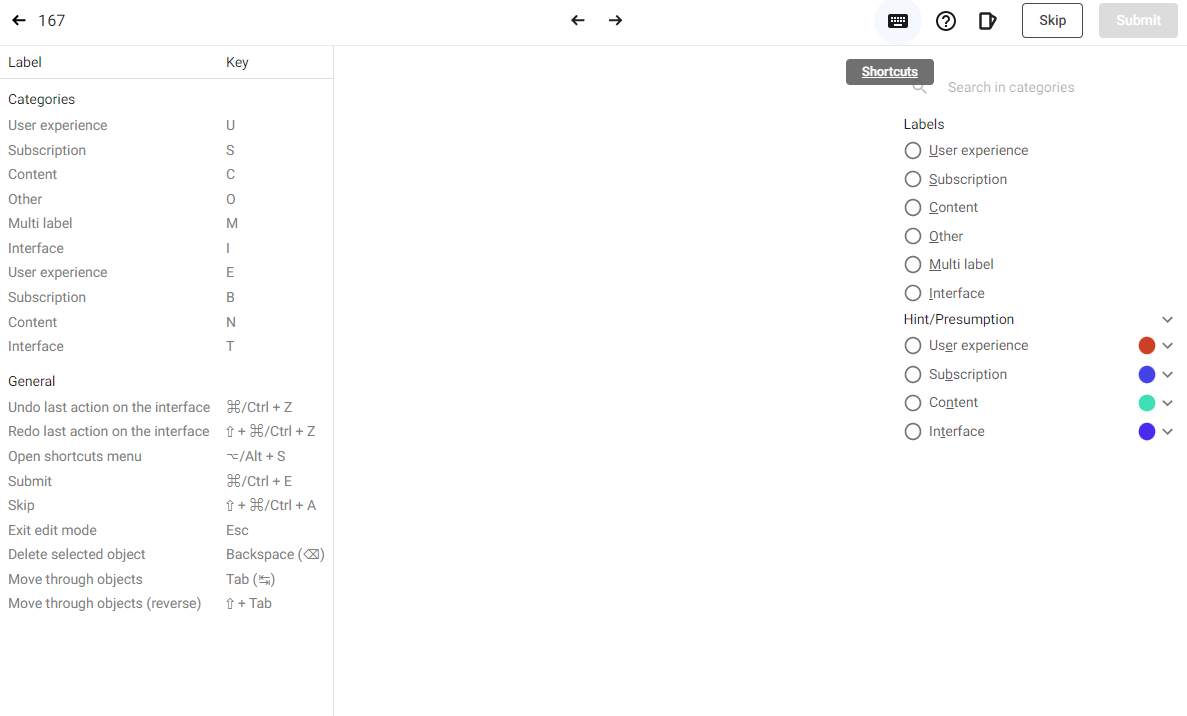
有些樣本非常奇怪,因此我們在標註時決定跳過它們。總的來說,由於 Kili 的內建平臺,整個過程要容易得多。
匯出標註資料
使用 Python API 可以輕鬆匯出標註資料。下面的指令碼將標註和稽核過的樣本匯出到資料框中,然後以給定名稱將其儲存為 CSV 檔案。
import argparse
import os

import pandas as pd
from dotenv import load_dotenv
from kili.client import Kili

load_dotenv()

parser = argparse.ArgumentParser()
parser.add_argument('--output_name',
                    required=True,
                    type=str,
                    default='dataset.csv')
parser.add_argument('--remove', required=False, type=str)
args = vars(parser.parse_args())

API_KEY = os.getenv('KILI_API_KEY')
dataset_path = '../data/processed/lowercase_cleaned_dataset.csv'
output_path = os.path.join('../data/processed', args['output_name'])


def extract_labels(labels_dict):
    response = labels_dict[-1]  # pick the latest version of the sample
    label_job_dict = response['jsonResponse']['JOB_0']
    categories = label_job_dict['categories']
    # all samples have a label, we can just pick it by its index
    label = categories[0]['name']
    return label


kili = Kili(API_KEY)
print('Authenticated!')
# query will return a list that contains matched elements (projects in this case)
# since we have only one project with this name, we can just pick the first index
project = kili.projects(
    search_query='User review dataset for topic classification')[0]
project_id = project['id']

# we can customize the returned fields
# the fields below are pretty much enough,
# labels.jsonResponse carries the labeling data
returned_fields = [
    'id', 'externalId', 'labels.jsonResponse', 'skipped', 'status'
]
# I read the raw dataset too in order to match the samples with externalId
dataset = pd.read_csv(dataset_path)

# we can fetch the data as a dataframe
df = kili.assets(project_id=project_id,
                 status_in=['LABELED', 'REVIEWED'],
                 fields=returned_fields,
                 format='pandas')

print('Got the samples!')

# we will pass the skipped samples
df_ns = df[~df['skipped']].copy()

# extract the labeled samples
df_ns.loc[:, 'label'] = df_ns['labels'].apply(extract_labels)
# The externalId column is returned as string, let’s convert it to integer
# to use as indices
df_ns.loc[:, 'content'] = dataset.loc[df_ns.externalId.astype(int), 'content']

# we can drop the `labels` column now
df_ns = df_ns.drop(columns=['labels'])

# we'll remove the multi-labeled samples
df_ns = df_ns[df_ns['label'] != 'MULTI_LABEL'].copy()

# also remove the samples with label specified in remove argument if it's given
if args['remove']:
    df_ns = df_ns.drop(index=df_ns[df_ns['label'] == args['remove']].index)

print(‘DATA FETCHING DONE')
print('DATASET HAS %d SAMPLES' % (len(df_ns)))
print('SAVING THE PROCESSED DATASET TO: %s' % os.path.abspath(output_path))

df_ns.to_csv(output_path, index=False)

print('DONE!')
太棒了!我們現在已經將標註資料作為 CSV 檔案。讓我們在 HuggingFace 中建立一個數據集倉庫並將其上傳到那裡!
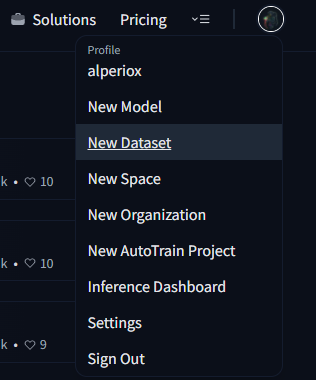
這真的很簡單,只需點選您的個人資料圖片並選擇“新建資料集”選項。
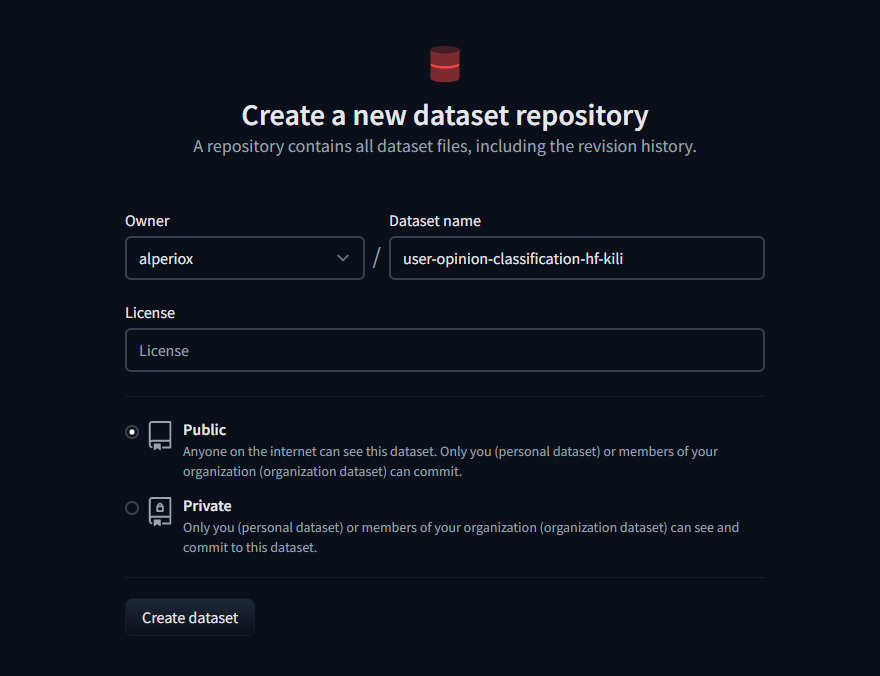
然後輸入倉庫名稱,選擇一個許可證(如果需要),就完成了!
現在我們可以在“檔案和版本”選項卡中從“新增檔案”上傳資料集。

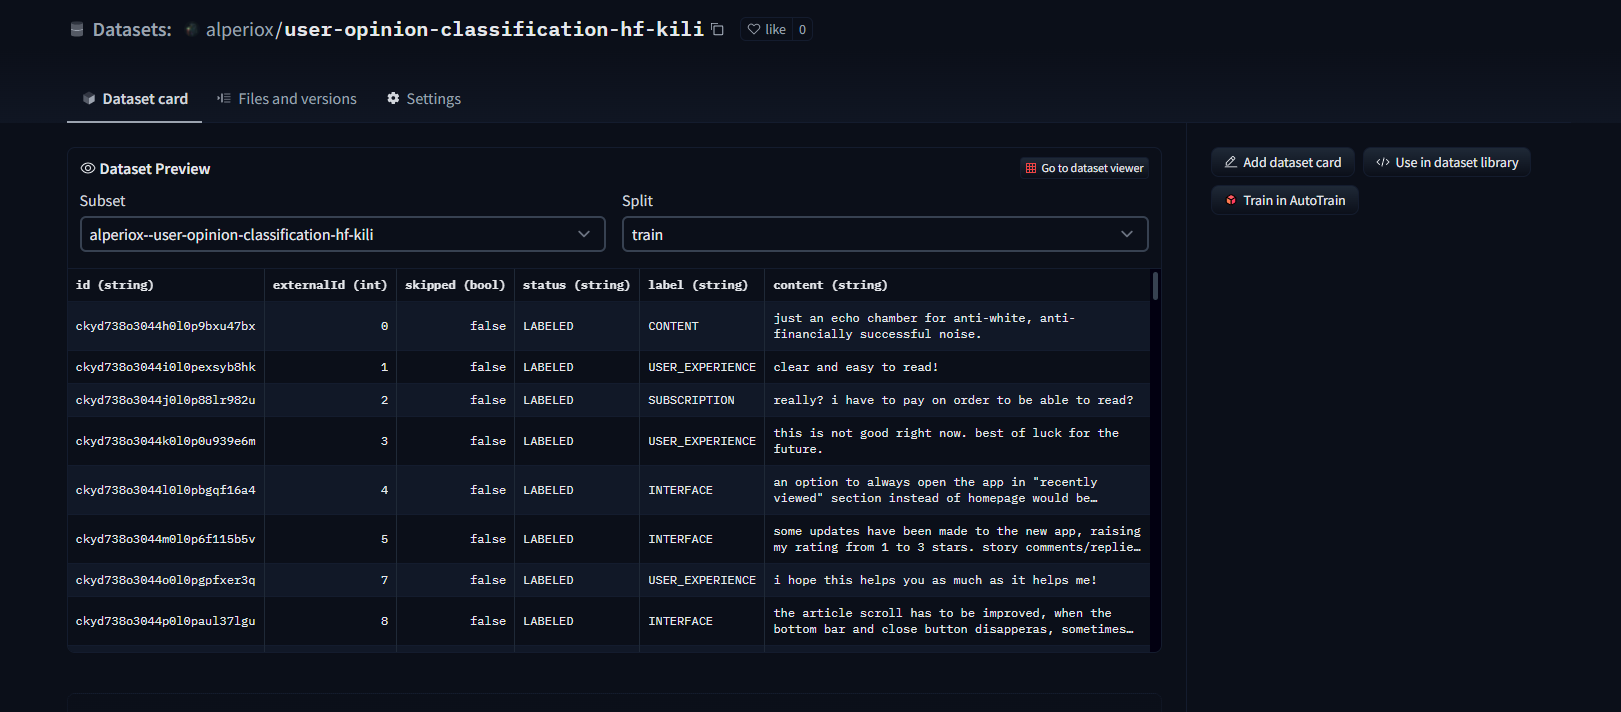
資料集檢視器在資料上傳後自動可用,我們可以輕鬆檢查樣本!
也可以使用 `datasets` 包將資料集上傳到 Hugging Face 的資料集中心。
建模
讓我們使用主動學習。我們迭代地標註和微調模型。在每次迭代中,我們標註資料集中 50 個樣本。樣本數量如下所示
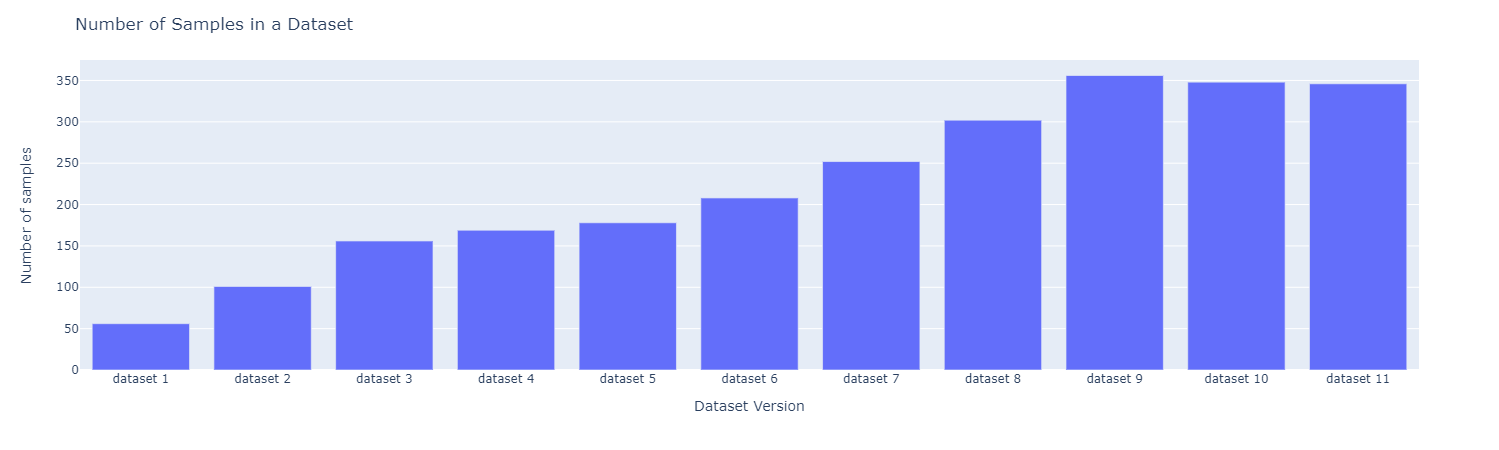
讓我們先嚐試 AutoTrain
首先,開啟 AutoTrain
- 建立一個專案
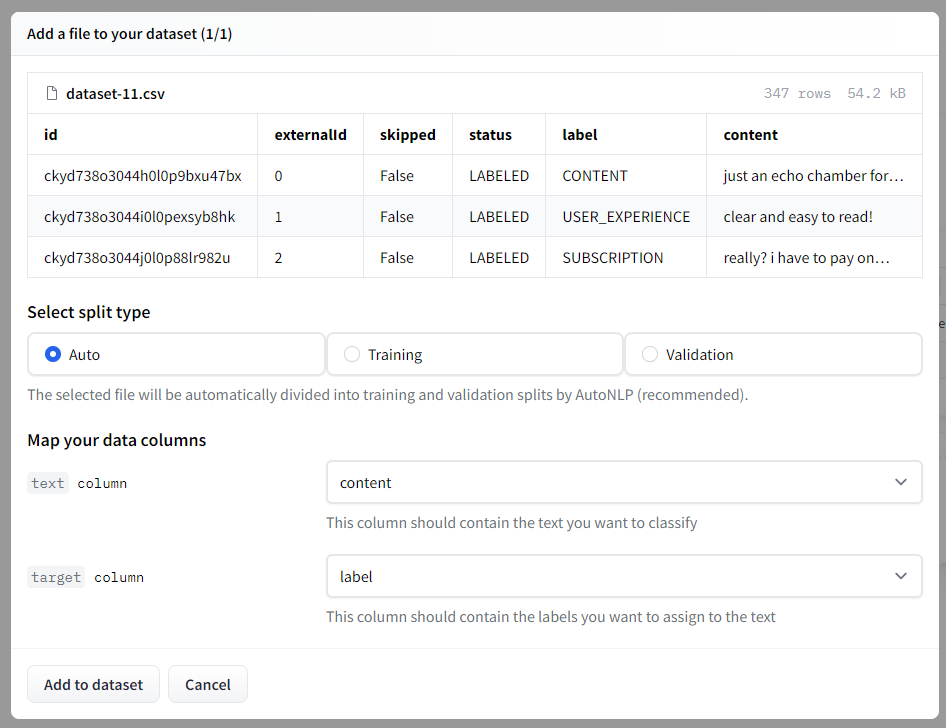
- 我們可以選擇之前建立的資料集儲存庫或再次上傳資料集。然後我們需要選擇拆分型別,我將保留為自動。
- 訓練模型
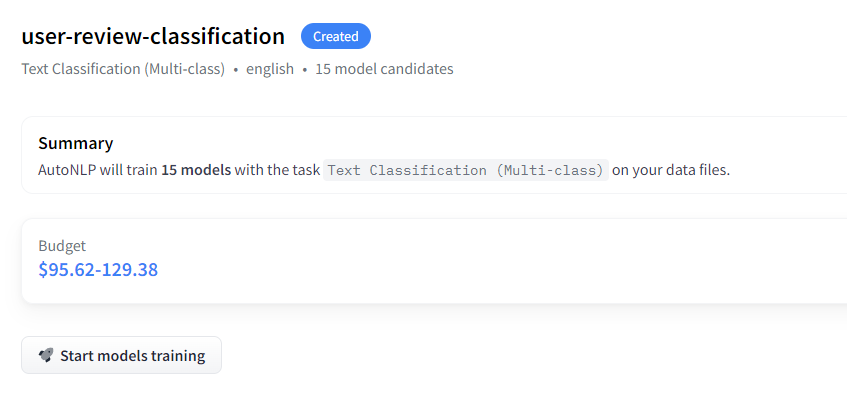
AutoTrain 將嘗試不同的模型並選擇最佳模型。然後自動執行超引數最佳化。資料集也自動處理。
價格完全取決於您的用例。它可以低至 10 美元,也可以比當前價值更昂貴。
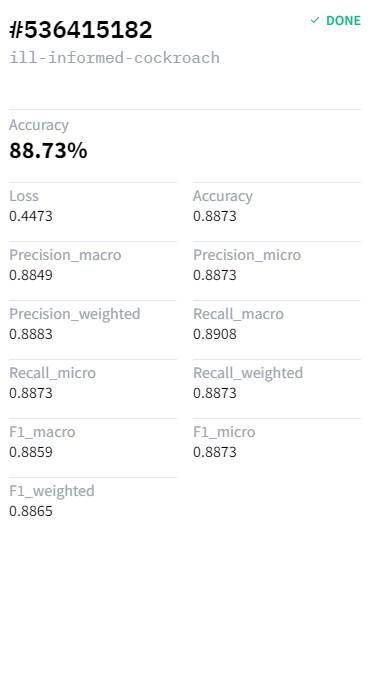
訓練大約在 20 分鐘後完成,結果非常好!
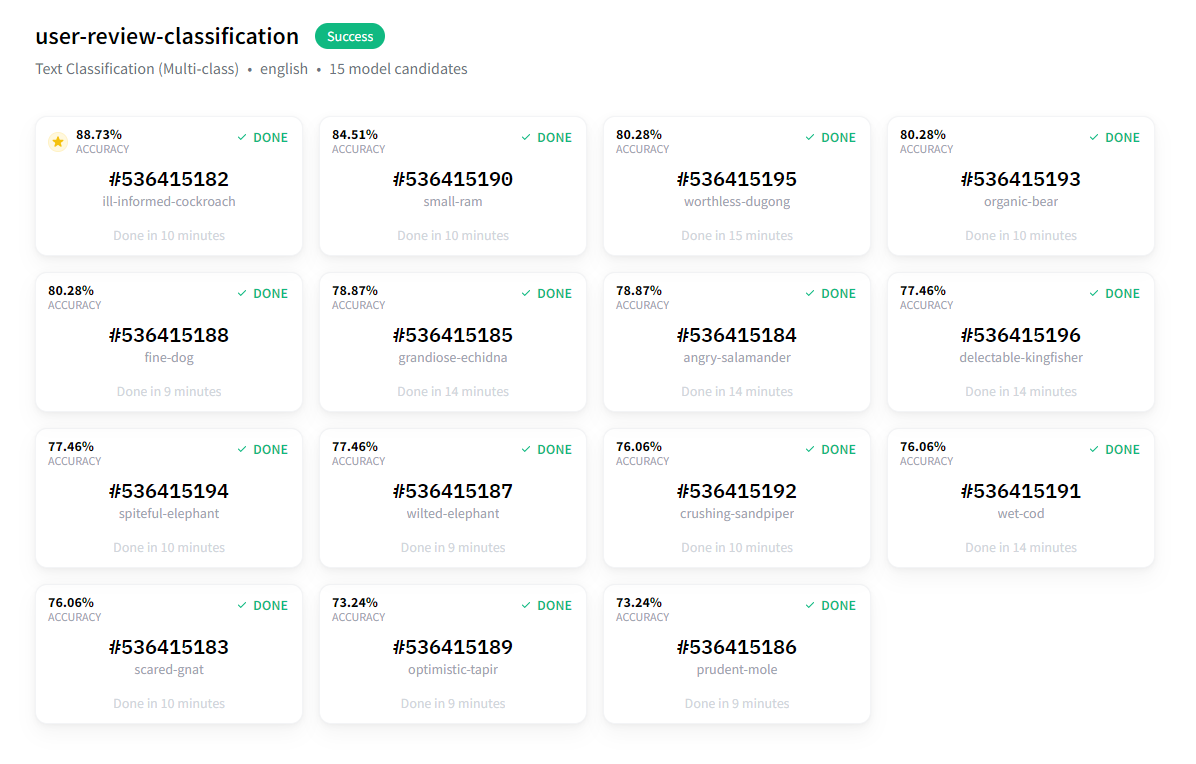
最佳模型的準確率幾乎達到 89%。
現在我們可以使用這個模型進行分析,整個設定只花了大約 30 分鐘。
不使用 AutoTrain 的建模
我們將使用 Ray Tune 和 Hugging Face 的 Trainer API 來搜尋超引數並微調預訓練的深度學習模型。我們選擇了在推文上訓練的 roBERTa 基礎情感分類模型進行微調。我們已經在 Google Colaboratory 上微調了模型,並且可以在 GitHub 倉庫的 `notebooks` 資料夾中找到它。
Ray tune 是一個流行的超引數最佳化庫,它開箱即用地提供了許多 SOTA 演算法。也可以使用 Optuna 和 SigOpt。我們還使用了 [非同步逐次減半演算法 (ASHA) 作為排程器,以及 HyperOpt 作為搜尋演算法。這基本上是一個起點。您可以使用不同的排程器和搜尋演算法。
我們要做什麼?
- 匯入必要的庫(十幾個)並準備一個數據集類
- 定義處理資料所需的函式和方法
- 載入預訓練模型和分詞器
- 執行超引數搜尋
- 使用最佳結果進行評估
讓我們從匯入必要的庫開始!(所有程式碼都在 notebooks/modeling.ipynb 和 Google Colaboratory 筆記本中)
# general data science/utilization/visualization imports
import json
import os
import random

# progress bar
from tqdm import tqdm

# data manipulation / reading
import numpy as np
import pandas as pd

# visualization
import plotly.express as px
import matplotlib.pyplot as plt

# pre-defined evaluation metrics
from sklearn.metrics import (accuracy_score, f1_score,
                             precision_score, recall_score)

from sklearn.model_selection import train_test_split
# torch imports
import torch
import torch.nn as nn
from torch.utils.data import DataLoader, Dataset, random_split
# huggingface imports
import transformers
from datasets import load_metric
from transformers import (AutoModelForSequenceClassification, AutoTokenizer,
                          Trainer, TrainingArguments)

# ray tune imports for hyperparameter optimization
from ray.tune.schedulers import ASHAScheduler, PopulationBasedTraining
from ray.tune.suggest.hyperopt import HyperOptSearch
我們將為我們使用的庫設定一個種子以確保可重現性
def seed_all(seed):
    torch.manual_seed(seed)
    random.seed(seed)
    np.random.seed(seed)

SEED=42
seed_all(SEED)
現在讓我們定義我們的資料集類!
class TextClassificationDataset(Dataset):
    def __init__(self, dataframe):
        self.labels = dataframe.label.to_list()
        self.inputs = dataframe.content.to_list()
        self.labels_to_idx = {k:v for k,v in labels_dict.items()} # copy the labels_dict dictionary

    def __len__(self):
        return len(self.inputs)

    def __getitem__(self, idx):
        if type(idx)==torch.Tensor:
            idx = list(idx)

        input_data = self.inputs[idx]
        target = self.labels[idx]
        target = self.labels_to_idx[target]

        return {'text': input_data, 'label':target}
我們可以透過指定 HuggingFace Hub 倉庫輕鬆下載模型。還需要為指定模型匯入分詞器。我們必須提供一個函式來在超引數最佳化期間初始化模型。模型將在那裡定義。
要最佳化的指標是準確性,我們希望這個值儘可能高。因此,我們需要載入指標,然後定義一個函式來獲取預測並計算首選指標。
model_name = 'cardiffnlp/twitter-roberta-base-sentiment'
# we will perform the search to optimize the model accuracy,
# we need to specify and load the accuracy metric as a first step
metric = load_metric("accuracy")


# since we already entered a model name, we can load the tokenizer
# we can also load the model but i'll describe it in the model_init function.
tokenizer = AutoTokenizer.from_pretrained(model_name)


def model_init():
    """
    Hyperparameter optimization is performed by newly initialized models,
    therefore we will need to initialize the model again for every single search run.
    This function initializes and returns the pre-trained model selected with `model_name`
    """
    return AutoModelForSequenceClassification.from_pretrained(model_name, num_labels=4, return_dict=True, ignore_mismatched_sizes=True)

# the function to calculate accuracy
def compute_metrics(eval_pred):
    logits, labels = eval_pred
    predictions = np.argmax(logits, axis=-1) # just pick the indices that has the maximum values
    return metric.compute(predictions=predictions, references=labels)
定義度量計算和模型初始化函式後,我們可以載入資料。
file_name = "dataset-11.csv"

dataset_path = os.path.join('data/processed', file_name)
dataset = pd.read_csv(dataset_path)
我還定義了兩個字典,用於將標籤對映到索引,將索引對映到標籤。
idx_to_label = dict(enumerate(dataset.label.unique()))
labels_dict = {v:k for k,v in idx_to_label.items()}
現在我們可以定義超引數搜尋的搜尋演算法和排程器。
scheduler =  ASHAScheduler(metric='objective', mode='max')
search_algorithm = HyperOptSearch(metric='objective', mode='max', random_state_seed=SEED)
# number of runs for parameter searching
n_trials =  40
在將文字資料傳遞給模型之前,我們還需要對其進行分詞,我們可以使用載入的分詞器輕鬆完成此操作。Ray Tune 在黑盒設定下工作,因此我使用分詞器作為變通方法的預設引數。否則,會產生關於分詞器定義的錯誤。
def tokenize(sample, tokenizer=tokenizer):
    tokenized_sample = tokenizer(sample['text'], padding=True, truncation=True)
    tokenized_sample['label'] = sample['label']
    return tokenized_sample
另一個實用函式,返回分層和分詞後的 PyTorch 資料集拆分。
def prepare_datasets(dataset_df, test_size=.2, val_size=.2):
    train_set, test_set = train_test_split(dataset_df, test_size=test_size,
                                        stratify=dataset_df.label, random_state=SEED)

    train_set, val_set = train_test_split(train_set, test_size=val_size,
                                        stratify=train_set.label, random_state=SEED)

    # shuffle the dataframes beforehand
    train_set = train_set.sample(frac=1, random_state=SEED)
    val_set = val_set.sample(frac=1, random_state=SEED)
    test_set = test_set.sample(frac=1, random_state=SEED)

    # convert dataframes to torch datasets
    train_dataset = TextClassificationDataset(train_set)
    val_dataset = TextClassificationDataset(val_set)
    test_dataset = TextClassificationDataset(test_set)

    # tokenize the datasets
    tokenized_train_set = train_dataset.map(tokenize)
    tokenized_val_set = val_dataset.map(tokenize)
    tokenized_test_set = test_dataset.map(tokenize)

    # finally return the processed sets
    return tokenized_train_set, tokenized_val_set, tokenized_test_set
現在我們可以開始搜尋了!讓我們從處理資料開始。
tokenized_train_set, tokenized_val_set, tokenized_test_set = prepare_datasets(dataset)

training_args = TrainingArguments(
    'trial_results',
    evaluation_strategy="steps",
    disable_tqdm=True,
    skip_memory_metrics=True,
)

trainer = Trainer(
    args=training_args,
    tokenizer=tokenizer,
    train_dataset=tokenized_train_set,
    eval_dataset=tokenized_val_set,
    model_init=model_init,
    compute_metrics=compute_metrics
    )

best_run = trainer.hyperparameter_search(
    direction="maximize",
    n_trials=n_trials,
    backend="ray",
    search_alg=search_algorithm,
    scheduler=scheduler
    )
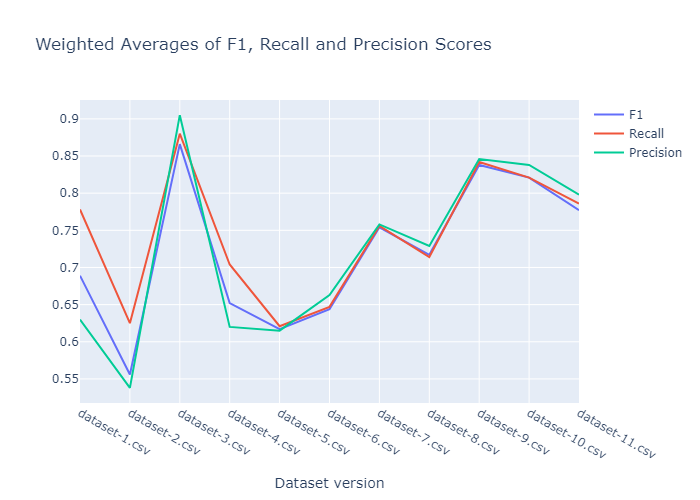
我們分別進行了 20 次和 40 次試驗的搜尋,結果如下所示。20 次執行的 F1、召回率和精確度得分的加權平均值。
40 次執行的 F1、召回率和精確度得分的加權平均值。
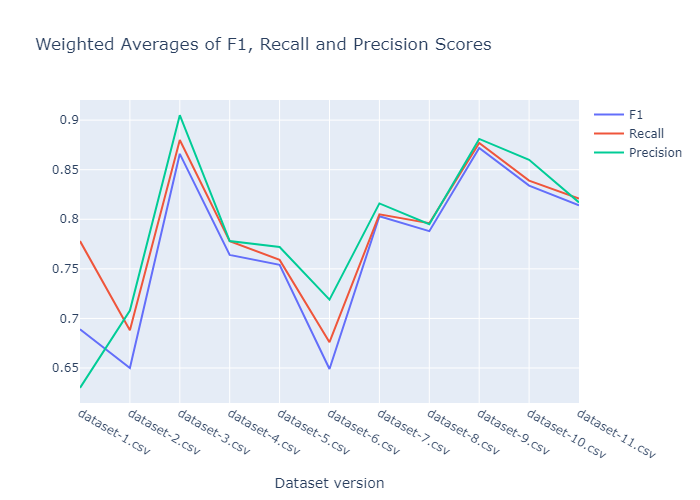
效能在第三個資料集版本時飆升。在資料標註的某個時刻,我不小心給資料集引入了太多的偏差。正如我們所看到的,由於樣本方差後來增加,其效能變得更加合理。最終模型儲存在 Google Drive 上,可以從這裡下載,也可以透過 download_models.py 指令碼下載。
最終分析
現在我們可以使用微調過的模型進行最終分析。我們所要做的就是載入資料,處理它,並從模型中獲取預測結果。然後我們可以使用預訓練模型進行情感分析,並希望能獲得洞察。
我們在 Google Colab 中進行推理(這裡),然後將結果匯出到 result.csv。它可以在 GitHub 倉庫的 `results` 資料夾中找到。然後我們在另一個 Google Colaboratory 筆記本中分析結果,以獲得互動式體驗。因此您也可以輕鬆互動地使用它。
現在讓我們檢查一下結果!
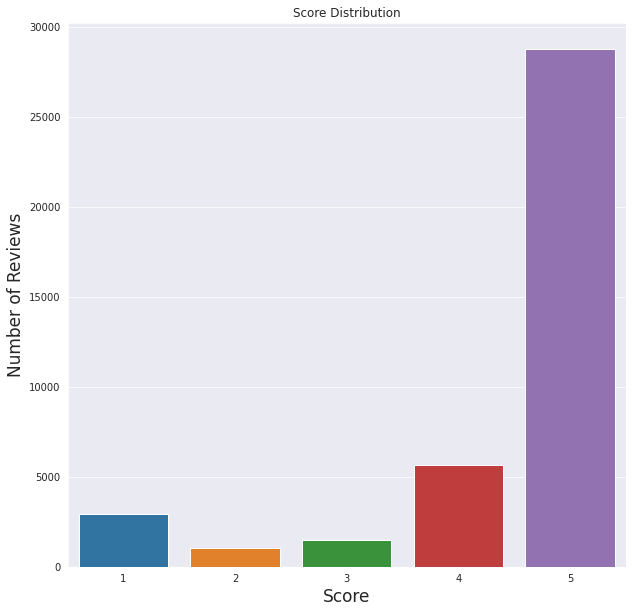
我們可以看到給定的分數非常積極。總的來說,使用者喜歡這個應用程式。
這也與情感分析結果吻合,大多數評論是積極的,而負面評論的數量最少。
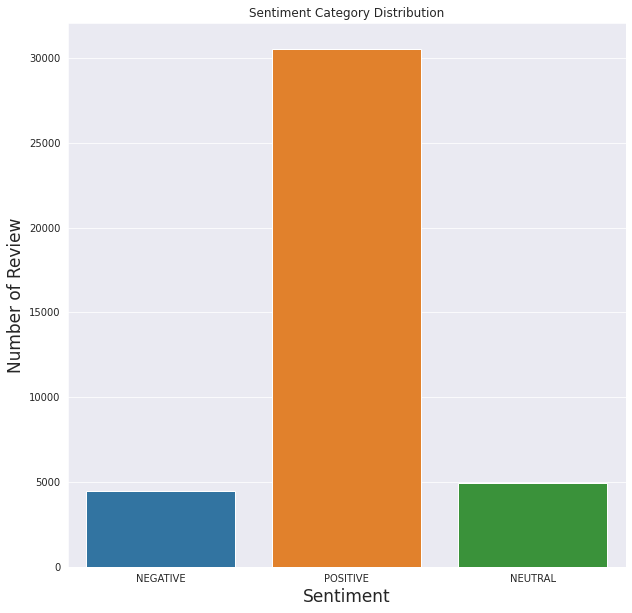
正如我們從上面看到的,模型的效能是可以理解的。積極分明顯高於其他分數,就像情感分析圖表顯示的那樣。
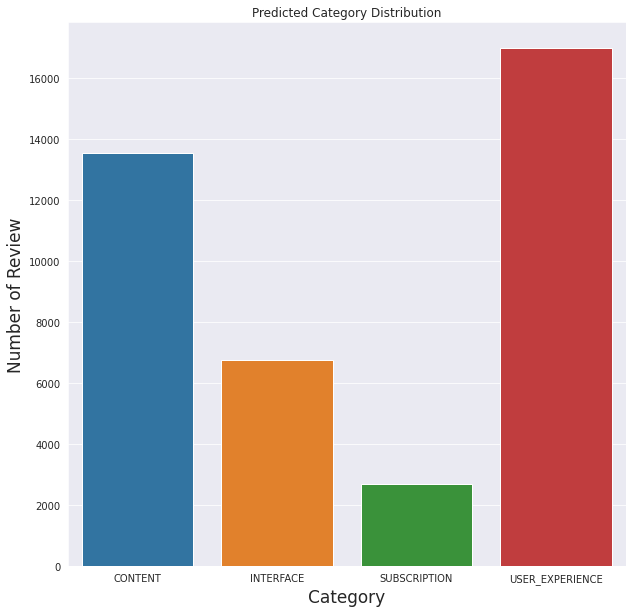
就之前定義的類別而言,模型似乎預測大多數評論都與使用者體驗有關(不包括與其他類別相關的體驗)
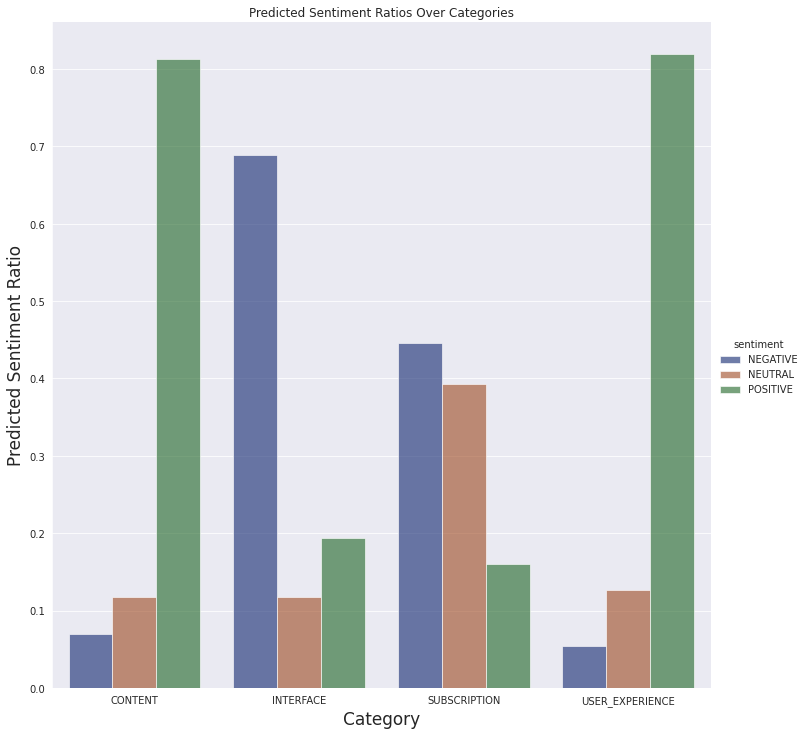
我們還可以看到下面定義的類別的情感預測
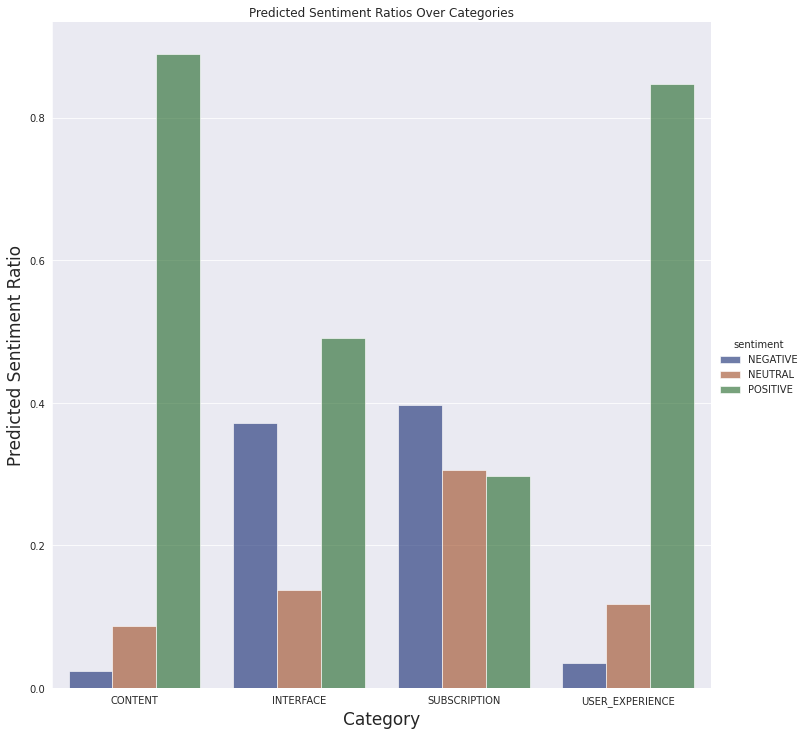
我們不會對評論進行詳細分析,對潛在問題有一個基本瞭解就足夠了。因此,從最終資料中得出簡單的結論就足夠了。
- 訂閱方面的大部分評論都是負面的,這是可以理解的。付費內容通常在移動應用程式中不受歡迎。
- 有很多關於介面的負面評論。這可能是進一步分析的線索。也許對功能存在誤解,或者某個功能不如使用者想象的那樣工作。
- 人們普遍喜歡這些文章,並且大多數人都有很好的體驗。
關於此圖的一個重要注意事項:我們沒有按應用程式版本過濾評論。當我們檢視最新當前版本 (4.5) 的結果時,似乎應用程式的介面讓使用者感到困惑或存在惱人的錯誤。
結論
現在我們可以使用預訓練模型來嘗試瞭解移動應用程式的潛在缺點。然後,分析特定功能將變得更容易。
在此示例中,我們使用了 HuggingFace 強大的 API 和 AutoTrain 以及 Kili 易於使用的介面。AutoTrain 的建模僅用了 30 分鐘,它為我們的使用選擇了模型並進行了訓練。AutoTrain 顯然效率更高,因為我獨自開發模型時花費了更多時間。
所有程式碼、資料集和指令碼都可以在 GitHub 上找到。您也可以嘗試 AutoTrain 模型。
雖然這可以被視為一個有效的起點,但我們應該收集更多資料並嘗試構建更好的管道。更好的管道將帶來更高效的改進。