投資效能:利用 LLM 洞察力微調小型模型——CFM 案例研究


概述:本文深入探討了資本基金管理公司 (CFM) 如何利用開源大型語言模型 (LLM) 和 Hugging Face (HF) 生態系統來最佳化金融資料的命名實體識別 (NER)。透過利用LLM 輔助標註以及HF 推理端點並使用Argilla改進資料,該團隊將準確性提高了6.4%,並降低了運營成本,實現了比單獨使用大型 LLM 便宜 80 倍的解決方案。
在這篇文章中,您將學習到
- 如何使用 LLM 進行高效資料標註
- 利用 LLM 洞察力微調緊湊模型的步驟
- 在 Hugging Face 推理端點上部署模型以實現可擴充套件的 NER 應用程式
這種結構化方法兼具準確性和成本效益,非常適合實際的金融應用。
| 模型 | F1-分數(零樣本) | F1-分數(微調) | 推理成本(每小時) | 成本效益 |
|---|---|---|---|---|
| GLiNER | 87.0% | 93.4% | $0.50 (GPU) / $0.10 (CPU) | 便宜高達 80 倍 |
| SpanMarker | 47.0% | 90.1% | $0.50 (GPU) / $0.10 (CPU) | 便宜高達 80 倍 |
| Llama 3.1-8b | 88.0% | 不適用 | $4.00 | 中等 |
| Llama 3.1-70b | 95.0% | 不適用 | $8.00 | 高成本 |
Capital Fund Management (CFM) 是一家總部位於巴黎的另類投資管理公司,在紐約市和倫敦也設有團隊,目前管理的總資產達 155 億美元。
CFM 採用科學的金融方法,利用量化和系統化方法制定卓越的投資策略。
CFM 一直與 合作,以瞭解機器學習的最新進展,並利用開源技術的強大功能來支援其廣泛的金融應用。此次合作的主要目標之一是探索 CFM 如何有效利用開源大型語言模型 (LLM) 來增強其現有機器學習用例。量化對沖基金依靠大量資料來為買賣特定金融產品提供決策依據。除了金融市場(例如價格)的標準資料來源外,對沖基金也越來越多地從新聞文章等替代資料中提取洞察力。將新聞納入全自動化交易策略面臨的一個主要挑戰是準確識別文章中提及的產品或實體(例如,公司、股票、貨幣)。雖然 CFM 的資料提供商提供這些標籤,但它們可能不完整,需要進一步驗證。
CFM 探索了多種方法來改進金融實體識別,包括使用 LLM 和小型模型的零樣本 NER、使用 Hugging Face 推理端點和 Argilla 的 LLM 輔助資料標註,以及在精選資料集上微調小型模型。這些方法不僅利用了大型模型的多功能性,還解決了實際金融應用中成本和可擴充套件性的挑戰。
在開源模型中,Meta 的 Llama 3.1 系列因其在各項基準測試中的強大效能而脫穎而出,使其成為生成合成註釋的首選。這些 LLM 在建立高質量標註資料集方面發揮了關鍵作用,結合了自動化和人工專業知識,以簡化標註過程並提高金融 NER 任務中的模型效能。
目錄
金融新聞和股價整合資料集上的命名實體識別 (NER)
我們在這個用例中關注的重點是從金融新聞和股價整合資料集 (FNSPID) (FNSPID) 中提取新聞標題中的公司名稱。它由新聞標題和與彭博社、路透社、Benzinga 等多個來源對應的股票程式碼相關的文章組成。在分析了各種新聞來源後,我們發現來自 Benzinga 的新聞沒有缺失的股票程式碼值。該資料集的子集包含約 90 萬個樣本。因此,我們決定將資料集縮小到 Benzinga 標題,以進行更一致和可靠的分析。
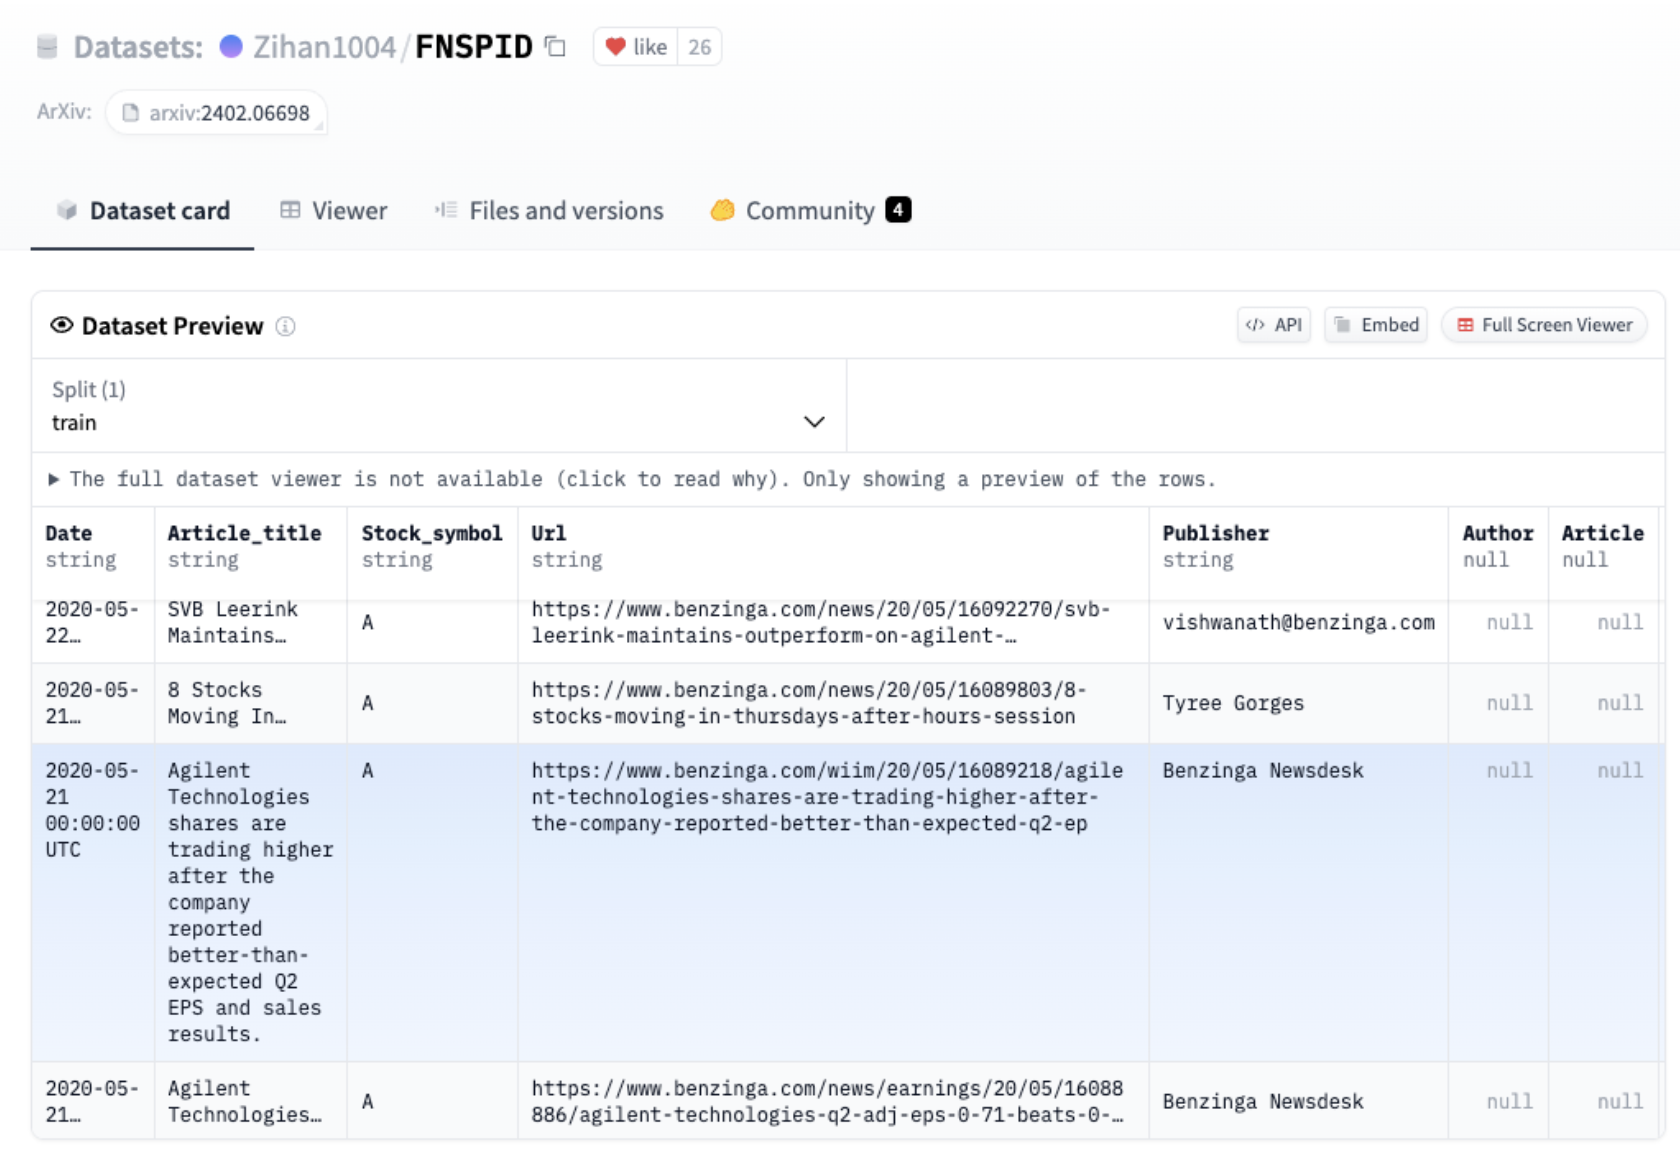
FNSPID 資料集預覽
    {"example 1": "Black Diamond Stock Falling After Tweet"} -> Black Diamond
    {"example 2": "Dun & Bradstreet Acquires Avention For $150M"} ->  Dun & Bradstreet, Avention
    {"example 3": "Fast Money Picks For April 27"} -> No company
任務的示例樣本和目標預測
Llama 輔助的資料標註
為了有效比較不同的方法,我們首先需要整合一個可靠的資料集,作為評估候選方法的基礎。該資料集將用於測試模型在零樣本設定中的效能,並作為微調的基礎。
我們使用 Llama 輔助資料標註來簡化和增強標註過程,讓 Llama 3.1 為資料集樣本生成標籤。然後使用開源資料標註平臺 Argilla 手動審查這些自動生成的標籤。這種方法使我們能夠加快標註過程,同時確保標註的質量。
使用 Hugging Face 推理端點 部署 Llama3.1-70b-Instruct
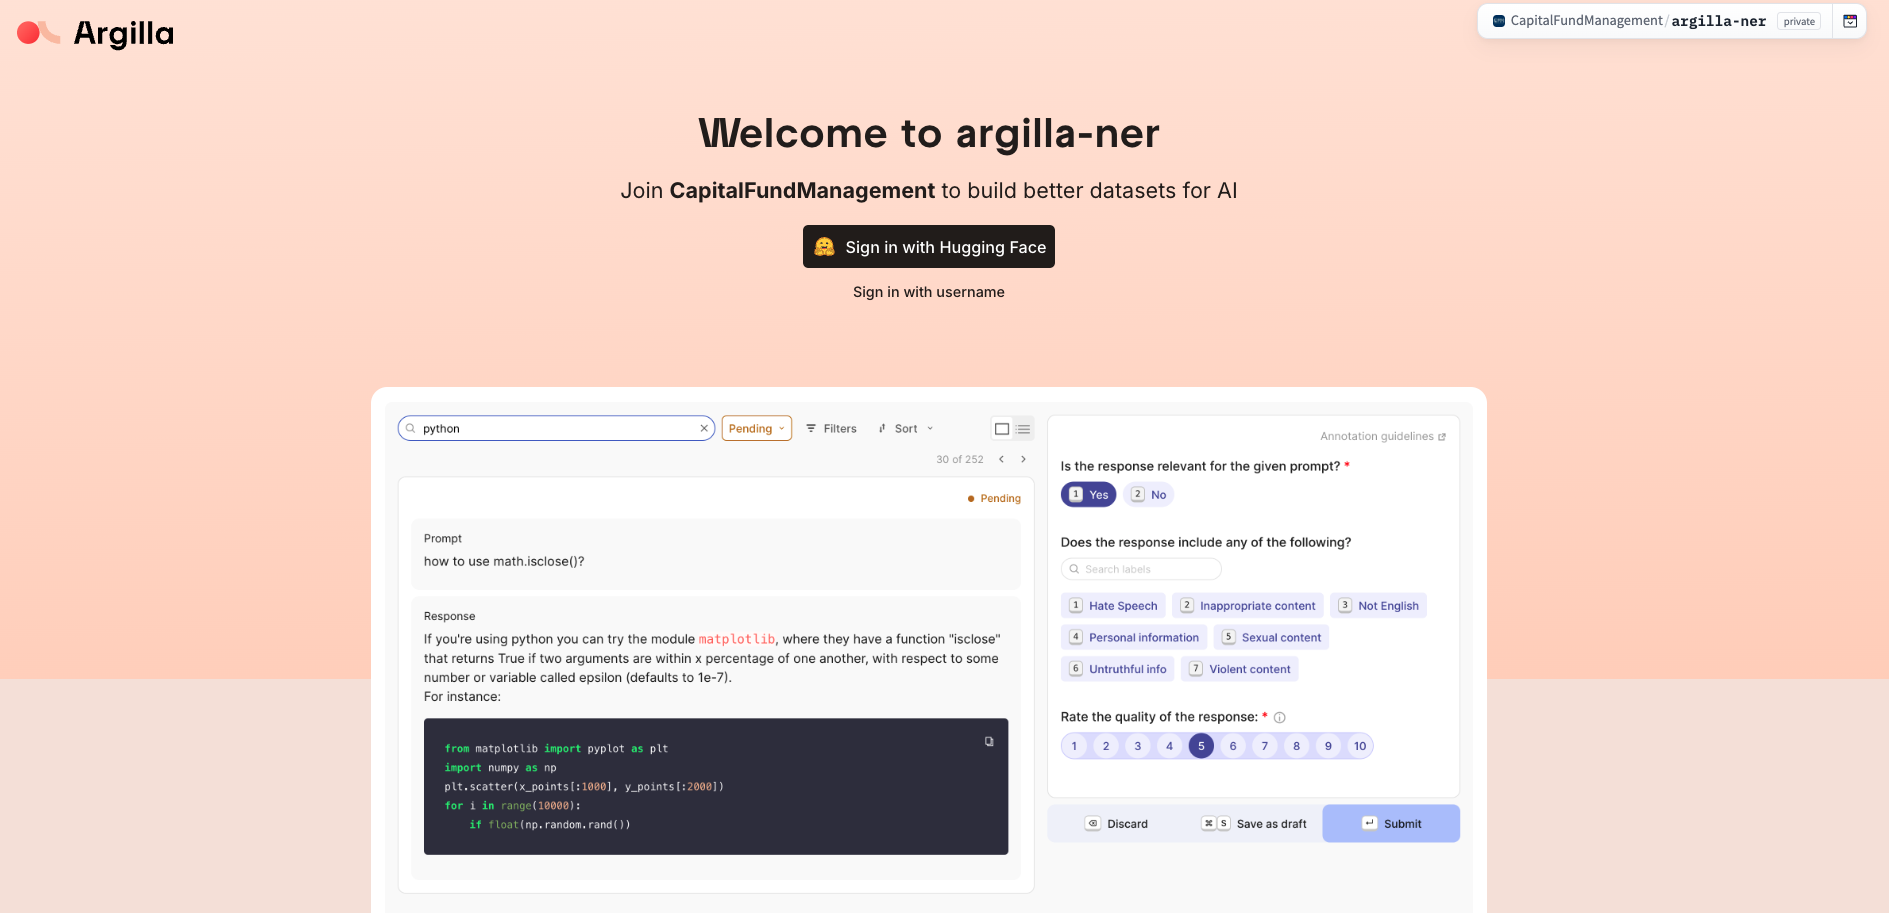
為了安全快速地訪問 Llama3.1-70-Instruct 部署,我們選擇了 Hugging Face 推理端點。
Hugging Face 推理端點為在生產環境中部署機器學習模型提供了簡單安全的解決方案。它們使開發人員和資料科學家能夠構建 AI 應用程式,而無需管理基礎設施,將部署簡化到只需幾次點選即可完成。
要訪問推理端點,我們以 CapitalFundManagement 組織的成員身份登入 Hugging Face Hub,然後訪問服務網址 https://ui.endpoints.huggingface.co。要開始新的部署,我們點選 New,然後選擇 meta-llama/Llama-3.1-70B-Instruct。
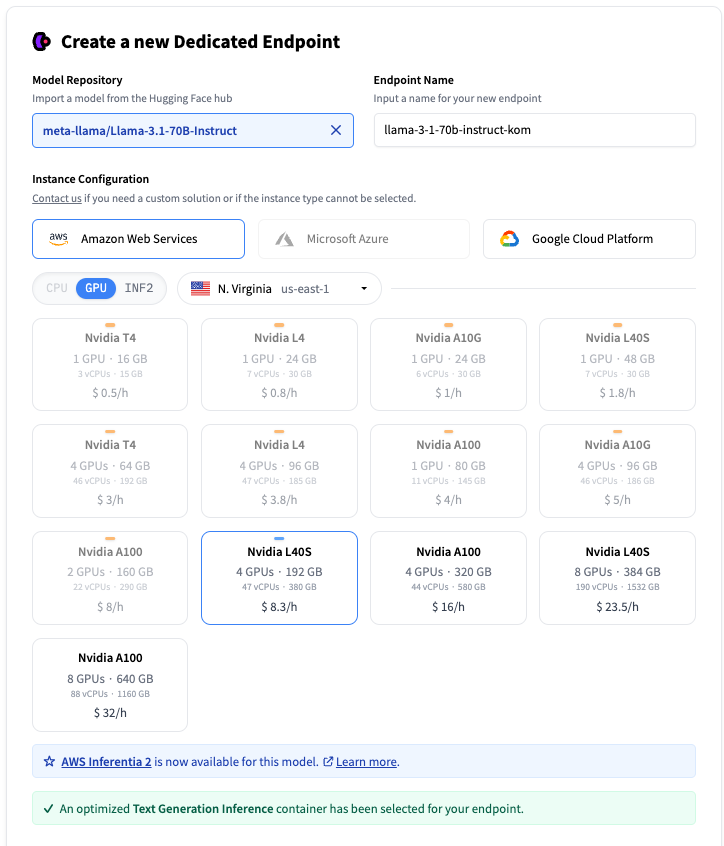
在推理端點 UI 上建立端點
您可以選擇硬體將託管在哪個雲提供商、區域以及例項型別。推理端點會根據模型大小建議例項型別,該例項型別應足以執行模型。此處選擇了一個帶有 4 個 Nvidia L40S 的例項。當選擇 LLM 時,會自動選擇一個執行 文字生成推理 的容器,以最佳化推理。
點選“建立端點”後,部署即告建立,端點將在幾分鐘內準備就緒。有關推理端點設定的更多資訊,請訪問 https://huggingface.co/docs/inference-endpoints。
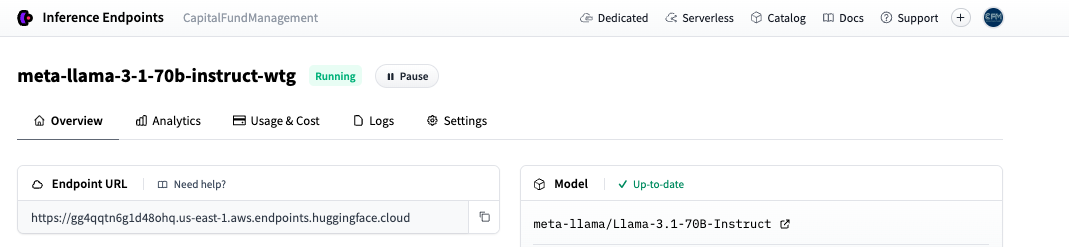
端點在推理端點 UI 上執行
一旦我們的端點執行起來,我們將使用提供的端點 URL 向其傳送請求。
為 NER 提示 Llama
在傳送請求之前,我們需要設計一個能夠有效引導模型生成所需輸出的提示。經過多輪測試,我們將提示構建為多個部分,以準確地處理任務:
角色定義:模型被定位為具有強大英語能力的金融專家。
任務說明:模型被指示提取新聞標題中提及的與股票相關的公司名稱,同時排除標題中常見的股票指數。
預期輸出:模型必須返回一個包含以下內容的字典:
"result":精確的公司名稱或股票程式碼。"normalized_result":與"result"中對應的標準化公司名稱。
少量樣本示例:一系列輸入-輸出示例,用於演示預期行為並確保在不同輸入之間保持一致的效能。這些示例幫助模型理解如何區分相關實體並正確格式化其輸出。每個示例都展示了不同的標題結構,以使模型為各種實際情況做好準備。
SYSTEM_PROMPT = “””
###Instructions:###
You are a financial expert with excellent English skills.
Extract only the company names from the following headlines that are related to a stock discussed in the article linked to the headline.
Do not include stock indices such as "CAC40" or "Dow Jones".

##Expected Output:##
Return a dictionary with:
A key "result" containing a list of company names or stock symbols. Make sure to return them exactly as they are written in the text even if the original text has grammatical errors. If no companies or stocks are mentioned, return an empty list.
A key "normalized_result" containing the normalized company names corresponding to the entries in the "result" list, in the same order. This list should have the same size as the "result" list.

##Formatting:##
Do not return companies not mentioned in the text.

##Example Outputs##

Input: "There's A New Trading Tool That Allows Traders To Trade Cannabis With Leverage"
Output: {"result": [], "normalized_result": []}
Input: "We explain AAPL, TSLA, and MSFT report earnings"
Output: {"result": ["AAPL", "TSLA", "MSFT"], "normalized_result": ["Apple", "Tesla", "Microsoft"]}
Input: "10 Biggest Price Target Changes For Friday"
Output: {"result": [], "normalized_result": []}
Input: "'M' is For Microsoft, and Meh"
Output: {"result": ["Microsoft"], "normalized_result": ["Microsoft"]}
Input: "Black Diamond: The New North Face? (BDE, VFC, JAH, AGPDY.PK)"
Output: {"result": ['Black Diamond', 'North Face', 'BDE', 'VFC','JAH','AGPDY.PK'], "normalized_result": ['Black Diamond','The North Face', 'BPER Banca', 'VF Corporation','Jarden Corporation','AGP Diagnostics']}
“””
從端點獲取預測
現在我們已經準備好了提示和端點,下一步是使用資料集中的標題傳送請求。為了高效地完成此操作,我們將使用 `huggingface_hub` 庫中的 `AsyncInferenceClient`。這是 `InferenceClient` 的非同步版本,基於 `asyncio` 和 `aiohttp` 構建。它允許我們向端點發送多個併發請求,從而使資料集的處理更快、更高效。
from huggingface_hub import AsyncInferenceClient

# Initialize the Hugging Face AsyncInferenceClient
client = AsyncInferenceClient(base_url="https://your-endpoint-url.huggingface.cloud")
為確保模型返回結構化輸出,我們將使用帶有特定 Pydantic 模式 `Companies` 的引導。
from pydantic import BaseModel
from typing import List, Dict, Any

# This class defines the expected structure for the output using Pydantic.
class Companies(BaseModel):
    """
    Pydantic model representing the expected LLM output.

    Attributes:
        result (List[str]): A list of company names or results from the LLM.
        normalized_result (List[str]): A list of 'normalized' company names, i.e., processed/cleaned names.
    """
    result: List[str]
    normalized_result: List[str]

grammar: Dict[str, Any] = {
    "type": "json_object",
    "value": Companies.schema()
    # This instructs the LLM to return a JSON with "result" and "normalized_result" as keys
}
我們還設定了生成引數
max_tokens: int = 512  # Maximum number of tokens to generate in the response
temperature: float = 0.1  # Controls randomness in the output (lower values are more deterministic)
現在我們定義用於向端點發送請求和解析輸出的函式
async def llm_engine(messages: List[Dict[str, str]]) -> str:
    """
    Function to send a request to the LLM endpoint and get a response.

    Args:
        messages (List[Dict[str, str]]): A list of messages to pass to the LLM.

    Returns:
        str: The content of the response message or 'failed' in case of an error.
    """
    try:
        # Send the request to the LLM endpoint asynchronously
        response = await client.chat_completion(
            messages=messages,
            model="ENDPOINT",  # Replace with your model endpoint
            temperature=temperature,
            response_format=grammar,
            max_tokens=max_tokens
        )
        # Extract the content of the response message
        answer: str = response.choices[0].message.content
        return answer
    except Exception as e:
        # Handle any exceptions that occur during the request
        print(f"Error in LLM engine: {e}")
        return "failed"

def parse_llm_output(output_str: str) -> Dict[str, Any]:
    """
    Parse the JSON-like output string from an LLM into a dictionary.

    Args:
        output_str (str): The string output from an LLM, expected to be in JSON format.

    Returns:
        Dict[str, Any]: A dictionary parsed from the input JSON string with a 'valid' flag.
    """
    try:
        # Parse the JSON string into a dictionary
        result_dict: Dict[str, Any] = json.loads(output_str)
        result_dict["valid"] = True
        return result_dict
    except json.JSONDecodeError as e:
        # Handle JSON parsing errors and return a default structure
        print(f"Error decoding JSON: {e}")
        return {
            "result": [output_str],
            "normalized_result": [output_str],
            "valid": False
        }
我們用一個例子來測試端點
messages = [
           {"role": "system", "content": SYSTEM_PROMPT},
            {"role": "user", "content": "Some stocks i like buying are AAPL, GOOG, AMZN, META"}
            ]
response = await llm_engine(messages)
print(parse_llm_output(response))
{"normalized_result": ["Apple", "Alphabet", "Amazon", "Meta Platforms"], "result": ["AAPL", "GOOG", "AMZN", "META"]}
現在,我們建立一個 `process_batch` 函式來處理以可管理批次傳送請求,防止 API 端點過載或達到速率限制。這種批處理方法使我們能夠高效地併發處理多個請求,而不會使伺服器飽和,從而降低超時、拒絕請求或節流的風險。透過控制請求流,我們確保了穩定的效能、更快的響應時間以及更容易的錯誤處理,同時最大限度地提高了吞吐量。
import asyncio

async def process_batch(batch):
    """
    Get the model output for a batch of samples.

    This function processes a batch of samples by sending them to the LLM and
    gathering the results concurrently.

    Args:
        batch (List[Dict[str, str]]): A list of dictionaries where each dictionary
                                      contains the data for a single sample, including
                                      an "Article_title".

    Returns:
        List[str]: A list of responses from the LLM for each sample in the batch.
    """

    list_messages = []

    # Loop through each sample in the batch
    for sample in batch:
        messages = [
           {"role": "system", "content": SYSTEM_PROMPT},
           {"role": "user", "content": sample["Article_title"]}
        ]
        list_messages.append(messages)

    # Use asyncio.gather to send requests to the LLM concurrently for all message sequences
    return await asyncio.gather(*[llm_engine(messages) for messages in list_messages])
我們將在資料集上執行推理
from datasets import load_dataset, Dataset

#Streaming data from Huggingface Hub to avoid downloading the entire dataset
dataset = load_dataset("Zihan1004/FNSPID", streaming=True)

iterable_dataset = iter(dataset["train"])

# Create a batch of samples from remote dataset
def get_sample_batch(iterable_dataset, batch_size):
    batch = []
    try:
        for _ in range(batch_size):
            batch.append(next(iterable_dataset))
    except StopIteration:
        pass
    return batch
然後我們建立主推理迴圈
#Main loop
batch_size = 128
i= 0
len_extracted = 0

while True:
    batch = get_sample_batch(iterable_dataset, batch_size)
    #batch = samples[i * batch_size : (i+1) * batch_size]
    predictions = await process_batch(batch)
    parsed_predictions = [parse_llm_output(_pred) for _pred in predictions]
    try :
        parsed_dataset = [
            {"Article_title": sample["Article_title"],
             "predicted_companies": pred["result"],
             "normalized_companies":pred.get("normalized_result", ""),
             "valid": pred["valid"]} for sample, pred in zip(batch, parsed_predictions)
            ]
    except Exception as e :
        print(i,e)
        continue

    # Write parsed_dataset to a JSON file
    with open(os.path.join(CHECKPOINT_DATA, f"parsed_dataset_{i}.json"), 'w') as json_file:
        json.dump(parsed_dataset, json_file, indent=4)  # Use json.dump to write data to a JSON file

    len_extracted += len(parsed_dataset)
    i+= 1
    print(f"Extracted: {len_extracted} samples")
    if len(batch) < batch_size:
        break
推理執行時,我們可以直接從使用者介面監控流量。

端點分析
處理整個 90 萬樣本的資料集大約需要 8 小時,花費約 70 美元。
使用 Argilla 審查預測
利用 LLM 生成的標註資料,下一步是整理一個高質量的子集,以確保對不同方法(包括零樣本和微調方法)進行可靠評估。這個經過仔細審查的資料集還將作為微調小型模型的基礎。LLM 標註的整個資料集也可以在 弱監督 框架中用於微調。
資料集抽樣和分割
為了建立可管理大小的樣本進行審查,我們使用 LLM 標籤並透過 模糊匹配 和 rapidfuzz 庫對公司名稱進行聚類。我們應用 cdist 函式計算公司之間的 Levenshtein 距離,並以 85 的閾值進行聚類。為每個聚類選擇一個代表性公司,並相應地對映 Llama 預測。最後,我們從每個與公司相關的聚類中抽取 5% 的新聞標題,並從不含任何公司的新聞標題中抽取 5%,最終得到一個包含 2714 個樣本的資料集。
然後利用元資料,將取樣資料集分為三個部分:
訓練:2010 年至 2016 年的新聞,用於訓練小型機器學習模型——2405 個樣本
驗證:2017 年至 2018 年的新聞,用於超引數調整——204 個樣本
測試:2019 年至 2020 年的新聞,用於評估模型在未見資料上的表現——105 個樣本
建立完成後,我們設定了一個標註工具 Argilla,以簡化標註過程。
Argilla 是一個開源工具,整合到 Hugging Face 生態系統中,擅長收集各種 AI 專案的人工反饋。無論您是處理傳統的 NLP 任務(如文字分類和 NER)、微調大型語言模型 (LLM) 以進行檢索增強生成 (RAG) 或偏好調整,還是開發多模態模型(如文字到影像系統),Argilla 都提供了高效收集和最佳化反饋所需的工具。這確保您的模型根據高質量、經過人工驗證的資料不斷改進。
Argilla 介面可以直接透過 Hugging Face Spaces 設定,這也是我們選擇的方法。請檢視文件以啟動您自己的介面,並前往 https://huggingface.co/new-space。
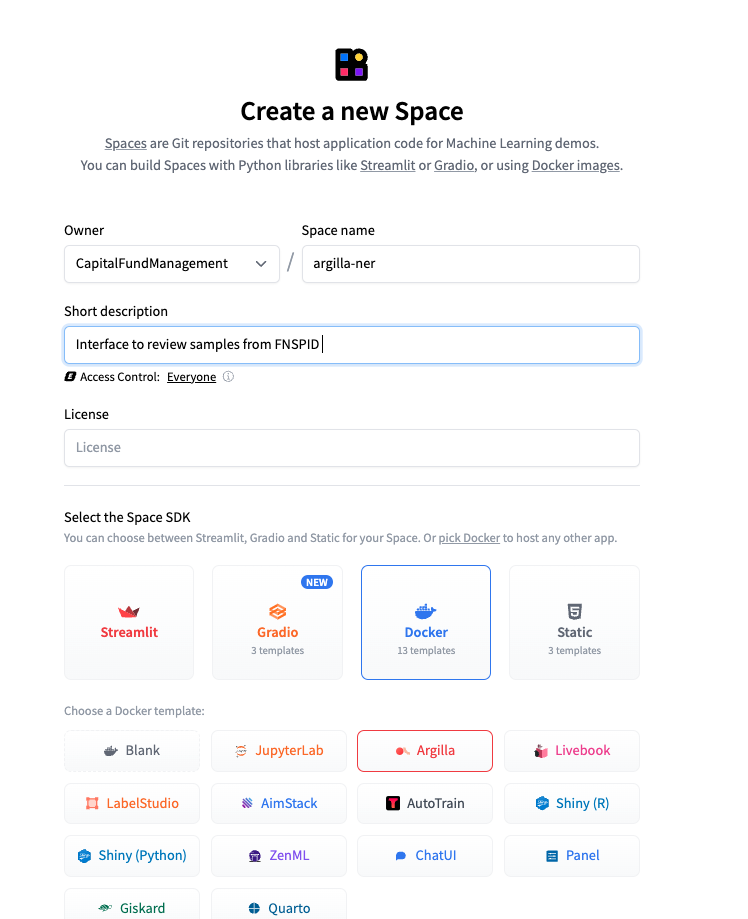
在 Hub 上建立 Argilla Space
Argilla 在 Spaces 上的主頁
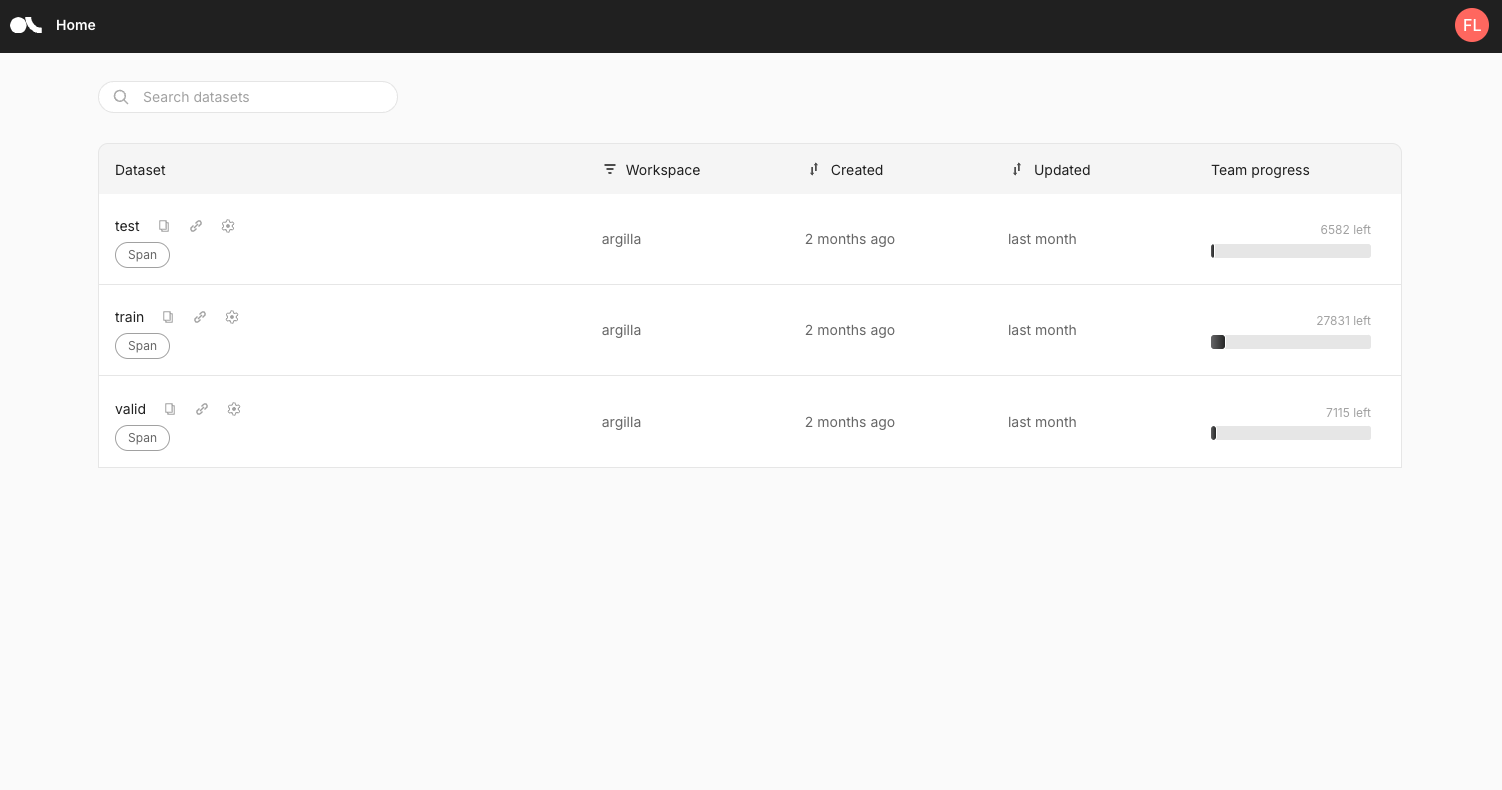
Argilla 資料集檢視
介面建立後,我們可以使用 Argilla Python SDK 以程式設計方式連線到它。為了準備好進行註釋,我們遵循了以下步驟:
- 我們使用設定中提供的憑據連線到我們的介面。
import argilla as rg
client = rg.Argilla(
    api_url="https://capitalfundmanagement-argilla-ner.hf.space",
    api_key="xxx",
    headers={"Authorization": f"Bearer {HF_TOKEN}"},
    verify = False)
- 我們為標註建立指導原則,並生成特定任務的資料集。在這裡,我們指定了 SpanQuestion 任務。然後,我們使用定義的設定生成訓練、驗證和測試資料集物件。
import argilla as rg  # Import the Argilla library.


# Define the label for token classification (e.g., "Company").
labels = ["Company"]


# Define settings for the annotation task.
settings = rg.Settings(
    guidelines="Classify individual tokens according to the specified categories, ensuring that any overlapping or nested entities are accurately captured.",
    fields=[rg.TextField(name="text", title="Text", use_markdown=False)],
    questions=[rg.SpanQuestion(
        name="span_label",
        field="text",
        labels=labels,
        title="Classify the tokens according to the specified categories.",
        allow_overlapping=False,
    )],
)


# Create datasets with the same settings for training, validation, and testing.
train_dataset = rg.Dataset(name="train", settings=settings)
train_dataset.create()

valid_dataset = rg.Dataset(name="valid", settings=settings)
valid_dataset.create()

test_dataset = rg.Dataset(name="test", settings=settings)
test_dataset.create()
- 我們用來自不同資料集的新聞標題填充資料集。
train_records = [rg.Record(fields={"text": title}) for title in train_df["Article_title"]]
valid_records = [rg.Record(fields={"text": title}) for title in valid_df["Article_title"]]
test_records = [rg.Record(fields={"text": title}) for title in test_df["Article_title"]]

train_records_list = [{"id": record.id, "text": record.fields["text"]} for record in train_records]
valid_records_list = [{"id": record.id, "text": record.fields["text"]} for record in valid_records]
test_records_list = [{"id": record.id, "text": record.fields["text"]} for record in test_records]

train_dataset.records.log(train_records)
valid_dataset.records.log(valid_records)
test_dataset.records.log(test_records)
- 在此步驟中,我們整合了來自各種模型的預測。具體來說,我們將 Llama 3.1 預測新增到 Argilla 中,其中每個實體都表示為一個字典,包含起始索引、結束索引和標籤(在本例中為“Company”)。
train_data = [{"span_label": entity,"id": id,} for id, entity in zip(train_ids, train_entities_final)]
valid_data = [{"span_label": entity,"id": id,} for id, entity in zip(valid_ids, valid_entities_final)]
test_data = [{"span_label": entity,"id": id,} for id, entity in zip(test_ids, test_entities_final)]

train_dataset.records.log(records=train_data, batch_size = 1024)
valid_dataset.records.log(records=valid_data, batch_size = 1024)
test_dataset.records.log(records=test_data, batch_size = 1024)
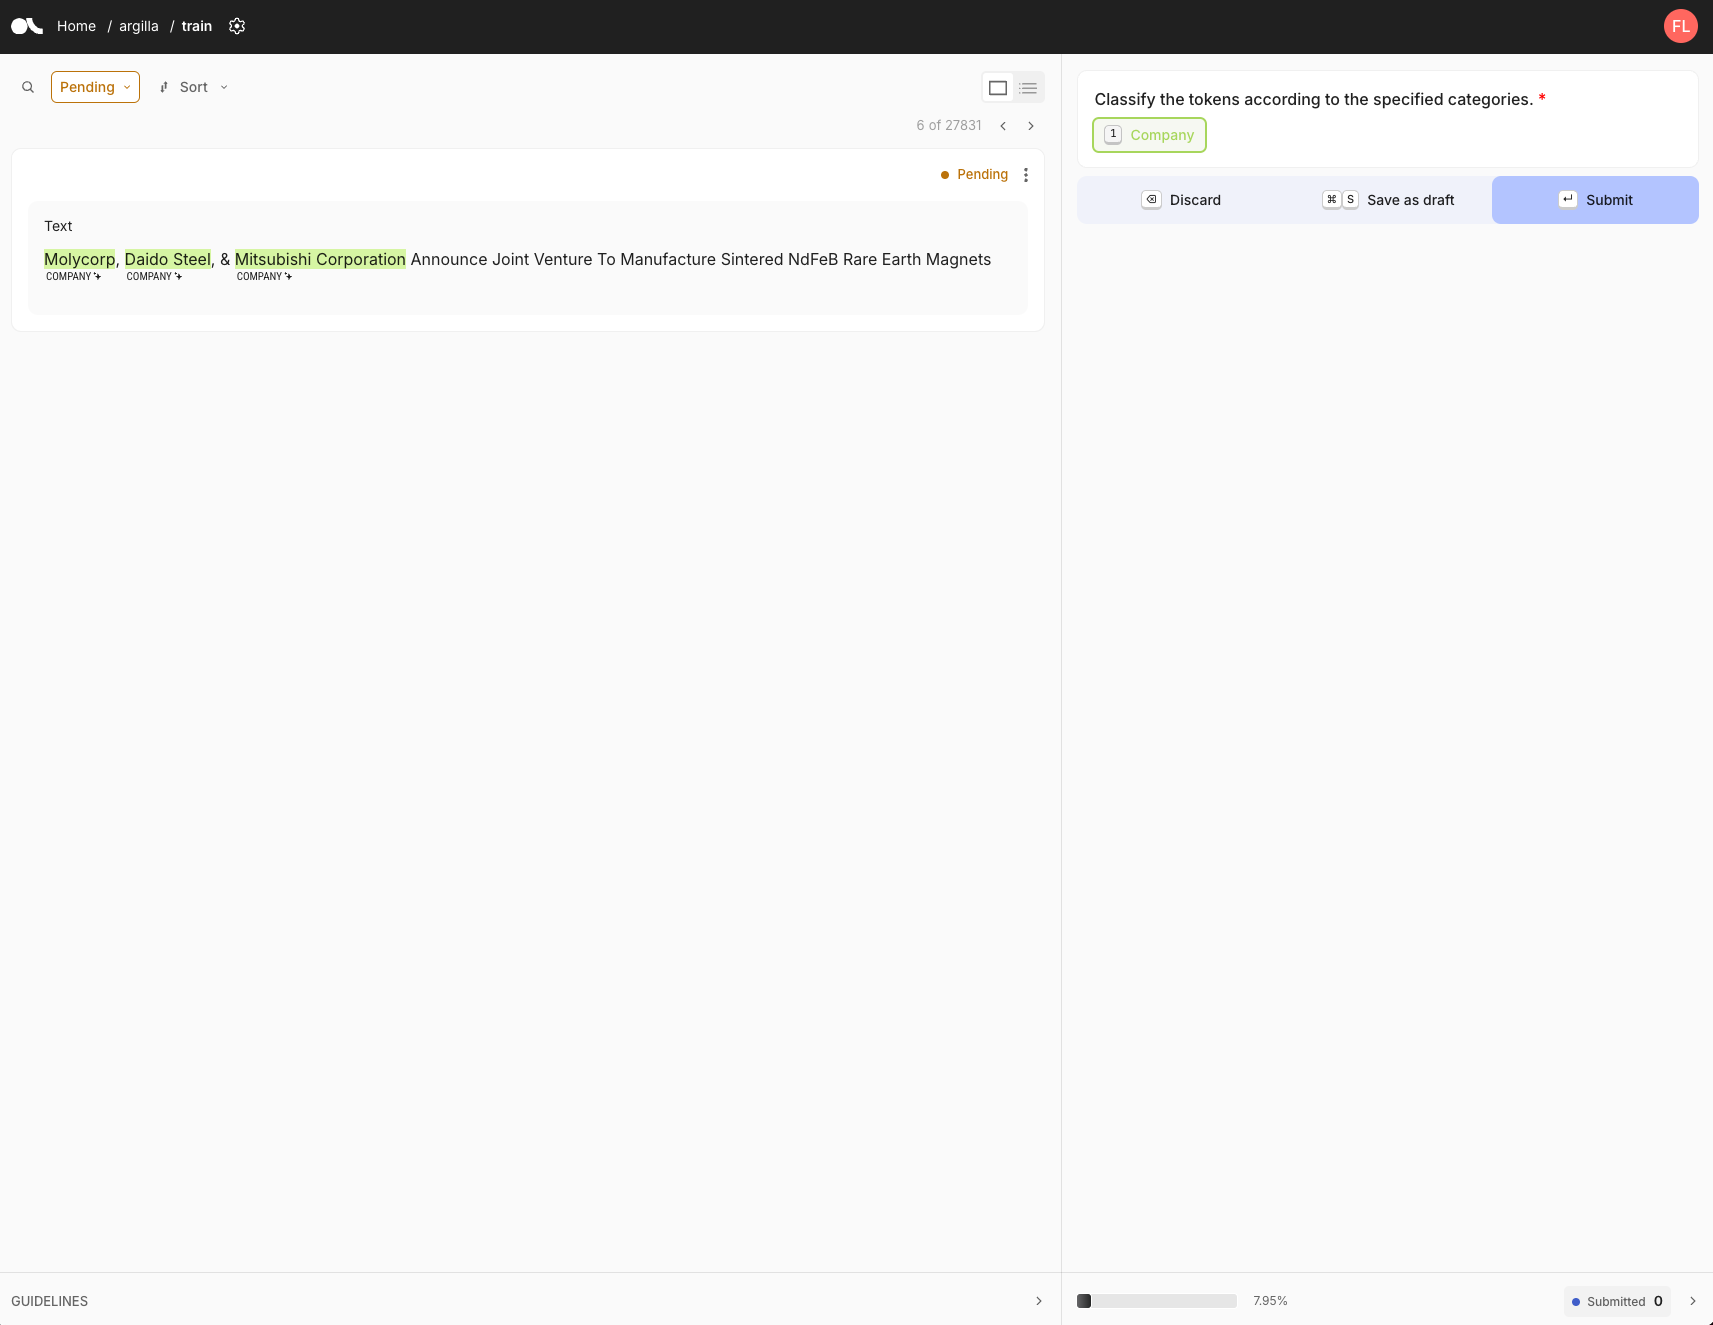
Argilla 標註檢視
標註介面顯示待標註的文字及其狀態(待處理或已提交)。標註指南顯示在螢幕右側。在這種情況下,我們有一個標籤:“公司”。要標註,我們首先選擇標籤,然後在句子中突出顯示相關文字。選擇所有實體後,我們單擊“提交”以完成標註。
標註時長
使用預計算的 Llama 標籤顯著加快了標註過程,將每個樣本的時間縮短到僅 5 到 10 秒, 而原始、未經處理的樣本大約需要 30 秒。這種效率帶來了顯著的時間節省,使我們能夠在大約 8 小時內完成 2,714 個樣本的標註。 對於比 NER 更復雜的任務,預計算標籤或生成所節省的時間效益更為顯著。
金融 NER 零樣本方法的效能
有了一個高質量、經過審查的資料集,我們現在可以嘗試不同的零樣本 NER 方法。我們測試了四種模型:
小型語言模型
- GLINER
- SpanMarker 大型語言模型 (LLM):
- Llama-3.1-8b
- Llama-3.1-70b
- GLiNER
GLiNER 是一種緊湊、多功能的 NER 模型,它利用像 BERT 這樣的雙向轉換器來識別各種實體型別,克服了傳統模型受限於預定義實體的侷限性。與大型自迴歸模型不同,GLiNER 將 NER 視為一種將實體型別與文字中的跨度匹配的任務,並使用並行處理以提高效率。它為 LLM 提供了一種實用且資源高效的替代方案,在零樣本場景中提供了強大的效能,而無需支付與大型模型相關的高計算成本。
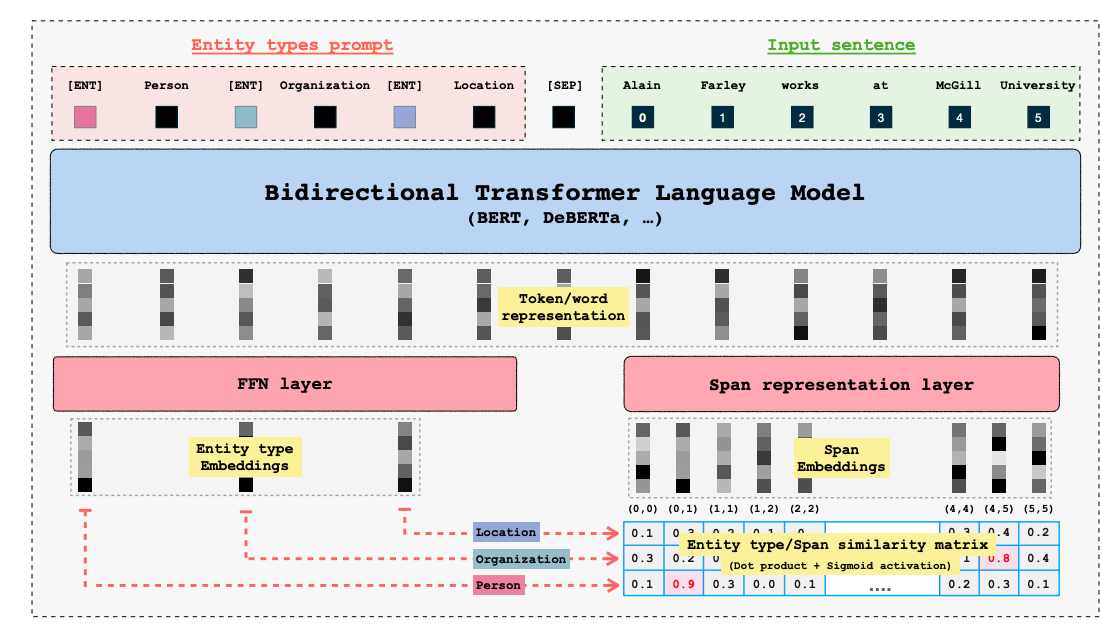
GLiNER 架構源自 原始論文<
GLiNER 提供三種模型變體:
- GLiNER-Small-v2.1(5000 萬引數)
- GLiNER-Medium-v2.1(9000 萬引數)
- GLiNER-Large-v2.1(3 億引數)
與 Llama-3.1-70b 等 LLM 相比,GLiNER 模型更緊湊、更具成本效益,並且在 NER 任務中更高效,而 LLM 通常提供更廣泛的靈活性,但模型更大且資源密集。GLiNER medium 可以在 Hugging Face Space 上試用:https://huggingface.co/spaces/tomaarsen/gliner_medium-v2.1 對於我們的實驗,我們關注特定的 GLiNER 變體 EmergentMethods/gliner_medium_news-v2.1 ,該變體已在 EmergentMethods/AskNews-NER-v0 上進行了微調,旨在提高各種主題的準確性,特別是長上下文新聞實體識別提取。要使用 GLiNER,您可以安裝基於 Hugging Face transformers 庫的 gliner 包。
!pip install gliner
然後,使用 GLiNER 進行 NER 就像這樣簡單:
from gliner import GLiNER

model = GLiNER.from_pretrained("EmergentMethods/gliner_large_news-v2.1")

text = """
EMCOR Group Company Awarded Contract for Installation of Process Control Systems for Orange County Water District's Water Purification Facilities
"""

labels = ["company"] # Add other entities that you want to detect here

entities = model.predict_entities(text, labels, threshold=.5)
#threshold indicates the minimum probability the model should have for the returned entities.

for entity in entities:
    print(entity["text"], "=>", entity["label"])
輸出
“EMCOR Group => company"
對於樣本列表,可以使用 `batch_text` 方法
from gliner import GLiNER

model = GLiNER.from_pretrained("EmergentMethods/gliner_large_news-v2.1")

batch_text = [
"EMCOR Group Company Awarded Contract for Installation of Process Control Systems for Orange County Water District's Water Purification Facilities",
"Integra Eyes Orthopedics Company - Analyst Blog"
]

labels = ["company"] # Add other entities that you want to detect here

batch_entities = model.batch_predict_entities(batch_text, labels, threshold=.5)
#threshold indicates the minimum probability the model should have for the returned entities.

for entities in batch_entities:
for entity in entities:
        print(entity["text"], "=>", entity["label"])
輸出
“EMCOR Group => company" #correct predictions
"Integra Eyes Orthopedics Company => company" #incorrect predictions, ground truth Integra
在先前整理的 2714 個樣本的標註資料集上,零樣本結果的 F1 分數為 87%。
GLiNER 模型在從文字中提取公司名稱方面表現良好,但在某些情況下(例如公司以股票程式碼形式提及時)仍有不足。它還會將對股票行業的通用引用(如“醫療保健股票”或“工業股票”)錯誤地分類為公司名稱。儘管在許多情況下有效,但這些錯誤突出表明需要進一步完善以提高在區分公司和更廣泛的行業術語方面的準確性。
- SpanMarker SpanMarker 是一個用於使用 BERT、RoBERTa 和 DeBERTa 等常見編碼器訓練強大 NER 模型的框架。它與 🤗 Transformers 庫緊密結合,可以很好地利用它。因此,SpanMarker 對於任何熟悉 Transformers 的人來說都將直觀易用。我們選擇了這個變體 tomaarsen/span-marker-bert-base-orgs,它在 FewNERD、CoNLL2003 和 OntoNotes v5 資料集上進行訓練,可用於 NER。這個 SpanMarker 模型使用 bert-base-cased 作為底層編碼器。它專門用於識別組織。它可以用於推理,預測
ORG(組織)標籤,如下所示:
from span_marker import SpanMarkerModel

# Download from the 🤗 Hub
model = SpanMarkerModel.from_pretrained("tomaarsen/span-marker-bert-base-orgs")
# Run inference
entities = model.predict("Enernoc Acquires Energy Response; Anticipates Deal Will Add to 2013 EPS")

for entity in entities:
    print(entity["span"], "=>", entity["label"])
輸出
“EMCOR Group => ORG" #correct predictions
"Energy Response => ORG" #incorrect
在先前整理的 2714 個樣本的標註資料集上,零樣本結果的 F1 分數為 47%。SpanMarker 模型在提取準確的公司名稱方面表現良好,但傾向於識別出過多的不正確實體。這是因為它的訓練基於更廣泛的“組織”類別,其中包括非營利組織、政府機構、教育機構和運動隊等實體。因此,它有時會將這些實體與公司名稱混淆,導致在某些語境中過度提取和結果不夠精確。
- Llama3.1-8b 和 Llama3.1-70b
我們測試了 Llama3.1 模型的 2 個變體,包括我們用於整理真實示例的 70b 版本。我們使用了上面介紹的提示。在我們標註的子集上,我們得到了以下結果:
| 模型 | Llama 3.1 8b | Llama 3.1 70b |
|---|---|---|
| F1-分數 | 88% | 95% |
效能回顧
| 模型 | GLiNER | SpanMarker | Llama 3.1 8b | Llama 3.1 70b |
|---|---|---|---|---|
| F1-分數 | 87% | 47% | 88% | 95% |
在本次實驗中,我們比較了 GLiNER 和 SpanMarker 等小型模型與 Llama 3.1-8b 和 Llama 3.1-70b 等 LLM 的效能。GLiNER (87% F1) 等小型模型在準確性和計算效率之間取得了良好的平衡,使其成為資源受限場景的理想選擇。相比之下,LLM 雖然資源密集型,但提供了更高的準確性,其中 Llama 3.1-70b 實現了 95% 的 F1 分數。這凸顯了在 NER 任務中選擇小型模型和 LLM 之間,效能與效率之間的權衡。現在讓我們看看在微調緊湊模型時效能有何不同。
利用 LLM 輔助標註資料集微調緊湊模型的效能提升
微調
利用我們之前建立的訓練/驗證/測試子集,我們在具有單個 Nvidia A10 GPU 的 AWS 例項上對 GLiNER 和 SpanMarker 進行了微調。GLiNER 的微調示例可在此處訪問 這裡,SpanMarker 的微調示例可在此處訪問 這裡。微調這些模型就像執行以下程式碼一樣簡單,其中 train_dataset 和 valid_dataset 已建立為 Hugging Face 資料集。
import numpy as np
from gliner import GLiNER, Trainer
# calculate number of epochs
batch_size = 4
learning_rate=5e-6
num_epochs = 20
model=GLiNER.from_pretrained("EmergentMethods/gliner_medium_news-v2.1")
    data_collator = DataCollator(model.config, data_processor=model.data_processor, prepare_labels=True)
    log_dir = create_log_dir(model_path, model_name, learning_rate, batch_size, size, model_size, timestamp=False)
    training_args = TrainingArguments(
        output_dir=log_dir,    # Optimizer, model, tokenizer states
        logging_dir = log_dir,
        overwrite_output_dir = 'True',
        learning_rate=learning_rate,              	# Learning rate
        weight_decay=0.01,                        	# Weight decay
        others_lr=1e-5, 					     # learning rate
        others_weight_decay=0.01,                 	# weight decay
        lr_scheduler_type="linear",        # learning rate scheduler
        warmup_ratio=0.1,                  # Warmup steps ratio
        per_device_train_batch_size=batch_size,   	# Training batch
        per_device_eval_batch_size=batch_size,    # Evaluation batch
        focal_loss_alpha=0.75,          # Focal loss alpha parameter
        focal_loss_gamma=2,             # Focal loss gamma parameter
        num_train_epochs=num_epochs,              # training epochs
        save_strategy="epoch",          # Save the model at the end of each epoch
        save_total_limit=2,             # Keep only the best model
        metric_for_best_model="valid_f1",
        use_cpu=False,                  # Use GPU
        report_to="tensorboard",        # Report to TensorBoard
        logging_steps=100,              # Steps between logging
        evaluation_strategy="epoch",    # Evaluate every few steps
    )

trainer = Trainer(
    model=model,
    args=training_args,
    train_dataset=train_dataset,
    eval_dataset=valid_dataset,
    tokenizer=model.data_processor.transformer_tokenizer,
     data_collator=data_collator,
     compute_metrics=custom_compute_metrics
     )
    trainer.train()
訓練運行了 20 個 epochs,我們儲存了在驗證集上獲得最高 F1 分數的檢查點。
效能比較
| 模型 | gliner-medium-news | Gliner-medium-news 微調 | SpanMarker | SpanMarker 微調 | Llama 3.1 8b | Llama 3.1 70b |
|---|---|---|---|---|---|---|
| 測試集 F1-分數 | 87.0% | 93.4% | 47.0% | 90.1% | 80.0% | 92.7% |
在此次更新的比較中,我們評估了模型在微調後的 F1 分數。GLiNER-medium-news 模型在微調後從 87.0% 提高到 93.4%,顯示出顯著的準確性提升。同樣,SpanMarker 經過微調後從 47.0% 提高到 90.1%,使其更具競爭力。同時,Llama 3.1-8b 和 Llama 3.1-70b 在開箱即用狀態下表現良好,F1 分數分別為 80.0% 和 92.7%,未經微調。此比較強調,微調像 GLiNER 和 SpanMarker 這樣的小型模型可以顯著提升效能,以較低的計算成本與大型 LLM 媲美。
Llama 3.1-70b 模型每次推理的成本至少為每小時 8 美元,明顯高於緊湊型模型,後者可以在每小時約 0.50 美元的 GPU 例項上執行——便宜 16 倍。此外,緊湊型模型甚至可以部署在 CPU 例項上,每小時成本低至約 0.10 美元,便宜 80 倍。這凸顯了小型模型在資源受限環境中的顯著成本優勢,同時在針對特定任務進行微調時,無需犧牲具有競爭力的效能。
弱監督與 LLM 輔助標註
在本次實驗中,我們探討了兩種關鍵的 NER 資料標註方法:弱監督和 LLM 輔助標註。雖然弱監督能夠實現合成數據的可擴充套件訓練,但我們的研究結果表明,它無法達到與手動標註資料訓練的模型相同的準確性水平。對於 1,000 個樣本,手動標註需要 3 小時,F1 分數為 0.915,而 Llama 3.1-70b 推理僅需 2 分鐘,但 F1 分數略低,為 0.895。速度和準確性之間的權衡取決於任務的要求。
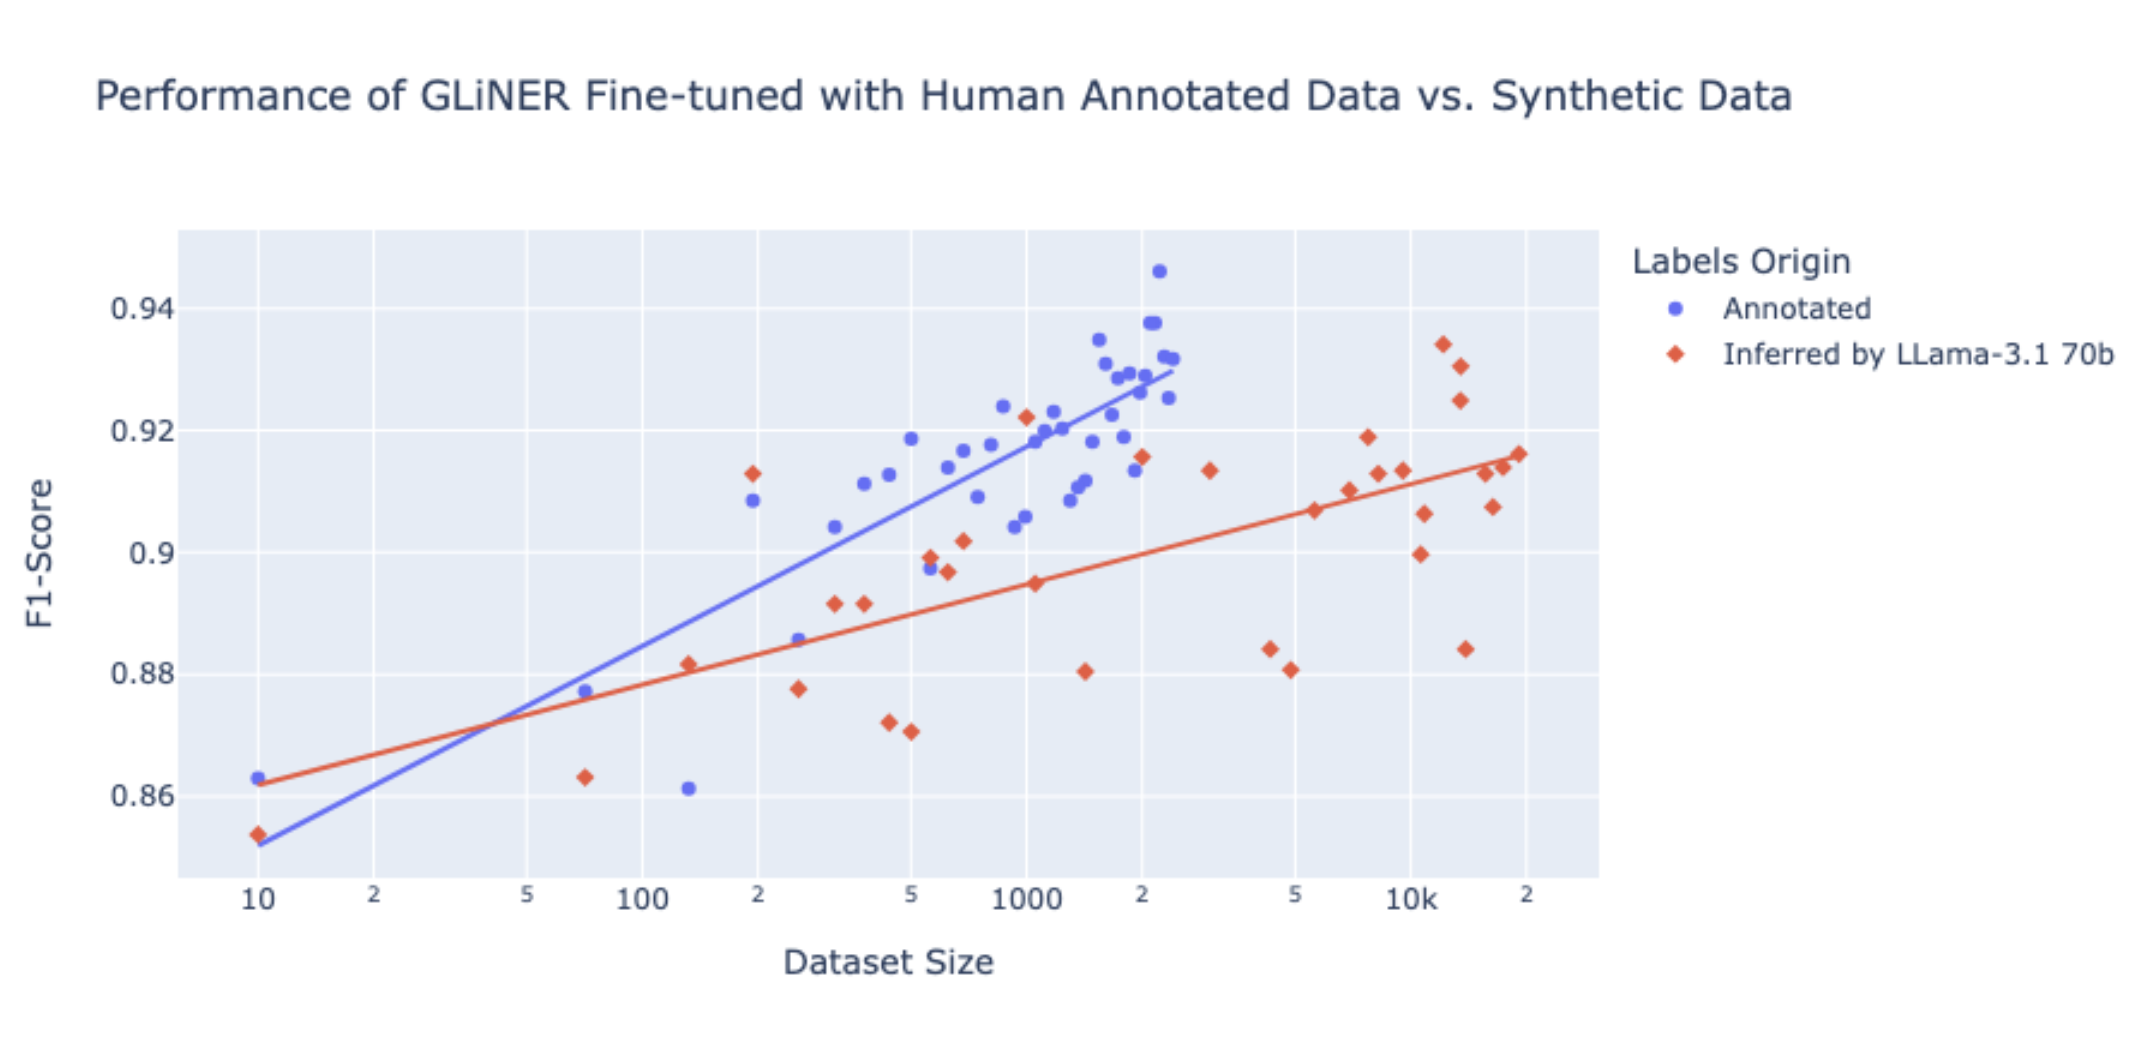
弱監督與 LLM 輔助標註
該圖比較了 GLiNER 在人工標註資料上微調與 Llama-3.1 70b 推斷的合成數據在不同資料集大小下的效能。藍色點代表在人工標註資料上訓練的模型獲得的 F1 分數,紅色點代表由 Llama-3.1 70b 推斷的模型獲得的 F1 分數。隨著資料集大小的增加,在人工標註資料上微調的模型始終優於使用合成數據的模型,實現了更高的 F1 分數。這表明,雖然在人工標註上微調的模型能帶來更高的準確性,但使用 Llama-3.1 70b 進行的 LLM 輔助標註 仍然可以提供相當大的價值,尤其是在手動標註資源有限的情況下。即使 LLM 推斷資料的 F1 分數略低,但在各種資料集大小下仍具有競爭力。LLM 可以快速生成大量標註,為高效擴充套件資料集建立提供了實用解決方案,使其在時間和成本限制至關重要的場景中具有優勢。
結論
我們的實驗表明,雖然像 Llama 3.1 這樣的大型模型開箱即用就能提供卓越的效能,但透過 LLM 輔助標註微調像 GLiNER 和 SpanMarker 這樣的小型模型可以顯著提高準確性,以更低的成本與 LLM 媲美。這種方法突出了利用 LLM 洞察力投資微調小型模型如何為金融 NER 任務提供一種經濟高效、可擴充套件的解決方案,使其成為對準確性和資源效率都至關重要的實際應用的理想選擇。