開源 AI 食譜文件
多模態RAG:在消費級GPU上使用ColQwen2、Reranker和量化VLM
並獲得增強的文件體驗
開始使用
多模態RAG:在消費級GPU上使用ColQwen2、Reranker和量化VLM
作者: Sergio Paniego
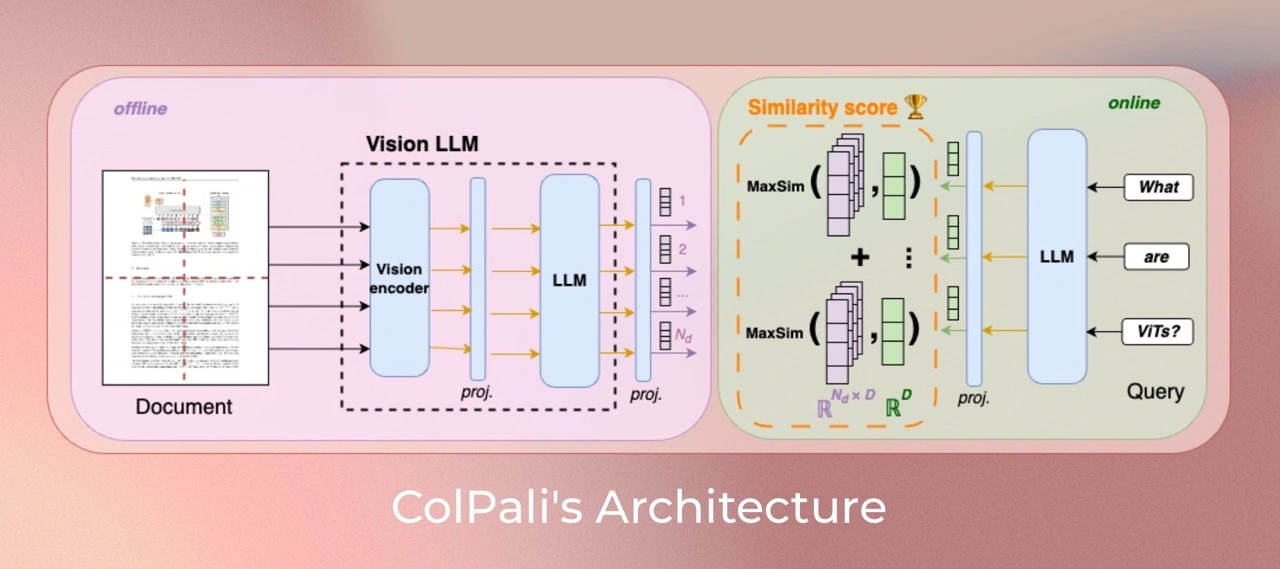
在本筆記本中,我們將演示如何透過整合ColQwen2進行文件檢索,MonoQwen2-VL-v0.1進行重排序,以及Qwen2-VL作為視覺語言模型(VLM)來構建一個多模態檢索增強生成(RAG)系統。這些模型共同構成了一個強大的RAG系統,透過無縫結合基於文字的文件和視覺資料來增強查詢響應。值得注意的是,由於集成了量化的VLM,本筆記本已針對在單個消費級GPU上使用進行了最佳化。
我們不依賴於複雜的基於OCR的文件處理管道,而是利用文件檢索模型根據使用者的查詢高效地檢索最相關的文件,從而使系統更具可擴充套件性和效率。
本筆記本建立在我們之前的指南《使用文件檢索(ColPali)和視覺語言模型(VLM)的多模態檢索增強生成(RAG)》中介紹的概念之上。如果您尚未閱讀該筆記本,我們建議您在繼續閱讀本筆記本之前先閱讀它。
在L4 GPU上測試。

此圖靈感來自Aymeric Roucher在高階RAG或RAG評估教程中的工作。
1. 安裝依賴項
讓我們開始安裝專案所需的基本庫!🚀
!pip install -U -q byaldi pdf2image qwen-vl-utils transformers bitsandbytes peft
# Tested with byaldi==0.0.7, pdf2image==1.17.0, qwen-vl-utils==0.0.8, transformers==4.46.3!pip install -U -q rerankers[monovlm]
2. 載入資料集 📁
在本筆記本中,我們將使用來自世界資料(Our World in Data)的圖表和地圖,這是一個提供廣泛資料和視覺化開放訪問的寶貴資源。具體來說,我們將重點關注預期壽命資料。
為了方便訪問,我們已在以下資料集中整理了該資料的一小部分。
雖然我們從這個來源選擇了一些示例用於演示目的,但在實際場景中,您可以處理更大規模的視覺資料集合,以進一步增強模型的能力。
引用
Saloni Dattani, Lucas Rodés-Guirao, Hannah Ritchie, Esteban Ortiz-Ospina and Max Roser (2023) - “Life Expectancy” Published online at OurWorldinData.org. Retrieved from: 'https://ourworldindata.org/life-expectancy' [Online Resource]from datasets import load_dataset
dataset = load_dataset("sergiopaniego/ourworldindata_example", split="train")下載視覺資料後,我們將將其本地儲存,以便RAG(檢索增強生成)系統稍後可以索引檔案。這一步至關重要,因為它允許文件檢索模型(ColQwen2)高效地處理和操作視覺內容。此外,我們將影像大小減小到448x448,以進一步減少記憶體消耗並確保更快的處理速度,這對於最佳化大規模操作的效能非常重要。
import os
from PIL import Image


def save_images_to_local(dataset, output_folder="data/"):
    os.makedirs(output_folder, exist_ok=True)

    for image_id, image_data in enumerate(dataset):
        image = image_data["image"]

        if isinstance(image, str):
            image = Image.open(image)

        image = image.resize((448, 448))

        output_path = os.path.join(output_folder, f"image_{image_id}.png")

        image.save(output_path, format="PNG")

        print(f"Image saved in: {output_path}")


save_images_to_local(dataset)
現在,讓我們載入圖片以探索資料並大致瞭解視覺內容。
import os
from PIL import Image


def load_png_images(image_folder):
    png_files = [f for f in os.listdir(image_folder) if f.endswith(".png")]
    all_images = {}

    for image_id, png_file in enumerate(png_files):
        image_path = os.path.join(image_folder, png_file)
        image = Image.open(image_path)
        all_images[image_id] = image

    return all_images


all_images = load_png_images("/content/data/")
讓我們視覺化一些樣本,以瞭解資料的結構!這將幫助我們掌握將要處理的內容的格式和佈局。👀
>>> import matplotlib.pyplot as plt

>>> fig, axes = plt.subplots(1, 5, figsize=(20, 15))

>>> for i, ax in enumerate(axes.flat):
...     img = all_images[i]
...     ax.imshow(img)
...     ax.axis("off")

>>> plt.tight_layout()
>>> plt.show()
3. 初始化ColQwen2多模態文件檢索模型 🤖
現在資料集已準備就緒,我們將初始化文件檢索模型,該模型將負責從原始影像中提取相關資訊,並根據我們的查詢提供適當的文件。
使用此模型,我們可以大大增強系統的對話能力。
對於此任務,我們將使用Byaldi。開發者將該庫描述為:“Byaldi是RAGatouille的迷你姐妹專案。它是ColPali儲存庫的一個簡單包裝器,旨在使ColPALI等延遲互動多模態模型易於使用熟悉的API。”
在此專案中,我們將特別關注 ColQwen2。
此外,您可以訪問ViDore(視覺文件檢索基準),查看錶現最佳的檢索器。
首先,我們將從檢查點載入模型。
from byaldi import RAGMultiModalModel

docs_retrieval_model = RAGMultiModalModel.from_pretrained("vidore/colqwen2-v1.0")
接下來,我們可以直接使用文件檢索模型索引我們的文件,透過指定影像儲存的資料夾。這將使模型能夠處理和組織文件,以便根據我們的查詢進行高效檢索。
docs_retrieval_model.index(
    input_path="data/", index_name="image_index", store_collection_with_index=False, overwrite=True
)
4. 使用文件檢索模型檢索文件並使用重排序模型進行重排序 🤔
文件檢索模型初始化完成後,我們可以透過提交使用者查詢並檢視其檢索到的相關文件來測試其能力。
模型將返回按與查詢的相關性排名結果。接下來,我們將使用重排序器進一步增強檢索管道。
我們來試試吧!
text_query = "How does the life expectancy change over time in France and South Africa?"

results = docs_retrieval_model.search(text_query, k=3)
results
現在,讓我們檢查模型已檢索到的具體文件(影像)。這將使我們深入瞭解與查詢相對應的視覺內容,並幫助我們理解模型如何選擇相關資訊。
def get_grouped_images(results, all_images):
    grouped_images = []

    for result in results:
        doc_id = result["doc_id"]
        page_num = result["page_num"]
        grouped_images.append(all_images[doc_id])
    return grouped_images


grouped_images = get_grouped_images(results, all_images)
讓我們仔細看看檢索到的文件,以便更好地理解它們包含的資訊。這項檢查將幫助我們評估內容與查詢的相關性和質量。
>>> import matplotlib.pyplot as plt

>>> fig, axes = plt.subplots(1, 3, figsize=(15, 10))

>>> for i, ax in enumerate(axes.flat):
...     img = grouped_images[i]
...     ax.imshow(img)
...     ax.axis("off")

>>> plt.tight_layout()
>>> plt.show()
如您所見,檢索到的文件與查詢相關,因為它們包含相關資料。
現在,讓我們初始化我們的重排序模型。為此,我們將使用rerankers模組。
from rerankers import Reranker

ranker = Reranker("monovlm", device="cuda")
重排序器需要影像為base64格式,因此我們先將影像轉換,然後再進行重排序。
import base64
from io import BytesIO


def images_to_base64(images):
    base64_images = []
    for img in images:
        buffer = BytesIO()
        img.save(buffer, format="JPEG")
        buffer.seek(0)

        img_base64 = base64.b64encode(buffer.getvalue()).decode("utf-8")
        base64_images.append(img_base64)

    return base64_images


base64_list = images_to_base64(grouped_images)
我們再次將`text_query`和影像列表傳遞給重排序器,以便它可以增強檢索到的上下文。這次,我們只返回1個文件,而不是之前檢索到的3個文件。如果您檢視結果,您會發現模型將大部分分數分配給一張影像,從而改善了之前迭代的排名。
results = ranker.rank(text_query, base64_list)
>>> def process_ranker_results(results, grouped_images, top_k=3, log=False):
...     new_grouped_images = []
...     for i, doc in enumerate(results.top_k(top_k)):
...         if log:
...             print(f"Rank {i}:")
...             print("Document ID:", doc.doc_id)
...             print("Document Score:", doc.score)
...             print("Document Base64:", doc.base64[:30] + "...")
...             print("Document Path:", doc.image_path)
...         new_grouped_images.append(grouped_images[doc.doc_id])
...     return new_grouped_images


>>> new_grouped_images = process_ranker_results(results, grouped_images, top_k=1, log=True)
Rank 0: Document ID: 0 Document Score: 0.99609375 Document Base64: /9j/4AAQSkZJRgABAQAAAQABAAD/2w... Document Path: None
之後,我們就可以載入 VLM 並生成對使用者查詢的響應了!
5. 初始化用於問答的視覺語言模型 🙋
接下來,我們將初始化用於問答的視覺語言模型(VLM)。為此,我們將使用 Qwen2_VL。

請在此處檢視排行榜here,瞭解Open VLM的最新進展。
首先,我們將從預訓練檢查點載入模型,並將其移動到GPU以獲得最佳效能。您可以在此處找到該模型。
在本筆記本中,我們使用模型的量化版本來最佳化記憶體使用和處理速度,這在消費級GPU上執行時尤為重要。透過使用量化版本,我們減少了模型的記憶體佔用,提高了其效率,同時保持了手頭任務的效能。
from transformers import Qwen2VLForConditionalGeneration, Qwen2VLProcessor, BitsAndBytesConfig
from qwen_vl_utils import process_vision_info
import torch

# BitsAndBytesConfig int-4 config
bnb_config = BitsAndBytesConfig(
    load_in_4bit=True, bnb_4bit_use_double_quant=True, bnb_4bit_quant_type="nf4", bnb_4bit_compute_dtype=torch.bfloat16
)

# Load model and tokenizer
vl_model = Qwen2VLForConditionalGeneration.from_pretrained(
    "Qwen/Qwen2-VL-7B-Instruct", device_map="auto", torch_dtype=torch.bfloat16, quantization_config=bnb_config
)
vl_model.eval()
接下來,我們將初始化視覺語言模型 (VLM) 處理器。在此步驟中,我們指定最小和最大畫素大小,以最佳化影像如何適應 GPU 記憶體。畫素尺寸越大,消耗的記憶體就越多,因此找到一個平衡點以確保最佳效能而不會使 GPU 過載非常重要。
有關如何最佳化影像解析度以提高效能的更多詳細資訊,您可以參閱此處的文件。
min_pixels = 224 * 224
max_pixels = 448 * 448
vl_model_processor = Qwen2VLProcessor.from_pretrained(
    "Qwen/Qwen2-VL-7B-Instruct", min_pixels=min_pixels, max_pixels=max_pixels
)
6. 組裝VLM模型並測試系統 🔧
所有元件載入完畢後,我們就可以組裝系統進行測試了。首先,我們將透過向系統提供檢索到的影像和使用者查詢來設定聊天結構。此步驟具有高度可定製性,可以靈活地根據您的需求調整互動,並允許嘗試不同的輸入和輸出。
chat_template = [
    {
        "role": "user",
        "content": [
            {
                "type": "image",
                "image": new_grouped_images[0],
            },
            {"type": "text", "text": text_query},
        ],
    }
]
現在,讓我們應用此聊天模板來設定系統,以便與模型進行互動。
text = vl_model_processor.apply_chat_template(chat_template, tokenize=False, add_generation_prompt=True)接下來,我們將處理輸入,以確保它們已正確格式化並準備好與視覺語言模型 (VLM) 一起使用。此步驟對於使模型能夠根據提供的資料生成準確的響應至關重要。
image_inputs, _ = process_vision_info(chat_template)
inputs = vl_model_processor(
    text=[text],
    images=image_inputs,
    padding=True,
    return_tensors="pt",
)
inputs = inputs.to("cuda")
現在我們可以生成答案了!讓我們看看系統如何使用處理後的輸入,根據使用者查詢和檢索到的影像提供響應。
generated_ids = vl_model.generate(**inputs, max_new_tokens=500)模型生成輸出後,我們對其進行後處理以生成最終答案。
generated_ids_trimmed = [out_ids[len(in_ids) :] for in_ids, out_ids in zip(inputs.input_ids, generated_ids)]
output_text = vl_model_processor.batch_decode(
    generated_ids_trimmed, skip_special_tokens=True, clean_up_tokenization_spaces=False
)>>> print(output_text[0])The life expectancy in France has increased over time, while the life expectancy in South Africa has decreased over time.
7. 大功告成! 🧑🏭️
現在,讓我們建立一個包含整個管道的方法,以便將來可以輕鬆地重複使用它。
def answer_with_multimodal_rag(
    vl_model,
    docs_retrieval_model,
    vl_model_processor,
    grouped_images,
    text_query,
    retrival_top_k,
    reranker_top_k,
    max_new_tokens,
):
    results = docs_retrieval_model.search(text_query, k=retrival_top_k)
    grouped_images = get_grouped_images(results, all_images)

    base64_list = images_to_base64(grouped_images)
    results = ranker.rank(text_query, base64_list)
    grouped_images = process_ranker_results(results, grouped_images, top_k=reranker_top_k)

    chat_template = [
        {
            "role": "user",
            "content": [{"type": "image", "image": image} for image in grouped_images]
            + [{"type": "text", "text": text_query}],
        }
    ]

    # Prepare the inputs
    text = vl_model_processor.apply_chat_template(chat_template, tokenize=False, add_generation_prompt=True)
    image_inputs, video_inputs = process_vision_info(chat_template)
    inputs = vl_model_processor(
        text=[text],
        images=image_inputs,
        padding=True,
        return_tensors="pt",
    )
    inputs = inputs.to("cuda")

    # Generate text from the vl_model
    generated_ids = vl_model.generate(**inputs, max_new_tokens=max_new_tokens)
    generated_ids_trimmed = [out_ids[len(in_ids) :] for in_ids, out_ids in zip(inputs.input_ids, generated_ids)]

    # Decode the generated text
    output_text = vl_model_processor.batch_decode(
        generated_ids_trimmed, skip_special_tokens=True, clean_up_tokenization_spaces=False
    )

    return output_text
讓我們看看完整的 RAG 系統是如何執行的!
>>> output_text = answer_with_multimodal_rag(
...     vl_model=vl_model,
...     docs_retrieval_model=docs_retrieval_model,
...     vl_model_processor=vl_model_processor,
...     grouped_images=grouped_images,
...     text_query="What is the overall trend in life expectancy across different countries and regions?",
...     retrival_top_k=3,
...     reranker_top_k=1,
...     max_new_tokens=500,
... )
>>> print(output_text[0])
The overall trend in life expectancy across different countries and regions is an increase over time.
>>> import torch

>>> torch.cuda.empty_cache()
>>> torch.cuda.synchronize()
>>> print(f"GPU allocated memory: {torch.cuda.memory_allocated() / 1024**3:.2f} GB")
>>> print(f"GPU reserved memory: {torch.cuda.memory_reserved() / 1024**3:.2f} GB")
GPU allocated memory: 13.93 GB GPU reserved memory: 14.59 GB
🏆 我們現在擁有一個功能齊全的RAG管道,它集成了文件檢索模型和視覺語言模型,並經過最佳化,可在單個消費級GPU上執行!這種強大的組合使我們能夠根據使用者查詢和相關文件生成富有洞察力的響應。
此外,我們還實施了重新排序步驟,以進一步完善文件檢索過程,提高結果的相關性並增強系統的整體效能。
8. 繼續旅程 🧑🎓️
如果您渴望繼續探索,請務必檢視我們之前指南《使用文件檢索(ColPali)和視覺語言模型(VLM)的多模態檢索增強生成(RAG)》結論中的結果和見解。這是深入瞭解多模態RAG系統的絕佳下一步!
< > 在 GitHub 上更新