開源 AI 食譜文件
如何使用推理端點嵌入文件
並獲得增強的文件體驗
開始使用
如何使用推理端點嵌入文件
作者:Derek Thomas
目標
我有一個想要嵌入用於語義搜尋(或問答,或 RAG)的資料集,我希望以最簡單的方式嵌入它並將其放入新的資料集中。
方法
我正在使用我最喜歡的 subreddit r/bestofredditorupdates 中的資料集。由於它有很長的條目,我將使用新的 jinaai/jina-embeddings-v2-base-en,因為它具有 8k 的上下文長度。我將使用 推理端點 進行部署以節省時間和金錢。要遵循本教程,您需要已經添加了付款方式。如果您還沒有,可以在 賬單 中新增。為了讓它更容易,我將使其完全基於 API。
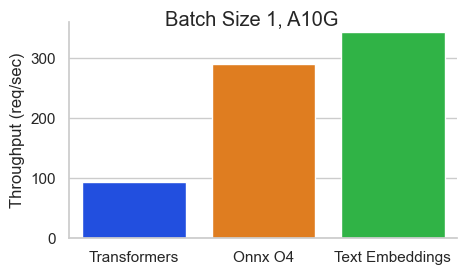
為了更快地完成這項工作,我將使用 文字嵌入推理 映象。這有許多好處,例如:
- 無模型圖編譯步驟
- 小巧的 Docker 映象和快速啟動時間。準備好迎接真正的無伺服器!
- 基於 token 的動態批處理
- 使用 Flash Attention、Candle 和 cuBLASLt 優化了 Transformers 推理程式碼
- Safetensors 權重載入
- 生產就緒(透過 Open Telemetry 進行分散式追蹤,Prometheus 指標)
要求
!pip install -q aiohttp==3.8.3 datasets==2.14.6 pandas==1.5.3 requests==2.31.0 tqdm==4.66.1 huggingface-hub>=0.20匯入
import asyncio
from getpass import getpass
import json
from pathlib import Path
import time
from typing import Optional

from aiohttp import ClientSession, ClientTimeout
from datasets import load_dataset, Dataset, DatasetDict
from huggingface_hub import notebook_login, create_inference_endpoint, list_inference_endpoints, whoami
import numpy as np
import pandas as pd
import requests
from tqdm.auto import tqdm
配置
DATASET_IN 是您的文字資料所在的位置,DATASET_OUT 是您的嵌入將儲存的位置。
請注意,我將 MAX_WORKERS 設定為 5,因為 jina-embeddings-v2 非常佔用記憶體。
DATASET_IN = "derek-thomas/dataset-creator-reddit-bestofredditorupdates"
DATASET_OUT = "processed-subset-bestofredditorupdates"
ENDPOINT_NAME = "boru-jina-embeddings-demo-ie"

MAX_WORKERS = 5  # This is for how many async workers you want. Choose based on the model and hardware
ROW_COUNT = 100  # Choose None to use all rows, Im using 100 just for a demo
推理端點提供多種 GPU 供您選擇。請查閱文件以獲取有關 GPU 和其他加速器的資訊。
您可能需要給我們傳送電子郵件以獲取某些架構的訪問許可權。
| 提供商 | 例項型別 | 例項大小 | 每小時費率 | GPU | 記憶體 | 架構 |
|---|---|---|---|---|---|---|
| AWS | nvidia-a10g | x1 | \$1 | 1 | 24GB | NVIDIA A10G |
| AWS | nvidia-t4 | x1 | \$0.5 | 1 | 14GB | NVIDIA T4 |
| AWS | nvidia-t4 | x4 | \$3 | 4 | 56GB | NVIDIA T4 |
| GCP | nvidia-l4 | x1 | \$0.8 | 1 | 24GB | NVIDIA L4 |
| GCP | nvidia-l4 | x4 | \$3.8 | 4 | 96GB | NVIDIA L4 |
| AWS | nvidia-a100 | x1 | \$4 | 1 | 80GB | NVIDIA A100 |
| AWS | nvidia-a10g | x4 | \$5 | 4 | 96GB | NVIDIA A10G |
| AWS | nvidia-a100 | x2 | \$8 | 2 | 160GB | NVIDIA A100 |
| AWS | nvidia-a100 | x4 | \$16 | 4 | 320GB | NVIDIA A100 |
| AWS | nvidia-a100 | x8 | \$32 | 8 | 640GB | NVIDIA A100 |
| GCP | nvidia-t4 | x1 | \$0.5 | 1 | 16GB | NVIDIA T4 |
| GCP | nvidia-l4 | x1 | \$1 | 1 | 24GB | NVIDIA L4 |
| GCP | nvidia-l4 | x4 | \$5 | 4 | 96GB | NVIDIA L4 |
| GCP | nvidia-a100 | x1 | \$6 | 1 | 80 GB | NVIDIA A100 |
| GCP | nvidia-a100 | x2 | \$12 | 2 | 160 GB | NVIDIA A100 |
| GCP | nvidia-a100 | x4 | \$24 | 4 | 320 GB | NVIDIA A100 |
| GCP | nvidia-a100 | x8 | \$48 | 8 | 640 GB | NVIDIA A100 |
| GCP | nvidia-h100 | x1 | \$12.5 | 1 | 80 GB | NVIDIA H100 |
| GCP | nvidia-h100 | x2 | \$25 | 2 | 160 GB | NVIDIA H100 |
| GCP | nvidia-h100 | x4 | \$50 | 4 | 320 GB | NVIDIA H100 |
| GCP | nvidia-h100 | x8 | \$100 | 8 | 640 GB | NVIDIA H100 |
| AWS | inf2 | x1 | \$0.75 | 1 | 32GB | AWS Inferentia2 |
| AWS | inf2 | x12 | \$12 | 12 | 384GB | AWS Inferentia2 |
# GPU Choice
VENDOR = "aws"
REGION = "us-east-1"
INSTANCE_SIZE = "x1"
INSTANCE_TYPE = "nvidia-a10g"notebook_login()
一些使用者可能在組織中註冊了付款。這允許您使用付款方式連線到您所屬的組織。
如果您想使用您的使用者名稱,請將其留空。
>>> who = whoami()
>>> organization = getpass(
...     prompt="What is your Hugging Face 🤗 username or organization? (with an added payment method)"
... )

>>> namespace = organization or who["name"]
What is your Hugging Face 🤗 username or organization? (with an added payment method) ········
獲取資料集
dataset = load_dataset(DATASET_IN)
dataset["train"]documents = dataset["train"].to_pandas().to_dict("records")[:ROW_COUNT]
len(documents), documents[0]推理端點
建立推理端點
- 方便(無需點選)
- 可重複(我們有程式碼可以輕鬆執行它)
- 更便宜(無需等待載入,並自動關閉它)
try:
    endpoint = create_inference_endpoint(
        ENDPOINT_NAME,
        repository="jinaai/jina-embeddings-v2-base-en",
        revision="7302ac470bed880590f9344bfeee32ff8722d0e5",
        task="sentence-embeddings",
        framework="pytorch",
        accelerator="gpu",
        instance_size=INSTANCE_SIZE,
        instance_type=INSTANCE_TYPE,
        region=REGION,
        vendor=VENDOR,
        namespace=namespace,
        custom_image={
            "health_route": "/health",
            "env": {
                "MAX_BATCH_TOKENS": str(MAX_WORKERS * 2048),
                "MAX_CONCURRENT_REQUESTS": "512",
                "MODEL_ID": "/repository",
            },
            "url": "ghcr.io/huggingface/text-embeddings-inference:0.5.0",
        },
        type="protected",
    )
except:
    endpoint = [ie for ie in list_inference_endpoints(namespace=namespace) if ie.name == ENDPOINT_NAME][0]
    print("Loaded endpoint")
這裡有幾個設計選擇
- 如前所述,我們使用
jinaai/jina-embeddings-v2-base-en作為我們的模型。- 為了可重現性,我們將其固定到特定的修訂版。
- 如果您對更多模型感興趣,請在此處檢視支援列表:here。
- 請注意,大多數嵌入模型都基於 BERT 架構。
MAX_BATCH_TOKENS的選擇基於我們的 worker 數量和嵌入模型的上下文視窗。type="protected"利用了此處詳細說明的推理端點安全性。- 我使用的是 1x Nvidia A10,因為
jina-embeddings-v2記憶體佔用大(請記住 8k 上下文長度)。 - 如果您的工作負載較高,您應該考慮進一步調整
MAX_BATCH_TOKENS和MAX_CONCURRENT_REQUESTS
等待它執行
>>> %%time
>>> endpoint.wait()
CPU times: user 48.1 ms, sys: 15.7 ms, total: 63.8 ms Wall time: 52.6 s
當我們使用 endpoint.client.post 時,我們會得到一個位元組字串。這有點麻煩,因為我們需要將其轉換為 np.array,但這在 Python 中只需要幾行程式碼。
response = endpoint.client.post(
    json={
        "inputs": "This sound track was beautiful! It paints the senery in your mind so well I would recomend it even to people who hate vid. game music!",
        "truncate": True,
    },
    task="feature-extraction",
)
response = np.array(json.loads(response.decode()))
response[0][:20]
您輸入的文字可能超過了上下文長度。在這種情況下,如何處理這些文字取決於您。在我的例子中,我寧願截斷它們而不是報錯。讓我們測試一下它是否有效。
>>> embedding_input = "This input will get multiplied" * 10000
>>> print(f"The length of the embedding_input is: {len(embedding_input)}")
>>> response = endpoint.client.post(json={"inputs": embedding_input, "truncate": True}, task="feature-extraction")
>>> response = np.array(json.loads(response.decode()))
>>> response[0][:20]
The length of the embedding_input is: 300000
獲取嵌入
在這裡,我傳送一個文件,用嵌入更新它,然後返回它。這與 MAX_WORKERS 並行進行。
async def request(document, semaphore):
    # Semaphore guard
    async with semaphore:
        result = await endpoint.async_client.post(
            json={"inputs": document["content"], "truncate": True}, task="feature-extraction"
        )
        result = np.array(json.loads(result.decode()))
        document["embedding"] = result[0]  # Assuming the API's output can be directly assigned
        return document


async def main(documents):
    # Semaphore to limit concurrent requests. Adjust the number as needed.
    semaphore = asyncio.BoundedSemaphore(MAX_WORKERS)

    # Creating a list of tasks
    tasks = [request(document, semaphore) for document in documents]

    # Using tqdm to show progress. It's been integrated into the async loop.
    for f in tqdm(asyncio.as_completed(tasks), total=len(documents)):
await f>>> start = time.perf_counter()
>>> # Get embeddings
>>> await main(documents)
>>> # Make sure we got it all
>>> count = 0
>>> for document in documents:
... if "embedding" in document.keys() and len(document["embedding"]) == 768:
... count += 1
>>> print(f"Embeddings = {count} documents = {len(documents)}")
>>> # Print elapsed time
>>> elapsed_time = time.perf_counter() - start
>>> minutes, seconds = divmod(elapsed_time, 60)
>>> print(f"{int(minutes)} min {seconds:.2f} sec")Embeddings = 100 documents = 100 0 min 21.33 sec
暫停推理端點
現在我們已經完成,我們可以暫停端點,這樣就不會產生額外的費用,這也能讓我們分析成本。
>>> endpoint = endpoint.pause()

>>> print(f"Endpoint Status: {endpoint.status}")
Endpoint Status: paused
將更新後的資料集推送到 Hub
現在我們已經用我們想要的嵌入更新了我們的文件。首先我們需要將其轉換回 Dataset 格式。我發現最簡單的方法是從字典列表 -> pd.DataFrame -> Dataset。
df = pd.DataFrame(documents)
dd = DatasetDict({"train": Dataset.from_pandas(df)})
我預設將其上傳到使用者帳戶(而不是上傳到組織),但您可以隨意透過在 repo_id 中設定使用者或在配置中設定 DATASET_OUT 來推送到任何您想要的位置。
dd.push_to_hub(repo_id=DATASET_OUT)
>>> print(f'Dataset is at https://huggingface.co/datasets/{who["name"]}/{DATASET_OUT}')Dataset is at https://huggingface.co/datasets/derek-thomas/processed-subset-bestofredditorupdates
分析使用情況
- 轉到下方列印的
dashboard_url - 點選“使用情況和費用”選項卡
- 檢視您的花費
>>> dashboard_url = f"https://ui.endpoints.huggingface.co/{namespace}/endpoints/{ENDPOINT_NAME}"
>>> print(dashboard_url)
https://ui.endpoints.huggingface.co/HF-test-lab/endpoints/boru-jina-embeddings-demo-ie
>>> input("Hit enter to continue with the notebook")Hit enter to continue with the notebook
我們可以看到這隻花了 $0.04!
刪除端點
現在我們已經完成,我們不再需要我們的端點。我們可以透過程式設計方式刪除我們的端點。

>>> endpoint = endpoint.delete()

>>> if not endpoint:
...     print("Endpoint deleted successfully")
>>> else:
...     print("Delete Endpoint in manually")
Endpoint deleted successfully< > 在 GitHub 上更新